Thank you…but HOW did you do it?
@jacobturner You might want to rethink your post. Assuming larger numbers mean higher intensity or speed, shouldn’t you say 10 speed and 10 power == 100 power and 100 speed? The “time” you refer to is not the same as velocity!
Oops. I had been feeling there was something wrong in how I was doing that, but had two kids demanding I get off the computer  Thanks for the catch. (I did switch to saying low/high later, and hope that was right, but will go re-read and edit as needed now that kids are napping)
EDIT: Yeah, I even flubbed my discussion of high/low. Should be correct now. Low power and low speed equates with high power and high speed. That also makes it easier for me to see the tradeoffs in terms of finishing.
Glad to help out. In the thick of paper grading now, so my “scrutinizer” is in high gear!
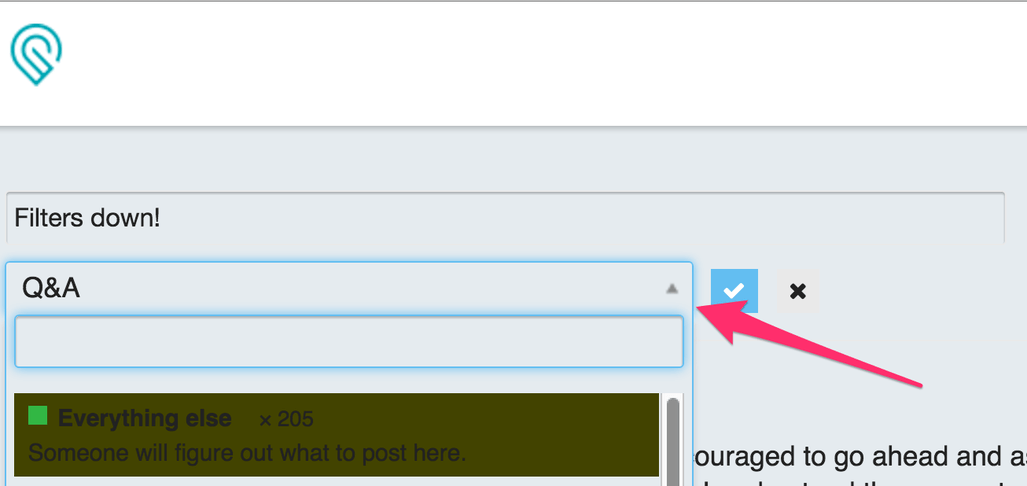
If you click the pencil next to your title you can also edit the category using the little triangle “drop down” control.
1 Like
A question is a struggle against ignorance.
No need for embarrassment, ignorance is a hole we are all climbing out of.
None of us knew how until the first time!
2 Likes
One of my first uses of my Glowforge will be to run test templates on materials that I want to use. An example is in this photo.
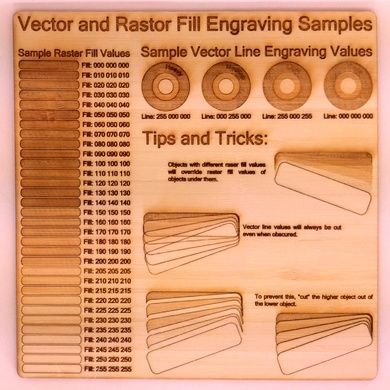
It will be easier to determine power and speed settings that create the desired affect. Hopefully some one on this forum can create a set of SVG template files that one can use to dial-in laser settings. For example, a template for various classes of material, ie. wood, acrylic, etc. that need to use different ranges of power and speed. Templates could include both cuts and engraving.
12 Likes
Perfect! Also include known circle diameters so one can adjust for kerf offsets. Love it!
2 Likes
Holy *
Thx. This concept is awesome.
Gonna have to whip up my own templates after.
1 Like
Another way to look at the issue is by imagining that the Glowforge is a sun lamp. Turn up the power all the way and you’ll get a sunburn more quickly than if you turn it to “Low.” However, there’s another factor–how long a material is under the lamp. If you put your arm under the lamp for half an hour, no matter what power setting it’s on, and your arm will get more exposure to the lamp’s light than if you just swiftly passed your arm underneath at the same setting. If it’s turned on high and you stay under a long time, you’ll get thoroughly scorched. On low, with a fast pass through, you get hardly any effect at all. There are tons of variations in between. Medium heat and long exposure will have different effects than high heat and medium exposure. It’s one of those things that you or someone else will have to dial in with each material that goes in the Forge.
1 Like
Just because I know someone’s going to be confused, I feel compelled to point out at this point that the Glowforge does not actually act like a sun lamp and give you a tan. : )
8 Likes
I do love @TomF’s posted template. Have seen it before and wanted to be sure people notice the comments on the three sets in the lower right. It talks about file setup for successful cutting.
1 Like
Of course there have been idiots (I think that’s probably the nicest term) who have intentionally scarified their skin with laser cutters. This is definitely a “DO NOT TRY THIS AT HOME”, or indeed EVER, scenario. I think I like the poster’s final comment: “any person with access to a laser cutter who is dumb enough to try this, deserves what they get.”
1 Like
Whoa…why would anyone use a laser cutter for tattoos when this 3D printer does a good enough job already!
1 Like
Related to the use of templates, it is not clear to me as to where the various power and speed values are set. Are set in an SVG file, ie. using various line and raster area colors or are they set when a file is uploaded as part of the functions of the Glowforge cloud application? Can they be associated with your “job” or file so that they may be reused in the future? If colors are used, where are they defined and are they standardized? What is required to create a “cut/raster ready” file?
Correct. There you will be able to select a line by it’s color and set it’s cut properties. (which is going to be fun for us color blind people BTW).
1 Like
In TomF’s posted image, you can see the bars along the left side all have three sets of three digits (all three sets the same). Those are RGB values for the colors used in the file. (since all numbers the same, in this case shades of grey).
You use any colors you want to in making the SVG file. Then you can (with most systems) include text anywhere in the file which includes lines identifying an RGB set, and assigning a power and speed value.
Then, when your file loads, it will pre-populate those colors to run at those power/speed settings.
Without the text inserted into the file itself, the interface of the laser software should show you a list of all unique RGB sets used in the file, and allow you to assign power/speed (and enable/disable) for each color.
@spike; Color blind people should be fine, as long as they rely on the software itself, which is also technically color blind. What little we have seen of the interface (the Brad Feld print job) shows a mask of only the relevant lines when choosing settings for each specific aspect of your job. Granted… for very large jobs with very fine detail, that mask may be quite lacking.
Thinking of the brief view we had of the interface, the GlowForge goes one level better than just breaking apart by color, but also allows you to set power/speed combinations for groups of line/fill. If two things are the same color, but never touch shapes with one another, it seems to allow you to treat them individually (likely up to a limit of total pieces, but maybe not)
2 Likes
You should be able to use the software quite well even if you’re color-blind - it’s not quite as easy to see what’s what at a glance, but nothing requires you to discriminate color. @Tony and I talked a bit about this - we’ll continue to keep an eye on it.
5 Likes