I stayed pretty late last week at Laser Thursday but my husband and daughter didn’t join me. When I came home she was unfortunately still awake and asked if I’d made any owls for her – she’d mentioned making “laser owls” repeatedly. I told her hadn’t because I made some picture frames for family (similar to what you may have seen in Maker Faire pictures). She replied: “you need to go back to work and laser some owls.” No really.
Last night we decided to make that happen. We were browsing Pinterest for ideas and found some light switch plate covers made of wood and shaped like owls. My husband and I realized we could do that! Easy! What is a kid’s bedroom without awesome decoration? First we looked up the dimensions for standard light switch plate covers and made a simple template for that.
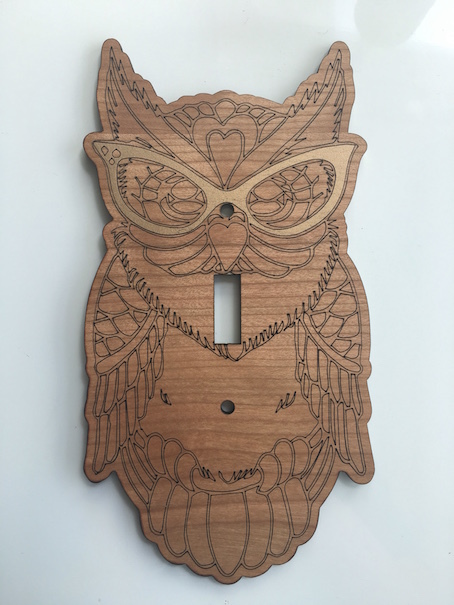
Then, since neither of us is an artist, we looked through Google image search for black and white owls that have licenses that allow re-use (e.g. creative commons). We found this nerdy owl picture on Flickr by Adrianna Battista that we both liked and was proportioned well to cover a rectangular hole. I first tried “tracing” it in Illustrator to make a vector version of it, but the background color is not actually white which made Illustrator unhappy and led to a lot of weird stray lines. So I opened the jpg in Gimp to change the background color transparent (after a bit of hair pulling and googling for how). I exported that as a png and pulled it back into Illustrator and converted it to a vector drawing.
Next I resized the vector version of the owl until it was bigger than the standard switch plate would be, aligning the switch and screw hole cut-outs to somewhere not too ugly. I originally just made a bigger rectangle around it to cut out but @Shell showed me how to duplicate the vector drawing and do some pathfinder magic to get a second vector outline just a bit bigger than the main drawing. I also learned a bit about cleaning up stray duplicate paths as somewhere along the line we had a bunch of extra ones!
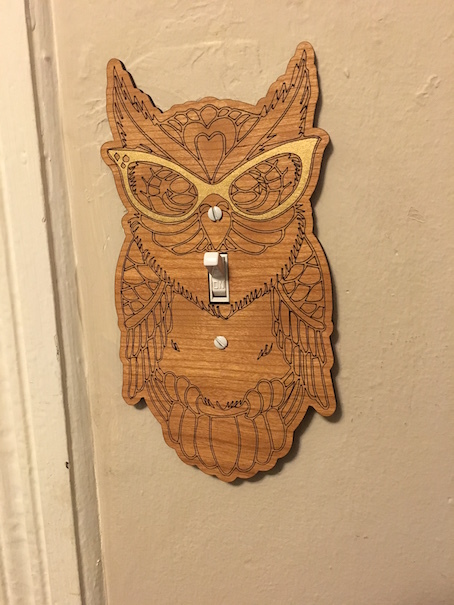
Off to the Glowforge to print! I set the main vector drawing of the owl to engrave in “score” mode along the vector paths which cuts a line that doesn’t go all the way through the material. The rest of the main sets of paths – the switch and screw holes and outline – were just set to cut all the way thru. The material that Shell suggested I use was maple veneered plywood with a top coat. She also had the idea of peeling off the tape only along the glasses and spray painting that gold, then peeling the rest of the tape off. The result:
This was a pretty simple and fast project, even for me who is not very good with drawing programs of any kind. Hopefully I got the measurements right. More importantly, hopefully the toddler likes it.
Nice! Laser-engraved switch plates was one of the first projects I put on my to-do list when I ordered my Glowforge. I did consider some kid-focused designs but I’m also playing with some Arts & Crafts or rustic style designs.
Wow, love it!! Love that it’s not your original design, but translated well into a laser project. Gives hope to those who don’t have a talent with drawing. So many ideas.
Yup…on a Universal laser, it’s any line with a specific line width…in CorelDraw its called hairline. I can vector engrave (score) vector cut and etch using a variety of 18 different speeds and power levels all in one file on one print.
I’m curious what the Glowforge is capable of doing…in the same manner.
“Manual lets you enter parameters (raster or vector, speed, power, focus) for a given color directly, instead of reading presets from the material (assuming you’re using material you got from us). If you bring your own material, ‘manual’ is the only option available.”
I really like the gold glasses. That’s such a great touch. I hope the kiddo loves it. Turning her light off and on will probably be a new favorite pass time.
These are the sort of projects that have me just as excited as any big ideas I’ve been planning. I’m thrilled by the idea of being able to put this sort of beautiful small embellishment around the house and having people find them.
Regarding taking an existing drawing, I’m really glad there’s so much out there I can try to re-use and re-work. I’ve never really done “crafty” things like this before Glowforge to be honest so it’s vert helpful as a place to get started.
The obvious next thing to do is make the switch and screws match the color – brass or brown which we may do (easy way: paint!)
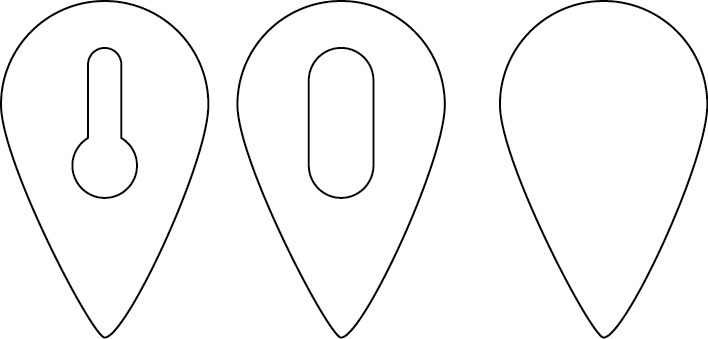
Keen observers will note the delay in posting and subtle differences in the final result compared to my previous picture. When laying out the screw and switch holes I worked off a diagram from a manufacturer. That diagram was correct, but my skills with illustrator were such that I didn’t place the screw holes correctly. We don’t actually have any standard residential-style light switches in the office (or I couldn’t find one quickly) and I didn’t want to do a test cut, take it home, check fit and bring it back in. Result: when I brought it home, it didn’t fit. My daughter didn’t care because a piece of owl-shaped wood is also a cool toy. To get it done right though, I brought in a plastic cover, measured, compared and adjusted my template. This time I cut just the outline and the holes out in chipboard (thanks @Shell), confirmed they lined up with a regular plastic cover, then I cut it out of the nice material.
Lesson learned. But I also learned how to check for relative positions (in absolute inches terms not just pixels) between elements in a design so it was maybe worth the re-work to force me to acquire new drawing skills. I also took the opportunity to slightly correct the way the original jpg had been vectorized to make the glasses look better which also improves my vector design skills.