I think the DPI for the raster process is telling you how far apart it can make distinct dots/lines (in the case of non-continuous lines and planes).
2 Likes
As @jacobturner said, the laser operates continuously during cuts & scores, but pulses for engraves. “DPI” is a bit of a misnomer since dot spacing in the X direction is controlled via laser on/off timing and dot spacing in the Y direction is controlled via motor stepping.
It’s tricky to convey resolution in a way that both makes sense and is accurate in this system, what we’ve gone with is “LPI” for (horizontal) Lines Per Inch. A more dense LPI setting will give a higher resolution engrave at the expense of a longer cut while a less dense LPI setting will give a lower resolution with a speedier cut.
See:
18 Likes
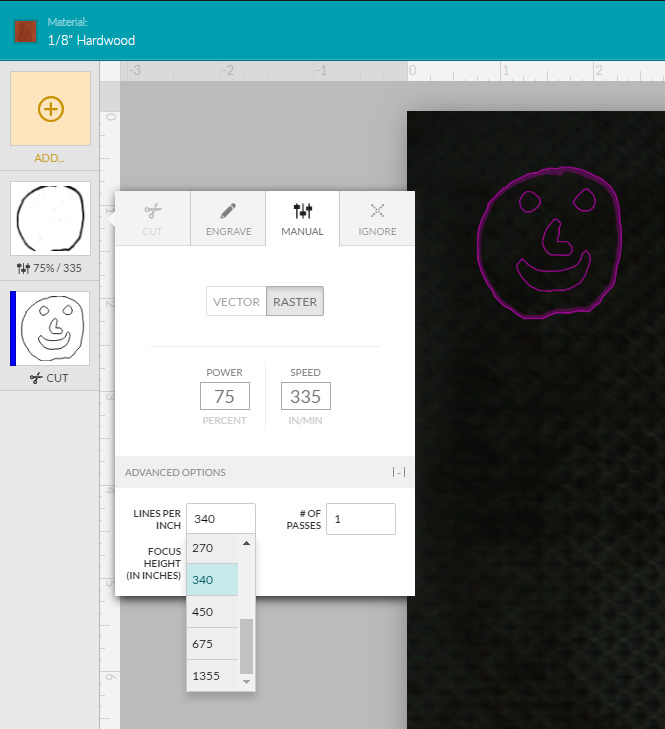
Is the LPI be set(able) by the user in the app?
Yes, in one of the videos from the Seattle Maker Faire you can even see where to set it.
Not finding the video right now… the one with the LotR map style luggage tag.
Found it: Something new for Maker Faire
At 0:55 you see where to set the LPI
5 Likes

29 Likes
Thank you thank you thank you! So nice to see this.
2 Likes
Oh look at that, a focus hight adjustment. For everyone who wants to run a de-focused pass.
Oh and thanks for the bonus 55 @dan lol.
11 Likes
double like ![]()
4 Likes
")
3 Likes
Out of curiosity… can we set metric units as a preference anywhere?
I use imperial units for almost all of my daily activity, but in equations and manufacture my background is pure metric. Looking at that 335 in/min I realized I have no immediate grasp of how fast that is, while with my laser I know my main benchmark speeds are 300 mm/min for cutting really thick wood, 500 for thick acrylic, 3000 for dark engraves, and 8000 for paper.
BTW, loving that you can specify number of passes. @Tony: Would also love it if we could maybe specify different power levels for the passes in that same space. My most recent work with some thicker Baltic Birch plywood I needed to do two runs at 300, and then a final run at 700 to get completely clean cuts. Maybe also the option to set a deeper focal point on subsequent passes? (All of this could be tucked away under an “Advanced Settings” link below the # of passes box…)
8 Likes
+1
Crazy how I was just looking around for this on the forum today and there it was, posted already a day ago!
Though I am curious, and I think @jdodds was wondering what about in vector cutting mode? [quote=“jdodds, post:1, topic:2974”]
while vector cutting
[/quote]
@dan, I see the screen-shot is for engraving. My question would be for vector cutting mode. @jdodds says pulses per inch, but in vector mode, you can’t really say per inch perse because it you’re trying to set the frequency and that is time dependent along with the velocity…
What I’d like to see is the user be able to set the pulse frequency while “vector cutting”. Not only does this make dashed lines super easy (draw straight line in Illustrator and pulse the laser along that line while moving), but it would allow for other aesthetic affects. Would that be possible to do with the power supply? I’ve seen this on the Epilog lasers (I fell bad mentioning that and almost could hear you want to say “Well then go buy an Epilog, Christopher”)! …and perhaps that what you’ll tell me to say at which point I’ll put my tail between my leg and say, “But I don’t want to…I want the Glowforge” 
I hope this makes sense! Pulsing laser while in vector cutting mode at user desired frequency. One step further would have the UI take the velocity and frequency into account in order to report to the user the pulses per inch!
1 Like
I still say that this is a continuous wave laser. There is no pulse, unless the cutting head is moving rapidly from “Cut this” to “Don’t cut this” and back again during an engraving pass. But even then it is not a pulse with a frequency, unless you happen to be cutting a section with regularly engrave/don’t spacing and widths.
This is something you have to do with RF lasers because they can’t be turned continuously on; they are always pulsed (as I understand it). The Glowforge laser can stay on continuously, so you don’t need to make the tradeoffs of different pulse frequencies. (This also results in nicer edges, since you don’t have the jaggedness of the pulses).
If you want a dashed cutline, just draw a dashed line and set it to cut. ![]()
8 Likes
And make sure that it’s actually a dashed line - and not just given the appearance of a dashed line (Illustrator)!
5 Likes
I can weigh in here- as I use adjusted vector frequencies often. (I’m running an Epilog Helix 40W)
A frequency of 5000 creates a beautiful “flame-polished” edge on acrylic, but it’s too much for 1/4" thick oak, where I might prefer a frequency of 700 (guessing at the numbers cause I’m not near the print manager at the moment which contains all the material setting suggestions and notes)
Lowering the frequency to 200 gives EXCELLENT results for pepakura files done in cardstock, as the vector lines are perforated just right- upping it to 350 gives you “pop-out” pieces that are still attached, but just barely.
I get a lot of mileage out of the ability to adjust it.
13 Likes
I’m with you! While you could take the time to make a dash line in illistrator, it’s much easier to adjust the frequency along a straight line!
I don’t know about how Illustrator works with plugins and what is available, but Inkscape has an extension that is built in to turn a vectored dashed line into a true series of short vector paths to make up the dashes. Convert your line to a path, if it isn’t already. Choose the stroke dash style you want. Then in extensions, Modify Path > Convert to Dashes.
Then again, you are most likely talking about a creasing cut rather than a through perforation.
1 Like
As long as the image actually loads – you’ll be able to easily see the perforation that is made by lowering the frequency on a peppakuraUploading… project