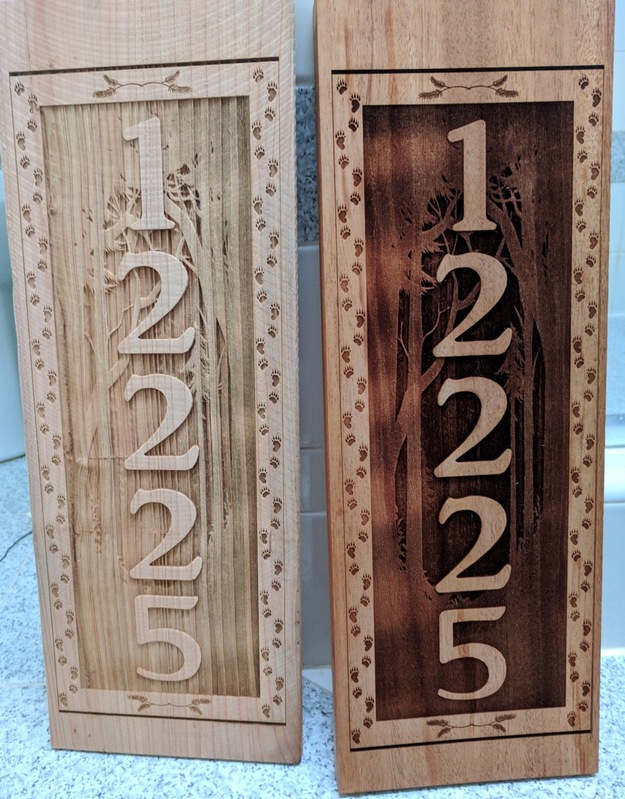
I did one in Redwood, but the grain was too pronounced, so I tried another in mahogany. That came out pretty good, but not as deep as I was hoping.
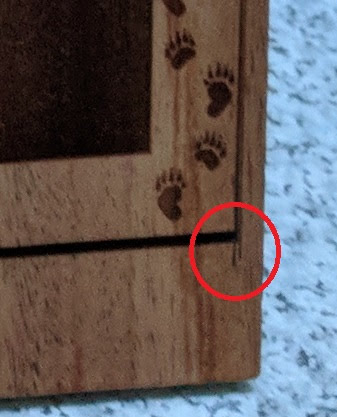
The original etch was at 100% power and two passes and that all went well. I wanted to do 3 or 4, but the image was too complex at the resolution to do 3 passes in a single run. I went back to the project and without any changes went to run it again, but as you can see in the following photo, it started off the cut about 3/16" off from the previous time it ran. I cancelled it quickly, turned the GF off and back on to recalibrate. I ran the project again and this time it started even further off (the other line sticking out the bottom).
Is there any way to get any accuracy/repeatability on the GF? I had my stock taped down to the bottom of the GF with the tray removed. It should not have shifted at all, especially since the first two pass print lined up perfectly.
I don’t understand what this means. Maybe it’s where the problem was introduced. Also, maybe not.
So if the material hasn’t been moved you should not be seeing that assuming your art board (in Inkscape File->Document Properties) is set to 12x20 inches. I don’t know if the 12x20 art board issue was ever fixed, as I just set everything of mine to that, but last year it had to be that size or reloading your file could move where stuff was.
The other thing that can affect alignment is material thickness. You mentioned the crumb tray was removed. The setting for material height has to be the same. One note of caution on that, karaelena reported that 1) a manually entered material height is supposed to override the measurement taken by the glowforge and 2) he has noticed that if the laser head takes a height measurement that is where his material is not number 1 isn’t working for him. What this means: when you pushed the button, the laser head should have moved over your material and then stopped and then you would see a red dot. If that red dot was in the removed material area, and number 2 above is true, your alignment could be off.
That is my take. Assuming no one here can help, then if you can reproduce this issue using proofgrade, with the crumb tray installed, and probably with a 12x20" art board, support will troubleshoot and if they can’t fix it remotely they will replace your machine. If you can’t do that, you can contact support, but that is probably what they’ll ask you to do.
The GlowForge should be 100% repeatable if the following are true:
design was not moved in the UI (even though it looks off)
material was not shifted
laser head and gantry were not moved or bumped by the operator
the head and gantry didn’t run into anything (some folks Glowforge’s are built such that they hit something on the right side or extreme right front corner, mine will hit the Pro Shield screw tops at the front)
It is often also repeatable across a recalibration (power cycle), but only if the door is closed to the same place as the last calibration. Recalibration sets the positioning of the motion control system by moving the gantry and head until the glowforge logo is in the same place in the lid camera’s field of view. If you move the camera enough, you’ll change the home location.
The material height was entered at 0.15 all three times (original 2 pass print, two additional attempts). The project was not altered other than setting the material height and clicking the print button each time.
However, doesn’t the material height and camera only affect the background image for positioning the layout? I didn’t change anything in the layout, so the GF should have done the same thing each time.
The print started in the lower left corner and the new cuts were to the left on the first and left and up a little bit on the second attempt after turning the GF off and on.
I’m not 100% sure. Reading karaelena’s post this morning he seemed to think it was about beam focus and not x,y positioning. Your issue looks like x,y positioning and not beam focus. So, yes, that should be correct. That said, the behind the scenes coding magic hasn’t always been what I’ve assumed, so…???
Your art board is 12x20 correct? Again, I’m not sure if this matters with the auto save feature.
It seems possible then that you lost steps while attempting travel to the right on the first line of the first engrave. It may not have had any noticeable effect since the next line up would have been full width.
If so, you may have the travel to the right hits something or binds problem that has shown up from time to time. The way to test it is to:
Place material in the front right (bottom right on the screen) of the bed. Support will ask you to do it with ProofGrade.
Place a “Gift of Good Measure” as close to the front right as you can get (don’t rotate it, it’s natural orientation has this nice effect of increasing width as the engrave progresses which shows just the scan line that hits something)
Take a screenshot
Print it
Take another screenshot
If you’re having the lost registration problem I’m talking about, it’ll appear as if the hole labels are shifted right at the bottom of the ruler. In actuality they’re where they were intended to go, but the rest of the ruler and the cut lines are shifted left. So far, support has generally replaced machines that do this, but there’s at least one user who diagnosed and fixed it himself (mis-aligned pulley if I remember correctly).
Didn’t see where you mentioned whether or not you just hit print again after the first run without reloading or in any way adjusting the layout. The unit is only repeatable on the same design layout if it is not moved in the UI and the material is not moved between runs. You can not position the 2nd run by the camera.
The unit is only repeatable on the same design layout if it is not moved in the UI and the material is not moved between runs. You can not position the 2nd run by the camera.
Correct, the layout UI was not touched. The board was taped down to prevent movement and all I did in the web interface was enter the material thickness (same as the first print) and hit print.
OK, was just touching all bases. A lot of folks don’t understand that. Have had 3 units in the past year, a Pre-Release and 2 production units. All were precisely repeatable between runs if design and material were not moved. One exception was that the first Production unit would bump during fast engraves on the extreme right side and that would change the calibration. It was replaced.
That really shouldn’t matter. There was a thing where for some reason it was homing one step off after a job, that would cause drift to accumulate over time. But we are talking in the neighborhood of like seven ten-thousandths of an inch.
I come back to jobs days later and set my jig to the zero mark on my crumbtray rulers and run jobs exactly where they are supposed to be.
I’ve never done that. I always import it into an Inkscape file first and size it there (if it hasn’t already been sized in GIMP or Paint.) But that was pre-Autosave.