I’ve searched for the answer, but I haven’t found anything quite like what I have going on. And yes, I have cleaned and calibrated and it’s still going on. This happens with BOTH auto and set focus. I have a pro.
Glowia and I are about to come to blows. When it comes to engraving and cutting wood or acrylic, she does so beautifully. Both the cut line and the engraving line up with what is shown on the screen at the end of the print. When it comes to marking metal, however, she is consistently about 1/8" off. She goes way high and to the right. I primarily work with jewelry, so 1/8" is HUUUUUUUUUUGE. I’ve had to try to compensate for her, but I’m sick of guessing where she’s going to go. Any idea what could be causing this and how to fix it?
I am sorry this is not very helpful, but 1/8" variance is within the stated specs of Glowforge and having problems with non Proofgrade material is often something that support cannot/will not address. Is there any chance you can make and use a jig for more precise placement?
Are you watching when you run set focus to see if the red dot lands on the metal? It’s only accurate it it does. If it hits a joke or the crumbtray the camera view will be off. On mine, the dot lands about 3/4” away from the spot I click on screen.
Don’t know how thick the metal bands are, but put a sheet of paper underneath it. Like everyone here has said, if the red dot (targeting laser) lands off of the material and falls into the black abyss of the grate, you won’t get an accurate reading for placement.
There are some great suggestions from other users on your post. You may receive better results if you create a jig for these types of precision prints.
As others have stated, if your Autofocuser or Set Focus doesn’t land smoothly on the material, you may experience a variance in where you’ve placed your print and where it prints.
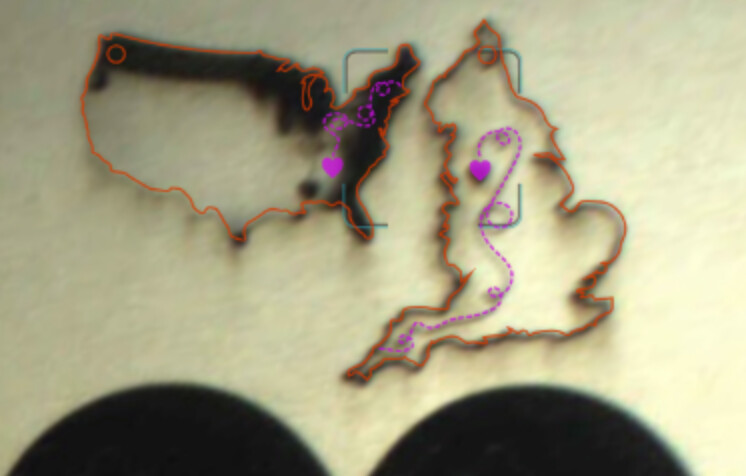
To be sure your Glowforge is operating within specifications, I’d like to have you perform a standardized test for us to review. At your earliest convenience, please perform the following:
Place Proofgrade material in the part of the of the bed that you are having the most trouble and print the Gift of Good Measure using the default settings.
When the print finishes, leave the lid closed and wait until the fans stop and the picture updates. Without moving your artwork or your material, take a screenshot of the Workspace to show us the difference between the artwork placement and the actual print placement. Make sure to include the rulers in your screenshot and show as much of the bed as possible.
Mac: Press Shift-Command-4 and click and drag a box around your image. You’ll find the screenshot file saved on your desktop.
Windows: Click on the Start Menu and type “snipping tool”. Open the Snipping Tool > New then click and drag a box around your image. Click the Save icon and name and save your file.
Send us the screenshot along with the date and time of the print, and we’ll investigate.
We haven’t heard from you in a few days, so I wanted to check in. Are you still have alignment trouble? If so, please run the test print my colleague Jeremy posted. Once the print is done, we’ll be able to review and provided next steps as needed. Please provide an update when you can. Thank you!
It’s been a little while since I’ve seen any replies on this thread so I’m going to close it. If you still need help with this please either start a new thread or email support@glowforge.com.