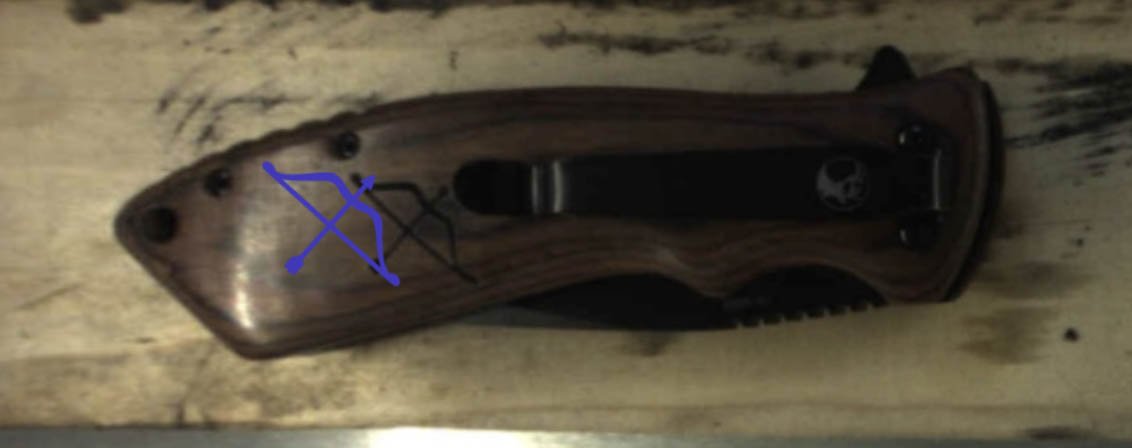
I just engraved this and blue is where I set it to engrave and the black is where it did. This is the second time this has happen. Any ideas what I’m doing wrong?
Thanks,
Gale
You have to make sure you use the set focus feature first and watch where the red dot lands. Make sure it hits your piece where you want the graphic and then align the artwork to that spot.
2 Likes
How thick is the handle? Was the crumb tray left in? Was the item placed directly under the lid camera? Most importantly, did you use set focus as directed before placing the design?
2 Likes
My setting are: 800 - 85 - 340 Auto Focus.
I’m not sure what you mean by “set focus feature”?
Yes, I removed the crumb tray. The knife handle is ~5/8" thick. No it is not under the camera. Again, I don’t know what “set focus” means? I used auto focus.
Since you took the tray out you’ll need to prop up that knife up into laser range to get an accurate photo for placement. That’s within 1/2” of the head.
This tool helps to figure out the right height ![]()
3 Likes
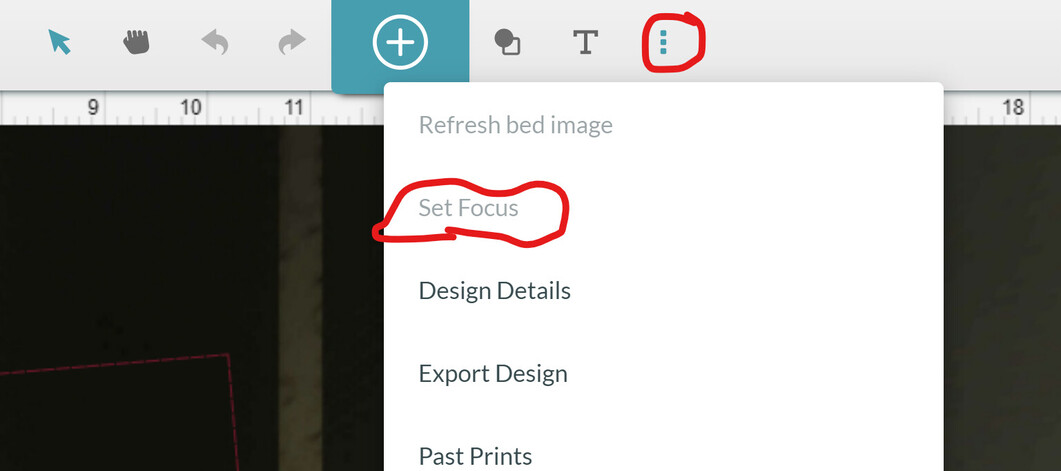
The set focus tool will be your very best friend! From the interface, click the three dots and select set focus from the drop down menu. Move your cursor to the point on your material that you want to align and click. The head moves over to that point and a red beam flashes onto the material. Make sure it lands on the material and not on a void. The camera refocuses and you can more accurately place your design on the material.
6 Likes
The Glowforge doesn’t know how big your knife is or how far away from the camera is, so without some extra information from you, it cannot accurately show its size on your computer screen.
Warning: long explanation incoming.
There’s a camera on the lid of the machine pointing at the crumb tray. It takes a picture of your material, which shows up on the GF application, bordered by some rulers, and you line up artwork with your material that way.
But how does the Glowforge know how big or small to make the camera picture so the rulers are accurate and you’re lining up your artwork with a life-sized image? After all, a 4 inch knife will look larger than 4 inches if it’s closer to the camera, and smaller than 4 inches if it’s further away from the camera. That’s just how vision works, right?
It can only scale it to show up as 4 inches on your screen if it knows EXACTLY how far away that knife is from the camera.
If you use Proofgrade materials, the thickness of each material is programmed in, so the Glowforge knows how far from the camera it should be. It’s still an approximation, since every piece of wood or plastic varies a little from the next, but it should be pretty close. That means the camera picture will be scaled pretty close to “true to real size”.
But if you put anything else in the machine, like a knife, it won’t know, and the picture won’t be the right size. If you line up your artwork with that picture, it will print somewhere other than where it shows on your screen. That’s what happened to you.
Youu can provide that thickness by measuring it, or asking the Glowforge to measure it. The “Set Focus” button tells the Glowforge to go measure the material height using its laser range finder on the bottom of the print head. If the measurement it comes up with is different from the thickness of the material you had selected, you’ll see everything “shift” on your screen as the camera image is scaled to true size.
If you place your artwork before doing this, it will print somewhere other than where you expected, because you were lining things up with a picture that didn’t reflect reality. If you use “set focus” BEFORE placing your artwork on any non-Proofgrade material or object, it will print where you expected.
TL;DR: After you’ve followed the above advice to make sure the knife is far enough off the bottom of the machine to be in the focal range of the lens, use the “set focus” button before lining up your artwork on anything other than Proofgrade material. The “set focus” button is under the 3 dots icon in the top menu. Click “set focus”, then click on your knife, and make sure the red dot the print head projects down falls on the knife.
6 Likes
Yes, I proped up the knife and used the No-Math Focus Ruler to make sure the surface was within the two lines on the ruler. I didn’t know about the three dots, thanks I’ll take a look at it.
2 Likes
As has been said here, the set focus is your best friend!! I don’t ‘measure’ anything anymore, just use this!
1 Like
Like almost everything I try to do with the Glowforge it turns out to be a pain in the a_ _. I engraved the other side of the knife with no problem.
I tried set focus and now I’m getting an error that says I should reboot my browser and restart the GF. I did both and I’m still getting this error.
The knife is proped up so it is within the two lines. What should I use for Material Thickness? I tried setting it to .5 and .25 and I’m still getting this error.
Two things, how do you turn on the grid?
When I do the “Set Focus” the head doesn’t move. Am I also doing that wrong?
I just checked again and the head is moving, but I’m still getting an error message.
That setting is only needed it you want to override the autofocus performed at the beginning of each job. I’ve used it once in 5+ years to slightly defocus the beam when engraving acrylic. You don’t need it at all in your use case.
Edited to add: The “thickness” this setting refers to is actually “how far above the surface of the crumb tray is the top of the material?” Without the crumb tray in place, this setting is irrelevant.
What grid are you referring to?
What does the error message say specifically? I’ve only seen a “set focus” error when the surface was outside the allowable focus zone, or when the material was too reflective. Can you verify that the red dot laser is landing on the intended spot on your material? Btw, it’s critical that you do not open the Glowforge’s lid once you set the focus - if you do, you’ll need to perform this step again.
1 Like
Error
An error occurred on your Glowforge. Please refresh your browser before printing. It may also help to turn your Glowforge off and then on again.
I did both of these.
To see if I would still get the error, I replaced the crumb tray and tried to set focus on a piece of paper, same error.
Hmm…. By any chance, do you use multiple browsers and/or computers to access the gui? Either way, I’d turn off the GF, clear all browser caches, and reboot your computer(s).
Other than that, you may need to email support@glowgorge.com (or give them a call on Monday).
Good luck!
How do you set the focus part feature. ?
Welcome to the forum.
The set focus tool can be found by clicking on the three dots in the interface, selecting the set focus tool, placing your cursor on the part of the material where your design will be located and clicking. The printhead will move to that point, send out a red beam and refocus the lid camera. Read the longer explanation previously posted in this thread.