The alignment is off, but it seems to be stretched/skewed…
I took the screenshot right after the GF finished the cuts…
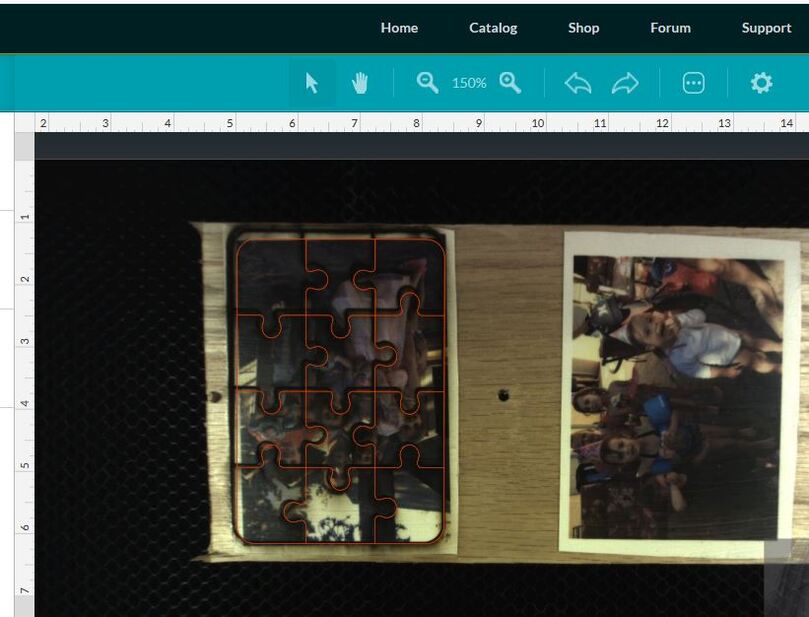
The bottom is right on, but the top is off…
Any ideas why?
The top is about 1/4" off.
Non-proofgrade plywood.
The alignment is off, but it seems to be stretched/skewed…
I took the screenshot right after the GF finished the cuts…
The bottom is right on, but the top is off…
Any ideas why?
The top is about 1/4" off.
Non-proofgrade plywood.
It was also happening when I was scanning a name I printed up and taped onto some leather. I used the trace option and placed it right over the the original taped on lettering. I didn’t change or move anything and it was off 1/8"
This is a good example picture that shows how this works. I suspect if you measure your puzzle with a ruler you’ll discover it is not stretched and skewed. The thing that is being stretched and skewed is the image from the fish eye camera.
The trace is off for the same reason since it comes from the camera and unfortunately 1/8" is within tolerances at the current time. Especially with leather which even for ProofGrade varies a minutely in thickness and flatness.
Thanks!
So, I should place things centered under the camera as much as possible? Think that is the best option until the tolerances get updates?
Yes, but if alignment is really important, I use a jig. The simplest jig that I use is made from blue painters tape where I cut the shape of the object I’m engraving or the stock I’m using into the painters tape then I place my object in my tape cutout and my artwork relative to the shape I cut out (ignoring the bed image the entire time).
I do the same thing with a piece of paper held in place with magnets. Score a guide from within your svg at speed 1,000; power 8. Ignore the artwork in the GFUI. Pay no attention to the bed image afterwards because it will be off, just put the object within the guides. Ignore the guides and un-ignore the artwork. Don’t panic. Press print.
Great idea!
That will be very helpful - especially when making many of one item.
I just jumped in here to ask the same question, the cut is correct but the image is skewed. Thanks for the tips.
Thanks for the tips, everyone!
Most alignment problems come from the material being closer or farther from the camera than expected. While the software is still improving, you can take these steps for the most accurate alignment results:
Should you finish all of these steps, and find that you have an alignment error of more than 1/4", please let me know - we’ll be happy to investigate!
It’s been a little while since I’ve seen any replies on this thread so I’m going to close it. If you still need help with this please either start a new thread or email support@glowforge.com.