Why is the start button amber? I also notice that one of the six designs that I was trying to cut did not cut all the way through ( the rest did just fine)
I was using proof grade material. Thanks
Check the connector at the end of the white ribbon cable, make sure that it is securely positioned in the print head receiver, and that there are no bent pins in the receiver if it has come loose.
1 Like
Is your room temperature within the operating range of the GF?
Sorry to hear about your trouble @marmot717
The steps @yoyodyne2112 suggested are the best course here I believe.
I extracted the logs from your Glowforge to investigate, and it looks like the amber button is appearing because the Glowforge is having trouble communicating with the printer head. There are two places we’d want to check this ribbon cable connection.
Could you please do the following?
- Turn off your Glowforge.
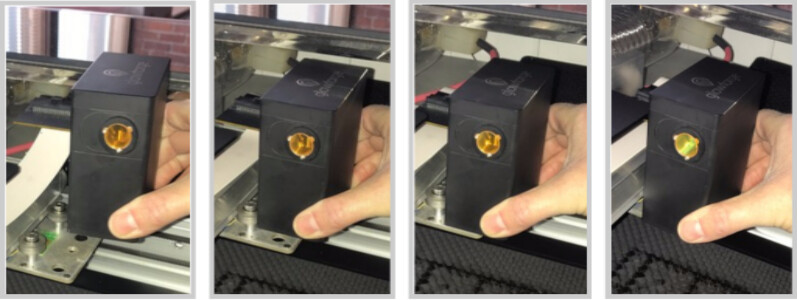
- Holding only the finished black surfaces, grasp the printer head as shown. Pull gently up and back to disengage the magnets and remove the head.

- There is a small tab in the center of the wire ribbon. Push down fully on the tab to release it, and gently pull the wire ribbon plug from the printer head.
- Take a clear photo of the gold pins inside the printer head where you just unplugged the wire ribbon. It should look like this.
- Pick up the printer head and wire ribbon. Make sure the tab on the wire ribbon is facing up. Slide the ribbon back into the head until it clicks.
- As shown, lower the printer head over the metal plate so that it rests next to the two round posts. Then push it gently away from you – you’ll feel a “click” as magnets pull the printer head until it sits snugly atop the metal plate.
- Pull the laser arm all the way forward.
- Reach over the laser arm, and to the left of the inside of the unit and you’ll see this circuit board:
- Take a photo of the circuit board. If the cable I’ve indicated above with the red arrow appears to be loose. This cable should ‘click’ back into place.
- Turn your Glowforge back on.
- Send us the photos you took in step 4 and step 9.
- Try printing again


Please let me know if you have any questions!
thank you it seems like it is working again! 
1 Like
@marmot717, That is great news! Thank you for letting us know.
Please don’t hesitate to reach out again should you need anything. We’re happy to help!