I think the common name for these lasers is K40. I’m sure you have watched every youtube video by now from unboxing to full review. Another source of info might be the Reddit laser cutting board. Search for K40. Lots of questions and answers. Good luck.
https://www.reddit.com/r/lasercutting/
Yes, I’m just about saturated with youtube videos at this point. Thanks for the name, K40. “Chinese laser” seems to be the magic search term but that seems like very poor branding! I’ll see how minimal the updates needed are.
So far required are 1) a once over of all cables to spot poor connections (esp. ground!), 2) wipe clean and align mirrors/lens (very good youtube video shows how). Easy non-essential mods 1) add LED light strip inside (have some kicking around), 2) add 1-2 CPU fans to clear the smoke from the cut faster. Cosmetic 1) swap orange window for clear. Safety, 1) double check vent tube is sound or replace with dryer vent tube, 2) add cut off switch for lid, or, more ideally just don’t open lid while operating! These sound like 1 time tasks, so hopefully each run after power/speed are dialed in will be quick.
Re software, my designs are easily exported as DXF so I should be able to import to whatever software comes with it.
I’d rather be tuning up the GF but this will have to do for now. Thanks for all the feedback!
Actually, I’d rather not have to tune up the GF which I think is one of it’s selling points!
1 Like
Excuse me if you were glossing over what follows as “duh”, but there may be others following this thread who will find it useful.
I believe the point of the lid cutoff switch is to wire it such that there can be no power to the laser when the lid is open. As in the circuit supplying power to the laser is physically off (electrically open). The laser is infrared, and infrared is outside the visible light spectrum, so without a switch you are relying on a combination of software and/or hardware to turn off the laser when you want it off. I wouldn’t trust this to be true in something I designed and built, much less someone else. Unless your plan was to unplug the laser from the wall whenever you opened the lid. That would be the truest fail safe (unless there is one honking-ginormous capacitor in there.)
1 Like
Right @caribis2 - that’s what I was concerned with; accidentally opening the case while the laser was on. And @LaserNewbie, the major reason for grounding isn’t just “fried PCB”, it’s “15kv arcs to the case because you’re touching it and you’re grounded”.
Also, nearly forgot - the HV power supply doesn’t discharge immediately. Don’t go in there without being 100% certain everything’s discharged!
3 Likes
Otherwise you will experience the thrill of a “shocking” experiance 
It’s always so tempting, isn’t it? I have experience with gcode machines for prototyping. I have consistently worked with high end industrial machines (like those in the prototyping lab at Fluke) to open-source fixer-uppers.
If you’re intending on using it for business: don’t. The time investment isn’t worth it. Like said before, there’s tons of setup fiddling and hacking to get it going. You’ll end up spending another $1000 getting the air pumps and exhaust set up. Then you’ll find yourself recalibrating for each job.
We have a video up on our fb (BootCat Design) of a test cut on the $1800 50w from China. I had to hack it to get it to connect with any software (we managed to get it set up with our Universal Laser interface). The embedded interface was in Chinese (more hacking). Oh and the working area says 500mm x 300mm but it’s actually 465x271.
Yes, 271, not some nice even number lol
I imagine your smaller cheaper version will have these quirks and more.
So, worth it for pet projects? Maybe
Worth it to rapid prototype? No
The way you want to use it says that you want plug-n-play. What you are getting is maker/hacker fodder.
Side note: I love maker/hacker fodder. I have an entire book shelf of mini “cheap” versions of proper prototyping machines. I keep them on display because I get nostalgic just thinking about how much I learned from just trying to cut/print/mill/mold one, JUST ONE, viable thing.
1 Like
@dan @caribis2 on the 50w version, I’ve seen an accidental button press pulse the laser with the door open. From then on, our shop has had a BRB policy “If youre walking away or finished cutting: Big Red Button.”
This 40w appears to be lacking an e-stop button :[
On that note, Dan, what is a general rule of thumb for discharge time?
@lasernewbie the orange window is to protect your eyeballs. If you change it out, at least go for uv tinted.
Well the laser was delivered yesterday and first impressions are pretty good! Thankfully doesn’t really match a lot of the stuff I’ve been reading about the K40 but perhaps they’ve up’d their game (whoever ‘they’ are!). I don’t think I can post pic’s here but I’ve got a few shots of the unboxing. I checked the mirrors, nice and shiny, the cabling is all nicely crimped and neatly bundled. Gantry moves smoothly. The PCB says M2 Nano V9 which is apparently the ‘good’ one.
The sheet metal holding the PCB seems to be missing a standoff which misaligns the USB connector but that’s pretty trivial. Other than that I can’t see anything wrong physically or anything needing any tweaks or mods.
Now I’ve got to figure out just where to put it along with the water pump, air, etc… Then the true test is to fire the thing and see if it works and how easy it is to cut the patterns I need to cut. I’ll let you know when I’ve got a chance to fire it up and give it a true test.
1 Like
I don’t remember the parameters on Glowforge-it discharges extremely fast for safety.
I’m currently about $1000 into my “cheap chinese” laser project.
The good news: the newest variants are a whole lot better than the original ones, with a very clean controller PCB and wiring and fairly clean software (“corelaser”) instead of the dreaded Moshidraw. Replacement parts are readily available from US sources, so the “shipped from China” problem disappears.
The bad news:
The software is for engraving, not cutting, and the engraving is a simple primitive raster.
The maximum XY area is about 9" by 12".
You do need to check the grounding, but at least on mine the internal wiring is reliably designed and the only problem will occur if your mains input is bad.
You do need to add interlocks. “Just keep the lid closed” is Just plain stupid.
I went into this with the attitude that I was buying a partially assembled kit of parts, not a functioning laser cutter. I have added serious exhaust filtering (as I would have for a Glowforge Basic, so that’s a wash.) I have also replaced the controller, added air assist, added control of the AC power for water pump, air assist, and exhaust, and added temperature monitoring and a honeycomb. I now have a decent cutter, but I will need to tweak the software to get engraving back.
You should not even consider this approach if your goal is to just start cutting. However, if you have the time and you get enjoyment out of tinkering, then I recommend it.
The more I look at engraving, the more I appreciate the difficulty. If the Glowforge cloud software can really do this, it probably justifies the cloud approach. Coming at this from a CNC background, I thought that you could just treat the laser power sort of like a Z axis and that it would be simple. The more you look at it the harder it looks. I doubt that any of the “simple” transforms are going to work well. Fortunately for me, I mostly just want to cut, not etch.
2 Likes
Good to know I’m not the only one who invested an additional $1000.
1 Like
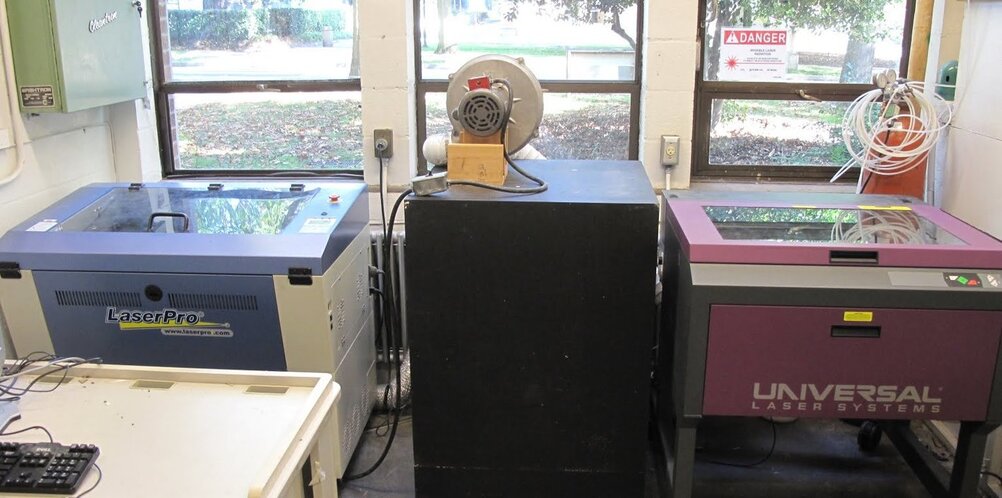
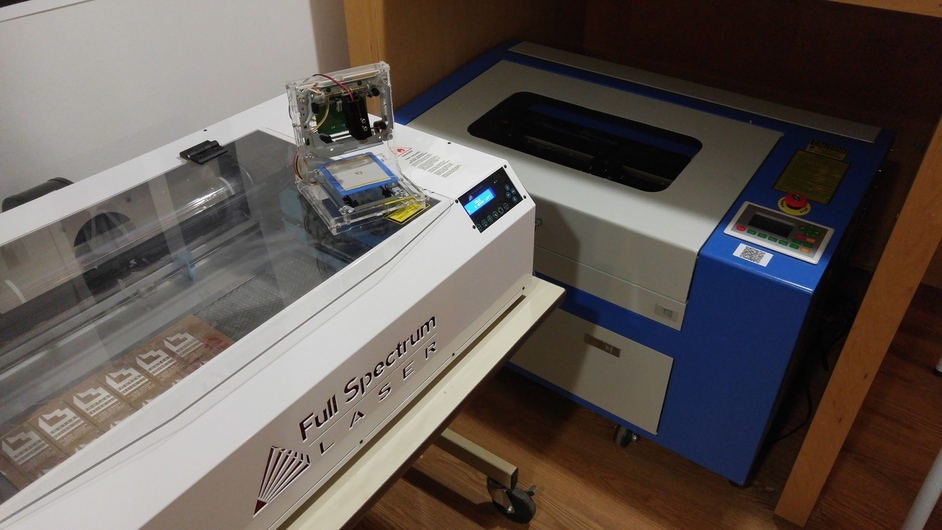
Has anyone mentioned focusing on cheap machines? It’s a pain, but your results will be garbage if you don’t. I definitely prefer auto-focusing machines, especially for engraving. For reference, I’ve attached photos of my laser minions. Yes, the tiny machine on the Full Spectrum is an engraver. It’s basically worthless, but I keep it 'cuz it’s so dang cute!
5 Likes
I think that’s true. I got one recently as “prep” for my GF ![]() I didn’t have any of the issues other folks on YouTube or some of the published reviews had - but I found most of those were a couple of years old. My wiring was solid (I’m an ex-EE) and except as you noted the lack of a few interlocks, nothing I had a problem plugging into my wall. It worked out of the box and the mirrors were pretty well aligned without needing me to fiddle with it.
I didn’t have any of the issues other folks on YouTube or some of the published reviews had - but I found most of those were a couple of years old. My wiring was solid (I’m an ex-EE) and except as you noted the lack of a few interlocks, nothing I had a problem plugging into my wall. It worked out of the box and the mirrors were pretty well aligned without needing me to fiddle with it.
I run mine in the garage with a hose to the outside, no filter. I don’t do any obnoxious materials so I’m not poisoning the plants.
I have the CorelDraw & LaserDraw & cut version (handles both engraving & cutting).
For $366 not a bad practice instrument. If I botch things up I haven’t blown up a GF.
For mods I’ve opened up the bottom tray that holds the material (they have a small clamping opening in it that is the official work area but the head tracks over the entire length and width of the bottom so pulling the raised support tray out wasn’t a big deal. I put in a sheet of light aluminum on the real bottom of the enclosure and then added a honeycomb (an aluminum grid from a fluorescent light fixture cheap from Home Depot). I initially had a set of MDF panels I could stack in the bottom to raise the material up or lower it - not infinitely variable but it worked because most materials are pretty standard in thickness so I could just pull out or put in another MDF panel. But then I added a lens holder below the stock focusing head with an adjustable bracket to raise and lower it so I can space it to 50mm (my unit’s focusing distance). I cut that out of acrylic using the cutter itself. I also added an air nozzle that I ziptied to the focusing head and have that attached to a small air compressor I have. All of it is plugged into a power strip that turns it all on at once so I have water & air before I hit the power switch on the box itself.
The only remotely tricky mod (since it requires electrical knowledge) was the lid interlock switch. Easy enough to wire to the laser switch on the main console though, lift the lid & the light goes out.
The mods were about $50 all in. I think the most expensive thing was the aluminum honeycomb from the light fixture - about $25 if I recall correctly.
I did buy 2 pairs of laser safety glasses but I’ll need those with the GF too so I don’t include those in the cost of the mods.
1 Like
My $1000 counts all cash outlays, including for the K40 itself, that I would not have spent if I had not decided to try for a laser cutter at all, and this includes a few mistakes. I would have spent at least $200 of that even with the Glowforge Basic (Goggles, initial materials, exhaust filtering system.) Cash outlay is not the issue: time and resulting quality are the real drivers here. I happen to just love to tinker and I have the time, so this is a plus on my overall quality-of-life balance sheet. I seriously doubt that most Glowforge purchasers would count the 40+ hours I have spent so far as a plus. But yes, the play value alone is high, and the freedom to learn about laser cutting without frying a Glowforge is very liberating. Results are TBD: I doubt I the K40 will ever achieve the etching quality of the Glowforge unless the Opensource/Maker community gets very heavily into laser-specific etching algorithms.
I agree that the K40 isn’t likely to be in the same league, but for $400ish that I’ve got invested it’s a good education. Our local Makerspace has an operator for the Epilog so the K40 allows me to play hands on. Like you I’m a big fan of tinkering with things. That helps me understand how the things work better than just opening a box and starting to send it files. I won’t be as worried about fragging the GF when I get it.
Although…I am tempted to cut the bottom out of the GF and install a drop bed to allow for thicker stock than the Pro will allow 
1 Like
wait my friend. wait until warranty has expired and care is no longer required 
1 Like
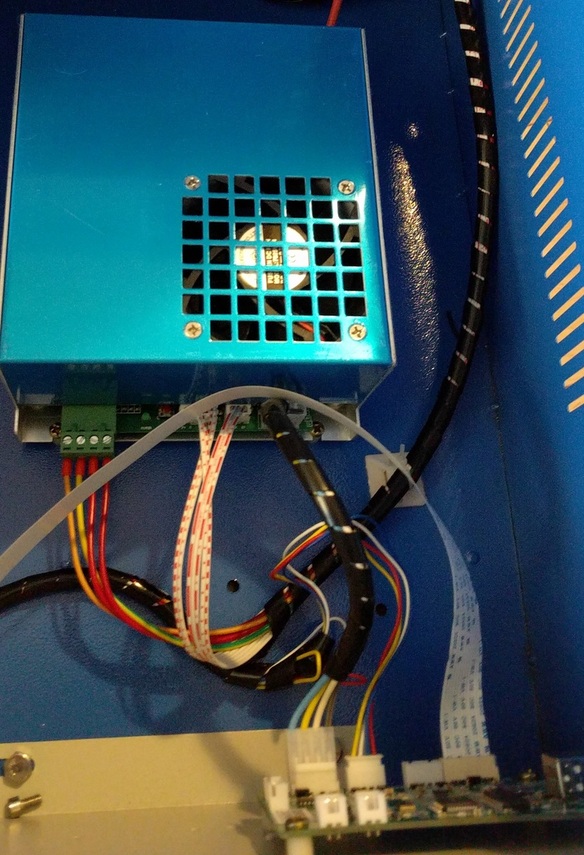
Spent an hour on the software today, definitely not the most user friendly but I do my CAD in other programs and just need to import the DXF. Like James I think I’ve got a pretty decent modern version, here’s a pic of the control circuitry. Some of the older pictures show the power supply as just a bare PCB. I think they’ve come a ways.
I haven’t fired it up yet, dinner parties continue and can’t risk stinking the place up with vaporized plastic. So still have yet to laser but I suspect the GF filter may be one of the most useful features.
I have been thinking a lot about this, why do you say it’s a pain? Where do you get the best deal for those, trade shows??