Be careful with something this dense, this is how fires get started. Watch the job carefully and be ready if it ignites.
1 Like
I can see design playtime in my future! (or is that reality bending right now?!!)
1 Like
im still open for any suggestions on how to proceed with complex files like the ones I’ve shared on the we transfer link 
my work’s firewall is blocking me from opening it here, I’ll have to wait till I get home to potentially play with it.
It’s a beautiful design, i wish you much success with it!
I do hope you are aware that this forum is open to the world for viewing (and I assume that applies to links and files as well), even though only Glowforge owners and authorized users can post. So you should avoid sharing links and files that you want to keep private.
3 Likes
thank you for your kind words
oops i didn’t know that, i will delete it once i find a solution
2 Likes
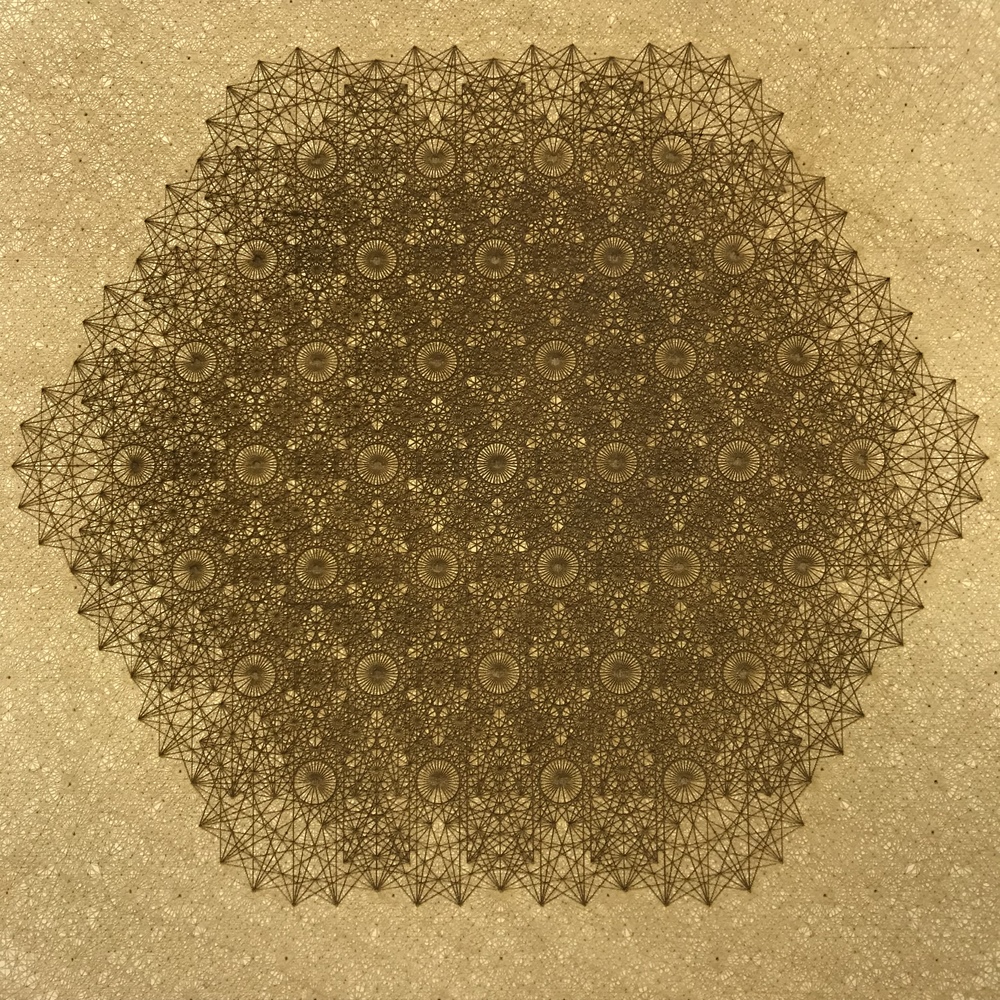
you are going to want to rasterize it. That is a very complex vector (75mb of pure vectors), and the main center shape has been expanded, so the laser will run both sides of each of those thicker lines. That main center shape alone has 4,019,020 nodes… I don’t know the GF’s upper limit for node counts, but I think 4 million is too many.
It is also almost 40" square, which is a little large for the bed.
Even if it were able to load and process, it would spend a whole lot of time revisiting areas, making the print time waay longer. There is also a clipping path in there (in the layer labeled “0”), and the GF does not like clipping paths.
4 Likes
Looking at the design and perhaps broken out to two or three layers that you cut on clear acrylic and project on to a plain inner dome perhaps as an array of LEDs and perhaps with stuff moving and or changing colors. They have the parts built for projecting Santa’s or pumpkins but what you are doing could be so much more.
1 Like
13 Likes
Nice!
2 Likes
one completely random thing you might consider is using multiple sheets of 1/16 clear acrylic.
break your design elements into multiple layers. if you divided it into 8 layers, you could etch on 8 different sheets and sandwich them together and use something to side light the resulting 1/2" slab.
or maybe if you reversed every other layer, you could etch on both sides of 1/16 acrylic and sandwich the 8 layers on 4 sheets and only be 1/4" thick.
or it may be a complete fail. but i’m kinda thinking about the piece that @xabbess did here.
4 Likes
 is this a render or a real image ?
how did you manage you do it ? 
2 Likes
This is a cell phone picture of a real engraved image from the file that you designed.
I opened the PDF in Adobe Illustrator, and, after examining it, exported it as a PNG.
Then I opened the PNG in Illustrator, resized it to 11" (to fit in the bed and the GFUI). I added an additional 11" square around your art, in red, to cut the shape out of my 12" sq material (3mm baltic birch plywood)
Then I saved the file as an SVG, which I loaded into the GFUI.
My settings were pretty simple, based on plenty of previous knowledge of this particular material.
(but I can’t share them here or the thread will get moved)
Then I hit print and let the laser do it’s thing for 2 hours.
I PMd you a jpg copy of the rasterized file, and the settings that i used. The PNG was too large to send here.
5 Likes
This topic was automatically closed after 32 days. New replies are no longer allowed.