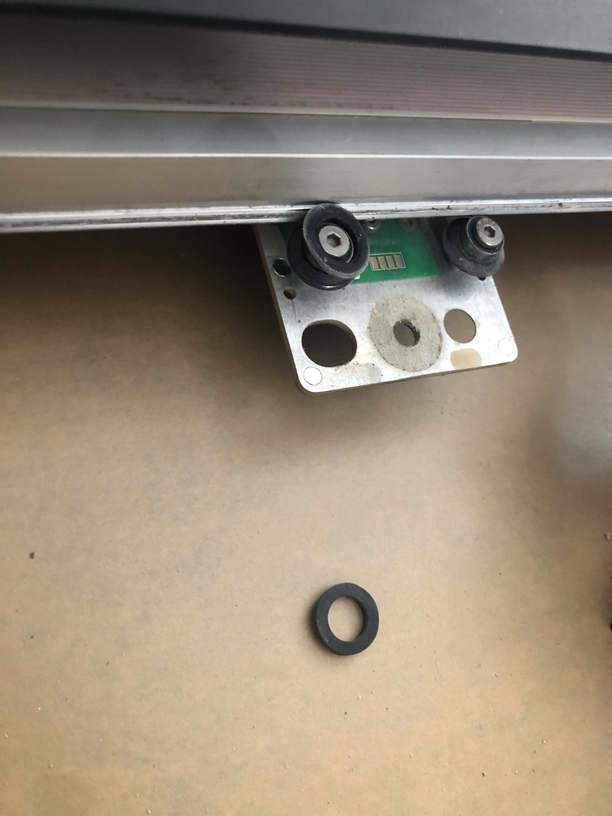
The black wheels that are under the laser module
3 Likes
That looks pretty straightforward. As eflyguy asks, you still have the original bearings, so you just need the black plastic part?
Do you have a set of calipers, and if so, might you be able to take some measurements off of the hardware? Otherwise I might have to disassemble the gantry on my machine, which I’d prefer not to do if I can avoid it.
2 Likes
yes… just the plastic part
1 Like
Cool. I actually took one off my GF, so I can get all the dimensions from here. The wheels on mine (a Glowforge PLUS) are made from a clear material, but they look the same as what you have.
You’ll (eventually) need the bearing, the bolt, and the aluminum spacer from your original, but I wouldn’t rip apart your old wheel just yet…
1 Like
Thank you so much for trying! Fingers crossed!
2 Likes
Ok, here’s a quick stab at it. I took the dimensions off of mine, and the render looks pretty good to my eye. I don’t know if you’ll have trouble printing this, due to the slope inside the groove. I would try to print it without any support material, and probably 100% infill.
Try printing this and see how it looks. If this works, you’ll probably want to replace both wheels eventually, but let’s make sure the part is correct first.
Let me know how it goes.
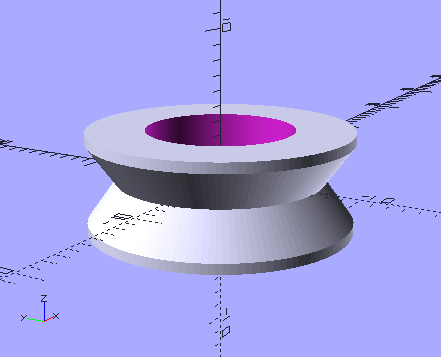
ReplacementGantryWheel.stl (417.2 KB)
UPDATE: (Because apparently I am a “new user” and am limited to 3 replies per thread)
This is all good feedback/speculation about the strength of 3D printed parts, but really the only way to know if it is strong enough is to print one (or more) and test it. It literally took me 15 minutes to go to my shop, take the wheel off my printer, caliper the dimensions, design the part, and upload the design with my description. This part should probably print in about 20 minutes. So the time investment in printing a set of these and installing them in a Glowforge should be under an hour.
So even if they only last 3 months, it’s still not a terrible solution.
The actual real solution would be for the folks at Glowforge to drop a set of replacement rollers in the mail to anyone who needs them. I’m assuming (since I saw the post to tech support) that @simplygage is exploring this option with them directly.
In any event, here is a minor tweak to the design that adds a bit of material to the bottom of the groove. This should strengthen the part and also provide more contact area with the rail to spread the forces more evenly. However, it might (depending on how it fits) change the effective radius of the wheel by 0.25mm, if that matters.
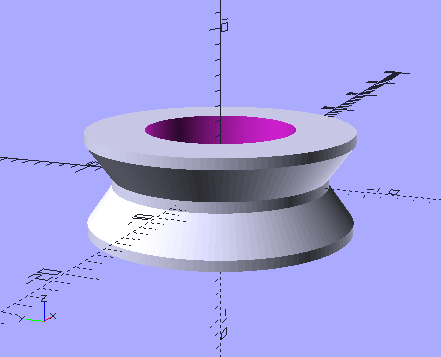
ReplacementGantryWheel_v2.stl (576.0 KB)
In the words of Master Yoda: “Do, or do not. There is no try.”
UPDATE
@ben1 I don’t use TinkerCAD. This part is defined to the precise numerical dimensions measured off the original part. Most hobbyist-grade 3D printers are limited in the materials they can handle.
Certainly the best course would be for Glowforge to provide the correct replacement. Based on some comments here, this is apparently a common point of failure. However, @simplygage asked if there is a temporary solution in the Problems and Support area and was told (by the service rep who closed the thread there) that there is not. She has been seeking some kind of resolution to this simple hardware failure for several days on this forum.
@evergreendesigns.llc might also be interested, as might @chynnalou23, @sstrouse, @brandy.gaskin, and probably several others. (I would reference all of them by @ but ever since I hopped in to help out here, the forum software is suddenly restricting every post I try to make.) Scanning the P&S section right now, I see at least half a dozen open support tickets that appear to be caused by a wheel failure, and GF is apparently having great difficulty providing replacement parts.
If it was my machine that was down, and I was going on several days without a solution, and I was resorting to spending money scouring the hardware store for parts that might fit, I would try a PLA wheel in a heartbeat.
What’s that saying? “Do not let the perfect become the enemy of the good.”
6 Likes
awesome!!! i’ll give it a shot and let you know how it goes!
thank you thank you thank you
4 Likes
I’m very interested on how well this works.
I would think the nature of how 3D printing works, that this wheel would have a very short life. I mean, you can always print more… but the pressures and movement of the thing seems like it will easily cut it right in half.
1 Like
I would add that I think you will want to print that standing up and not in the orientation shown. You would be rolling it around at the points layers are adhering together which makes it a weak point. If you print it vertically it will likely stand up to time a bit better. Though that adds another issue. Stairstepping will probably not make it roll smoothly so you’ll want to sand it smooth. And to get a little more advanced, make sure it’s 100% infill. You want it solid. And to make it stronger you might want to look up annealing your print. That does tend to shrink the piece a bit but makes it much stronger. Determine how much it shrinks and appropriately scale up the object in your slicer.
3 Likes
I noticed that the original wheel on my machine is slightly worn, and it has only ever seen hobby-level use. I suspect the spring loading of the carriage puts a decent amount of pressure on these wheels.
Durability will depend a lot on the material used, but they should last awhile if the fit is good. I use PLA for almost everything, but for this I might use ABS or perhaps PETG. If I had a carbon printer, that would be the way to go.
One problem with this part is that the groove around the wheel comes within a few millimeters of the inside bearing race. I suspect this is why the OP’s wheel split the way it did. It might be possible to tweak that a little, but I would worry about alignment of the print head if the diameter changed too much.
2 Likes
Annealing is an excellent suggestion.
I think printing this standing vertically would definitely present challenges, mainly that it would probably need supports, which will affect the surface finish. But you’re right - the wheel is going to want to split at that center groove.
That gives me an idea, though. Instead of making the groove a V shape, I wonder if it would have less stress if the channel was the same shape as the rail?
4 Likes
If I was close by I would turn one on my lathe for you…
2 Likes
Or just buy a metal or urethane one online. It’s a track or guide roller, possibly an off the shelf one.
2 Likes
They are only a couple of dollars, but finding the exact one is not so easy…
3 Likes
Thanks to everyone for their replies and feedback. Things got a little crazy this afternoon so I didn’t have the opportunity to try to print it. I only have PLA so hopefully it will work for the short term anyway. Ill follow up once printed. I agree that having the wheel groove shaped differently would definitely help. As it is now, It’s like running a knife across plastic over and over all day long… bound to split
4 Likes
I have searched online but have not found anything that is the exact or
reasonably close size
1 Like
This is a standard mechanism for precision motion control, used for many years on many devices, including the Glowforge since the beginning.
The issue is with the quality of a recent batch of the wheels, not the design.
3 Likes
The problem with this replacement is that all the force on the printed part is going to be where the print is the weakest. 3D prints are much less strong along the layer lines. This may split fairly quickly, parting at the bottom of the groove where all the forces are going to be working to pry the two sides apart along that line. You should consider printing it with supports (even though you’ll have to clean it up some afterwards), standing on edge so the layers are at right angles to the forces that’ll be applied to them…
4 Likes
Also, GF can’t be using a custom part for this. I’ve got similar looking wheels (metal, though) for a large 3-axis gantry CNC machine. Do a Google Search for “Linear Rail Guide Wheel” and you will get plenty of hits for things that look similar. You just need to size the replacement to be able to order one.
3 Likes
Most adhesives won’t work with nylon or Delrin. They don’t have any chemical or physical availability for the adhesives to use.
I would not try to resolve this on your own. I would wait for GF to get your replacement parts. You are looking at a pretty exact part and TinkerCad is anything but.
I wouldn’t use ABS, PLA, or PETG for this part. I would use PMMA or nylon due to the strength requirements. You have to seat a bearing into that wheel and have it properly pressed into place. I don’t think you are going to get good wear and also the strength you need in those other materials.
4 Likes