I’m having a problem with my glow Forge and need a little help. It seems that when I place an image onto a coaster, it appears that I have it lined up correctly. However when I start to score or engrave the coaster, it’s not lined up the same and it’s off the mark. Is there some type of camera calibration settings that I need to adjust? Or does anyone have any advice at all?
2 Likes
Hi!
Have you done the camera calibration?
Getting the material thickness set right or, using autofocus correctly will also help with positioning.
You might also want to try low-power runs on masking or paper over your piece to confirm alignment before you proceed.
Depending on how accurate you want it, you may need to use a jig. Search the forum for more info.
6 Likes
If you can, put it as directly under the camera on the lid as you are able. This is the most accurate as there’s distortion from the camera (fish-eye type) to capture the whole bed.
2 Likes
For absolute precision, make and use a jig. Also, make sure you use the set focus tool properly before placing your artwork.
5 Likes
Thank you everyone for your help! I’ve been trying to set the material thickness since we are printing on wood coasters we found at Hobby Lobby rather than proofgrade material. I thought based on the above suggestions that this would help. However, when I select unknow material, it won’t allow me to enter in a value for the thickness of the material. I’m not sure what I’m doing wrong.
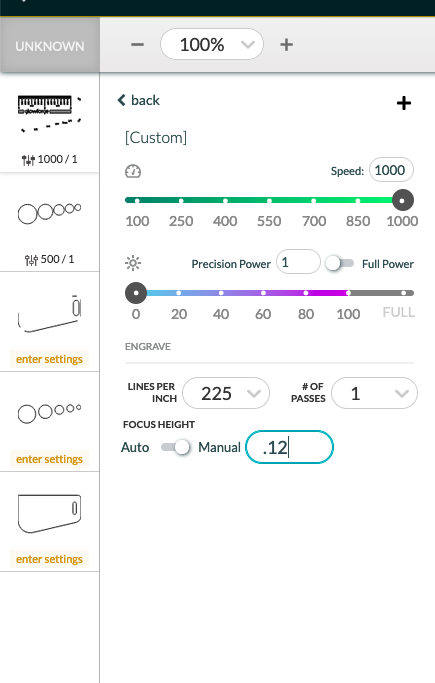
You can choose uncertified material. Then when you go to your engrave or cut operation, toggle the focus height to manual and input your thickness.
1 Like
I’m so sorry to hear that you’re running into trouble with the alignment on your Glowforge. I’d like to have you perform a specific test print, so that we can ensure your Glowforge is performing within specification.
We’d like to have you try a few troubleshooting steps for us:
- Turn off your Glowforge.
- Check for small pieces of debris or dust.
- Check the lower door to make sure it closes all the way. It may require some force to open, but open it, wipe any dust off the edges, and close it all the way.
- Remove the tray and clean any dust or debris from the surface underneath. Pay careful attention to remove all debris from the four dimples where the tray rests.
- Check the lid to make sure it closes all the way. Small particles of material, such as dust or debris, can prevent it from closing completely.
- Check the surface your Glowforge is on to make sure it’s flat. Ensure it is not twisted slightly and that there is no debris propping up one side of the machine.
- Turn your Glowforge back on.
- Place Proofgrade material in the part of the of the bed that you are having the most trouble and print the Gift of Good Measure using the default settings.
- When the print finishes, leave the lid closed and wait until the fans stop and the picture updates. Without moving your artwork or your material, take a screenshot of the Workspace to show us the difference between the artwork placement and the actual print placement. Make sure to include the rulers in your screenshot and show as much of the bed as possible.
- Mac: Press Shift-Command-4 and click and drag a box around your image. You’ll find the screenshot file saved on your desktop.
- Windows: Click on the Start Menu and type “snipping tool”. Open the Snipping Tool > New then click and drag a box around your image. Click the Save icon and name and save your file.
- Send us the screenshot along with the date and time of the print, and we’ll investigate.
Let us know how it goes!
This doesn’t work for placing your art though - only for forcing it to focus at a specific depth.
@chadowensgcpd are you using Set Focus before you try placing your art?
My process for super-precise engraves is basically:
- Set the focus based on the height of the material
- Make an outline of whatever it is i want to have as the edge of the thing that’s going to be engraved then ignore that outline in the GF software
- Start the print from the GF software
- Let the laser make a bunch of noise so the pic gets taken with the actual laser’s camera
- Cancel the print in the GF software, do NOT reopen the lid
- Align the outline with the edge in the pic that’s taken with the laser’s camera
- Start the print from the GF software
- Mash the big flashing button.
- Pew pew pew.
I can’t get things completely on top of each other, but I’ve definitely noticed it’s an awful lot closer than with the lid camera’s fisheye lens
That totally works.
Using the Set Focus function means I get sub millimeter accuracy every time - it’s literally what it’s for.
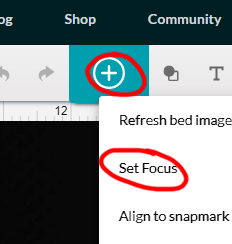
Place material
Click Set Focus on material
Place Art
Hit Print
1 Like
Thanks everyone! Just to note, I have been using the set focus feature. For whatever when I center the image on top of a small coaster, it prints it slightly off center and to one side. When I get the time, I’ll try some of the other suggestions above and try again. Thanks everyone!
If the piece is in the cutting area and use set focus you should be able to set your custom settings. Unless you want a special effect just use set focus and then move the design to the work.
Set focus will set the proper thickness for you.
1 Like
Thanks MarcM! I haven’t had a chance to do this yet but will do so as soon as I get a chance. I’ll let you know how it goes. Thanks!