My searches have not produced anything relative so I may be thinking about this all wrong. The board is too thick to use the pass though.
I am not certain that a 20" round will fit in the Glowforge. Cut a 20" cardboard circle and place it in the Glowforge without the honeycomb tray. Can you see a way to engrave half then rotate? The problem is the distance from the front door to the back of the bed.
2 Likes
Ok… it’s not 20”, it’s 17 3/4” and 1” thick.
I printed on an 18 in 1 inch thick round by rotating it. You should be able to make it work!
2 Likes
You will be able to fit the item in the Glowforge with the honeycomb tray removed. Whether or not you will be able to engrave the design you desire in two different operations will be a challenge.
4 Likes
Any tips on where to start?
As suggested by @dklgood remove the honeycomb tray. I would then measure the round/ area where you want your image(s) so that you are sure that it’s spaced accurately (also that it reads correctly). Insert your round, be sure to use the set focus and print.
You may have to add some scrap wood to correct the height of your round in the laser bed. The GF will let you know if the height is not right.
3 Likes
That part I understand. It’s figuring out how to realign once I turn it 180 to complete the top half of the image.
I mark my material in pencil in order to try to line it up manually. Your image is not broken up I take it? If not, can you maybe break the image up and then realign it manually?
2 Likes
What you’re trying to do is impractical, unless the design is already broken up along a line that will tolerate mis-alignment.
Suggest you test on cardboard or similar to prove it to yourself.
3 Likes
I will add - I have a few pieces that were engraved using the passthru, which I know you can’t use. They are photographic or technical images. There is a bug in the passthru (that has been documented, shared here and with support, but never addressed) where the first engrave pass after a reposition simply does not fire the laser. Even at 340LPI, this results in a visible ‘blank’ line in the final result.
The passthru alignment on my machine is absolutely precise, and cut pieces are perfect, but any engraving has that problem, always has, still does. I watched it, head makes a pass but laser does not fire. Some pieces were previously painted and as the laser engraves, you can hear it. Totally silent on that first pass.
So my point to posting this is to point out that even the very slightest gap (and, probably overlap) in an engraved piece will be very noticeable.
I have ‘fixed’ these issues with colored pencils or ink, but they are easy to spot if you know they are there. The stuff I have was just done as tests on the passthru before it was released to the overall pro-owner population. Still does it, however.
3 Likes
Ok the primary problem as everyone notes, which is the bane of anyone with a less than 5-axis CNC milling machine. And the solution is a jig ( or ally soft-jaws in a vice) that allows flipping so in the case of a non-round object it is easy to make a jig (in that case basically the negative of the object) but for a round you need a jig that clamps onto the sides of the round stock and aligns. The good news of course is unlike a milling machine the laser doesn’t provide any force on the object (nobody better mention light-pressure e.g. light-sails…) so you don’t need a beefy object (I frequently print jigs in tough-1500 on my form 3 which fit on a soft jaw, which has the advantage that if I plow into it with a bad CNC program, I just reprint and less chance of snapping an expensive end-mill). In your case it basically needs to get clamped to the stock’s rim and stick out. I would make small fittings that stick out as a rectangle and have a flange up the side of the cylinder that you could lock in place with wire-ties (since they are unlikely to provide sufficient force I would consider a small amount of blue tape to prevent the flange from sliding around the rim). And then with the tray removed (you could do the general technique with the tray, but not with your stock). Make the receivers for each entangle taped down to laser floor with blue tape. now when you flip the object will lock in around the z-axis rotation with perfect alignment. Such a jig is totally makable purely with the laser and scrap draft board if you have it. Sorry didn’t take a long time modeling the idea in Fusion (I can’t draw to be honest, so that was the quickest way). But here is the idea:
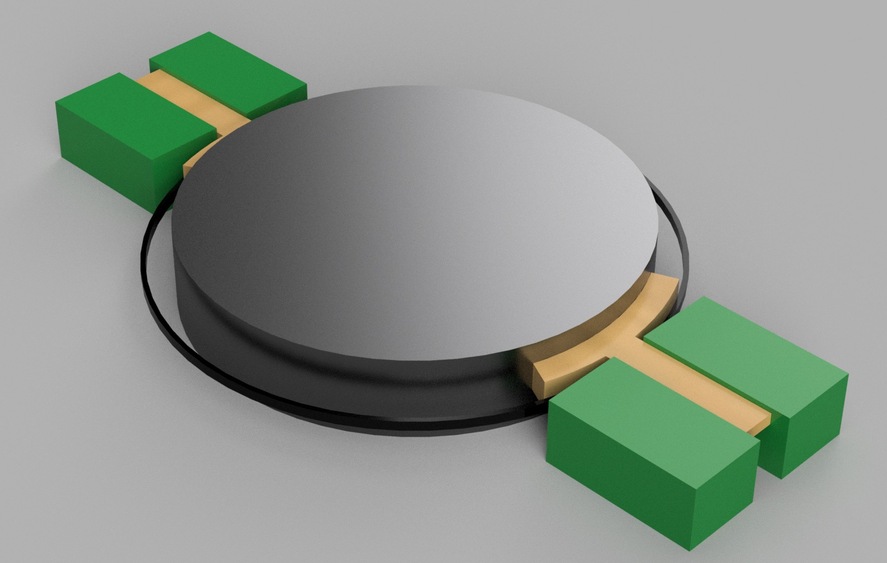

sectional view since I couldn’t make the blocks transparent but still visible in the render view (sigh). And that black band is my artistic concept of the wire tie - the container near me has black wire ties so there you go)
Note: the blocks have to be proud.
7 Likes
WOW! I thought I was lost a few sentences in but the visual really helped! You’ve inspired me, I thank you!!
1 Like
This topic was automatically closed 30 days after the last reply. New replies are no longer allowed.