You can use artist’s frisket for masking paper, it’s low tack and meant for the job. Maybe transfer tape would be OK but you have to stick the tape to clothing or something else first to pick up lint and reduce the tack.
@iliketomakestuff cut paper in his video making an “ice cream” air freshener for a car. It didn’t seem to burn or deposit residue on the surface, but it did blow away before he added magnets to hold it in place.
That’s the one thing that bothered me about it… why not just glue the paper onto the wood first, and then laser the whole thing? Getting the proper setting might have been tricky, but then you wouldn’t have to worry about lining up multiple prints of the same image. And it’s not like the cardstock would have provided much resistance, anyways.
And then there’s drilling out the hanger hole, when you’ve got a 40W laser handy…
There’s a million ways to skin a light bulb, as the old saying goes!
What I mean is, I think that is just a different choice on how to get it done. The goal was to make stuff. Stuff got made. Efficiency could be worked in at a later date if it was a thing to be made more than once. Lessons learned from this project could help efficiency get worked into projects earlier with future projects.
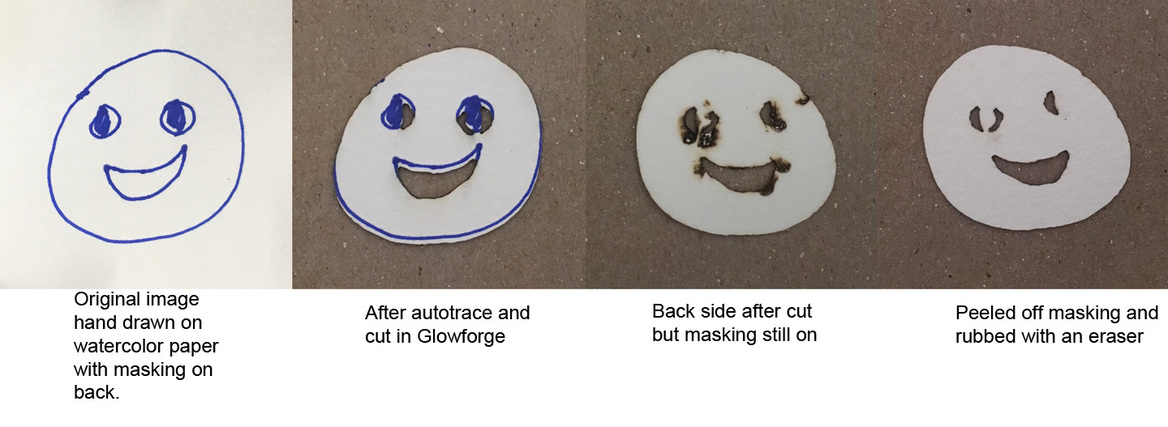
The autotracing registration is off, maybe partly because this is not Proofgrade material, but I know they are still working on it.
Bottom line is the back side is pretty clean looking. This masking tape is pretty low tack, in fact it doesn’t really want to stick to the paper but it did well enough.
He probably didnt think about it. If it was me in his shoes, I probably would have glued solid card stock to the cut wood shape then used an X-acto to trim the holes using the wood as a guide.
Sometimes it’s about the process more than finding the most efficient way to do things.
On my car project, there are times that I will rack my brain trying to think of the best order of operations for a particular step/project. Sometimes that will cause me to shut down mentally, go into paralysis, and completely halt the project for a day or two while I try to sort it out, and often I’m just not able to visualize the solution at all. At that point I have to abandon the idea of “doing it the best way” and just get SOMETHING done even if it means I get 10 steps down the way and end up having to backtrack and cut out all 10 steps to go a different direction.
Not sure how you are doing this, but when you go to cut, make sure you put in the correct thickness of the material after the tracing operation is done if you are using non-proofgrade. I was messing around with that today and it makes a difference for sure.
Yes, I did do that. Although I do have the cheap calipers . So I borrowed Don’s fancy expensive ones, got pretty much the same dimensions.
I even got a brain wave and thought maybe it was because we are at the extreme edge of focal distance, so I propped the paper over a gap in some Proofgrade ply to bring it up off the bottom a bit. Put in the combined thickness of ply plus paper for a focal distance. It didn’t make any difference.
I’m still learning about this positioning system and how it works and how to work around it. I did a flip of a piece the other day to engrave a chamfer around a hole for some screw heads. I kept the surrounding material in place and didn’t touch the design in the GFUI. I ignored the newly aquired image and resisted the urge to reposition the design to match the holes. It engraved perfect countersinks on the opposite side exactly centered on the existing hole.
I’ve used a second sheet of paper as a mask for paper with some success. Also small weights because our honeycomb isn’t magnetic (hint, hint, GF’s should be).


 . So I borrowed Don’s fancy expensive ones, got pretty much the same dimensions.
 Just getting started!