Has anyone else had frustrations attempting to move around complex shapes in the cloud print preparation screen? If I’m trying to size, shift and move different “layers” around on the canvas, it is rarely capable of selecting an entire “layer” (piece of artwork) without forgetting some piece of it. Often, I’ll have to move everything away from where I actually want to cut, just to get use of the arrow cursor for a click-and-drag around my object. And boy, don’t misplace it within another shape the first atttempt, because once it’s deselected, it seems impossible to select it again without also selecting other “layers” at the same time.
Of course, there’s a bunch of Ctrl+Z and moving stuff around workarounds one can do, but in the case of my most recent project, it quite seriously made the print time double in length, just trying to get the software to cooperate.
Perhaps the best thing to do is not have several piece of artwork, rather, have it all designed before hand? But still, selection is such a hassle sometimes.
It is best to put things where you want them in your design software. If you’re using Adobe Illustrator work on a 12 x 20 artboard. In addition, make use of groups and colors to help differentiate designs. I tlooks like you’re doing that and might just need to adjust to the 12x20 size so things don’t just jumble up in the top left corner (like when you copy items from AI and just paste them into the GFUI).
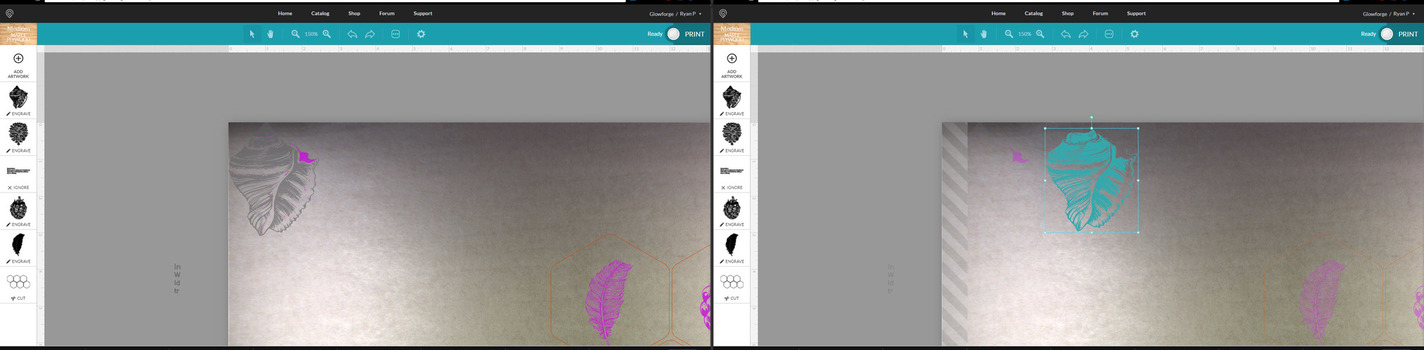
Just so you know how it works with vector engraves, anything that is completely enclosed inside a shape acts as a single unit. (No matter the color.) That means you can click and drag anywhere on a design, and the whole thing follows along.
But if any part of the design overlaps another part, crossing a line, or if any part is not completely enclosed, the parts will be treated as individual units, and you have to drag a selection rectangle around the whole thing to move it.
It’s easy to put a different colored rectangle around your design and then just set the rectangle to ignore. That makes everything act as a unit, and you can ignore the rectangle in the interface.
Even if they don’t jumble up in the top left hand corner (great advice working from a presized artboard…duh!) it’s still quite difficult to select specific items, like the shell in my image - it’s got lots of tiny lines and shapes that the GFUI thinks are different items. But locking could help me a lot here. Thanks for the reply!
LOL, I understand completely, Tell your friend that it will vary depending on what program they are using but the help files for those programs and a lot of good tutorials here will help them through.
In Inkscape, it is highlight all you need to lock and then Object: Group for most things.
I understand that folks are using this term to describe their experience in the GFUI, but it might not be best to think of it in these terms from a design standpoint. What we are talking about is combining vectors to make a compound object, all of one color of course, so that when it appears in the GFUI, it appears to be locked together as a unified selection object. If you would search for the term “locking” objects, it has to do with locking or unlocking objects for editing purposes according to layers. That is a red herring or path to distraction as layers might not be a helpful term for understanding how the Glowforge works. The layers in the design program don’t have a bearing on how they are treated in the GFUI [except if the layer is visible/turned on or off in the design program.)
I think that the common way to refer to the thumbnail squares in the left column in the GFUI is to call them operations. Each operation has been determined by the color of the object(s) as chosen in the design software, either as a fill/engrave, path/score-cut.
From a design software standpoint: know the difference between simple and compound objects then compound paths. Know that many single simple objects in the design software may be brought into the GFUI as one operation (but only if they are the same color and are paths or filled closed paths with no stroke.
They may appear grouped or combined together in regards to selecting, as @Jules pointed out, and that also can depend on whether the objects are concentric or bounded, one object inside another but also whether or not they have been combined as a compound object.).
I think this has to be broken down into some other steps for Inkscape. Normally if you group two objects and they are the same color, either fill or path, those two objects will remain separate to select in the GFUI, even though they come in as the same operation. If I want to make several objects come in as one selection object, group doesn’t do it. I may be missing something here though.
And even just combining two objects by selecting and then doing Object > Combine might not make one object or path that comes in and is wholely selectable by clicking on any part and not having to draw a selection box around them. Try it out. Unless I am really missing something here.
It’s been a little while since I’ve seen any replies on this thread so I’m going to close it. If you still need help with this please either start a new thread or email support@glowforge.com.