I hope I am posting in the correct place. I am new to glowforge with all it can do and was wondering if someone could shed some light on a topic that is sort of the missing puzzle for me. I see many people posting what they created whether it is “colored” text printed on a wood frame or an object that is also colored so my question is how are people doing this? Are they actually sitting there and manually painting everything they create to perfection or is there a setting which allows to print some sort of colors with the actual glowforge machine? If anyone can give me some insight I would appreciate it so I can get a better take on how I should be creating things. I have the setting all created in Adobe Illustrator to use ONLY Glowforge colors but it doesn’t make sense to me because if you cannot print in color what is point of creating your design in all different color combinations?
Sorry if this is a dumb question but I’m trying to learn…
The dumb questions are only the ones that you never ask, so you never learn…
The Glowforge doesn’t print in colors, the reason to put different colors on different parts of your design is to then assign different operations to each color, for example, red is “cut”, green is “score”, blue is “engrave”. (Just an example, use the colors you like for each operation!) Also, if you want to not do a step during a certain print job, you can set a particular color to “ignore”.
Does that make sense?
The colors will also allow order changes, this part done first, then this part. Easier to engrave a part before it’s cut out. There are exceptions of course. But better to have the ability to modify before hand.
Here is a way back link to using ‘color’ to separate actions during a design print. It will allow you to ignore, cut, scribe, or engrave different aspects of the design.
Actual color on the finished project is a different animal and it is done several ways. Some of the examples on this forum show an awesome amount of talent.
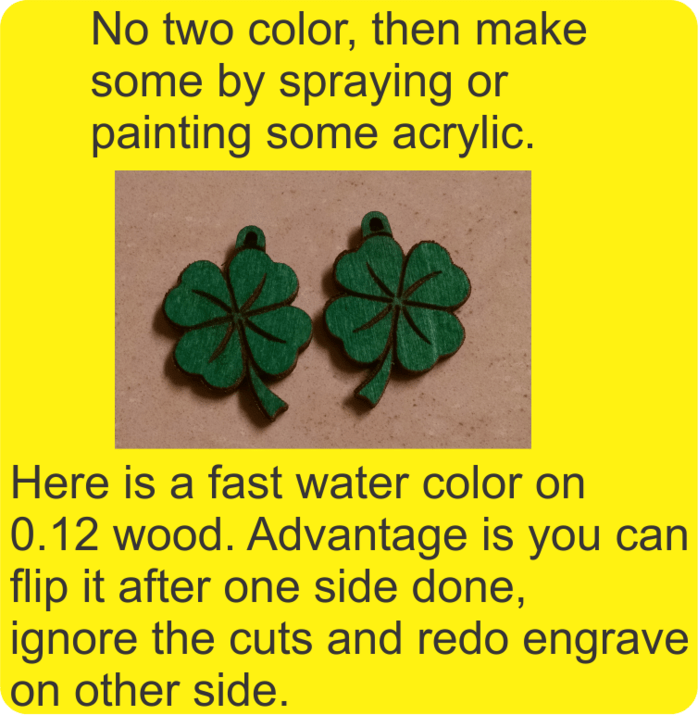
Two color acrylic - a base color with a secondary color layer on top. Etching/scoring the top layer will expose the base color while leaving the rest the top color. Painting the resource - Adding color with paint, marker etc can make a design pop. Also, like the two color acrylic, the wood, leather, or even acrylic can be painted before burning for a dual color design.
Here is some painted wood, just to show the concept:
Thanks for the responses. Trying to wrap my head around this. So the only reason color’s are used is for order of operation (cut, score, etc,) and not to print an actual color itself. If that is the case then why have a 13 color palette when you only really need to use like 4 since there are only 4 operations?
Maybe that is where I am getting confused because you have this 13 palette of basic colors but you only use red, green, blue, etc. Then why need brown, pink, etc.?
The simpler answer to why have more than 4 colors is so I can have multiple cuts, engraves, scores, in the same file, but want to dictate what order they are processed. For example, the picture below shows every line in this Bucky Badger, but I ignore most of the different colors in the Gloworge interface depending on what layer I’m cutting. (This was a 7 layer piece.) As long as you different lines are different colors when you save, they’ll show up as separate operations in the UI. I like to make my border line a different color than the interior cut lines, so I can force the Glowforge to cut that part last. It gives you the control to specify what order things are cut/engraved/scored.
It might help to think of the colors as “steps” instead of “operations”.
For example:
It’s generally a good idea to cut all of the inside cuts before you cut the outside shape because the parts can shift slightly when they drop out.
You have different areas to engrave that need different settings, if they were all the same color you can only apply one setting to the whole engrave.
you want to score the masking, pause the job to peel off what you scored and then continue with more scoring or engraving in the peeled area.
you’re cutting an intricate pattern in material that’s particularly prone to fire like acrylic or cardboard and want to spread the cuts around to allow the material to cool between cuts.
You’re making something double-sided like coins. After engraving side 1 and cutting them out you’d pause the job to flip them over and engrave side 2.
There’s a lot of potential reasons.
And PS you can technically have way more than 13. It doesn’t matter what the actual colors are, red green or whatever, just that they are different from each other.
You might even want to use this when you are figuring out what settings you need for non-proofgrade stuff. Lots of colors because each line is cut at different settings.