Hate to keep saying “in Inkscape” but that’s all I have…
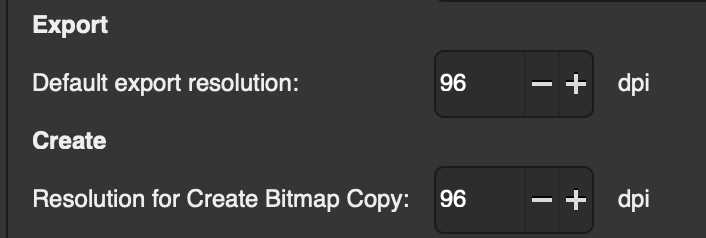
So, in Inkscape, you set the DPI for both bitmap conversions in the app, and the resolution for export. The default is 96dpi, because that’s what SVG was designed for (screen display), but you can set it to anything.
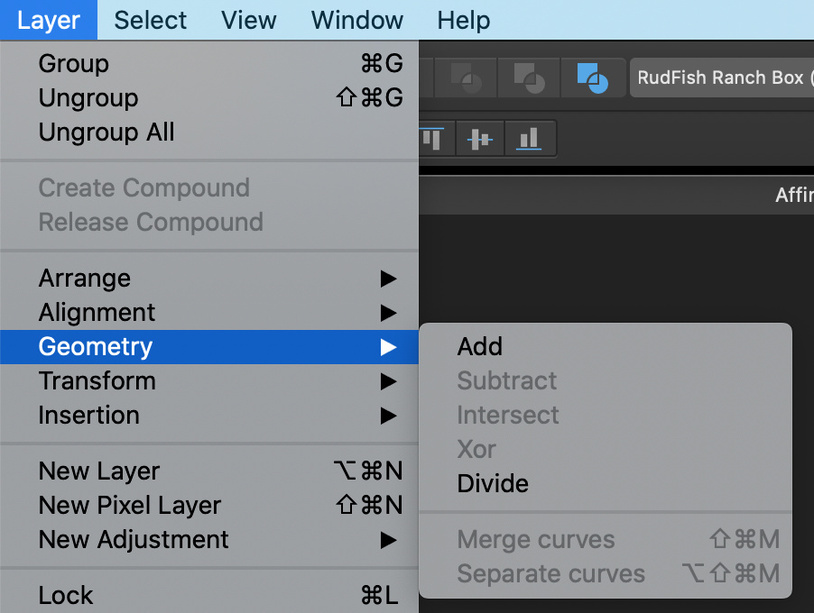
I use Illustrator. But Affinity probably has a similar option to this. It should be “subtract” or something like that. Draw a shape that follows the contour of the edge of the box***. Make sure it covers the area of the fish you want to get rid of, and that the shape is layered ABOVE the fish. Select the shape, and the fish, and subtract the front object.
This has a section with video explanation of the Subtract feature. Now you shouldn’t have the entire fish.
So there are two recommendations here (three if you count “use a different program”), they’re both good but have trade-offs. As you said, Glowforge doesn’t support clip masks, but you can apply a boolean operation to remove the part of the fish that extends outside the shape. And/or, you can rasterize the fish.
While using the boolean operation and keeping everything a vector is nice and clean, Glowforge sometimes has trouble interpreting complex vector shapes. Since an engrave has to be rasterized anyway, either by your software or by the Glowforge software, sometimes it’s just safer to do it yourself and know what you’re getting. I’m not sure why that didn’t work… it looks kind of like a transparency issue. I know in Illustrator there are some options in the rasterize dialog for stuff like that. Maybe the same with Affinity?
With a copy of your cut path at the highest level, click the vector design, followed by that path, then use “Path/Intersection”, and turn on fill. If you want to do multiple vector designs at once, use “Path/Combine” on them all first.
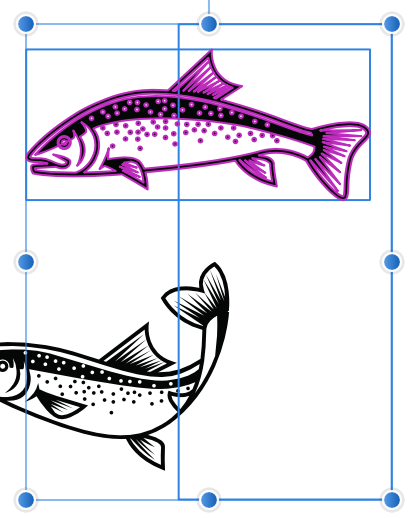
I do @chris1’s method here. I don’t like to use the cut outline as my “intersection” as per @eflyguy , I prefer to draw a rectangle just outside my cut piece (>= 0.02" outside) that covers the part of the fish that I don’t want. Then I use difference to leave just the portion of the fish that I need. I think it leads to a cleaner result because booleans are prone to very small errors and this way the cut line is fully within the engrave. If you use the cut line as the intersection border the slight boolean errors might well be visible at the end of the cut, the difference method sidesteps all that uncertainty.
The problem is that the fish are made up of multiple groups, and each of those groups have subgroups and curves. It looks like I have to get rid of the groups and then combine the shapes into a compound or merge them. Otherwise if I select the fish, and a rectangle that overlaps it, I only get the following options:
Inkscape user here. In Inkscape I would ungroup everything and delete what falls outside the large shape. Then I’d do a boolean operation for what remained.
However, if I just wanted it done, and didn’t care about the material to the right of the cut line, I’d just run it as is. The glowforge is going to cut right through the fish.
Right, but not quite. If the entire design is wide enough to encroach into the margins where engraving can’t happen (cutting can) then none of the design will engrave.
Wheelbarrows and holocaust cloaks aside, you could open the trout in GIMP, or the Apple equivalent of MS Paint, chop off the tails and export the resulting PNG. That way you could make it fit inside the engrave area while still engraving outside the lines. No doubt it is a kludge, plain and simple, and I in principle I am opposed to them, but sometimes…
I tried exporting as a PNG, but the quality was crap and the size shrank by 1/3. See above.
What has worked so far is to combine all the groups and subgroup layers into one “curve” using Merge Curves. Then I can use a rectangle to do a subtract or an intersection depending on whether I want to keep or discard some portion.
Of course, now that I am on a roll, none of my tabs or finger joints fit each other. They’re way too tight. This used to work some months ago, so I am wondering what has changed. But I’ll save this for a a new topic post…
Thank you. I did some of their training courses and tutorials. The problem here is that GlowForge doesn’t respect some things and not others. For example, I assumed that cropping vectors would work, but it does not. Clipping we know doesn’t work.
Using the add and subtract for curves does work. But then you have to work on curves and not groups of curves.


 Movie CLIP - If We Only Had a Wheelbarrow (1987) HD")