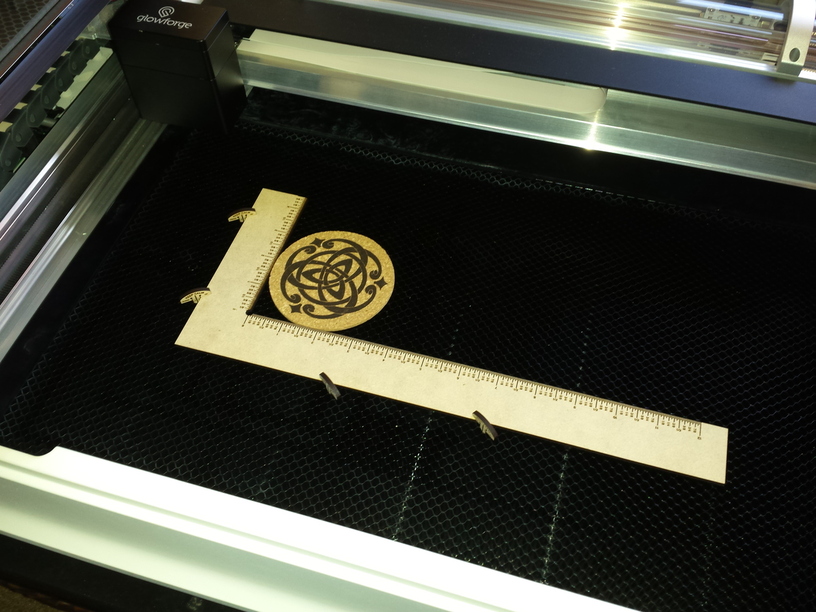
Based (and with markings borrowed from) the Crumbtray Rulers by jbmanning5, I made a square to assist with repeatable registration. Just lay the square down on the crumbtray, and, if necessary, use the honeycomb pins by eljefe4 to secure it in place. Then you can set items in the bed and align them against the bottom and left edge to make sure that they are in the exact same position every time.
If you make that wide enough on the one edge to wedge up against the front door (or the rear) then you’ll have created a fixed reference point. The door and rear do not shift. (It’s what I do with a few spacer bars that come in extremely handy for squaring things up.)
I wanted something that I could position in the center of the FOV. I try to do everything directly under the lid camera whenever possible, because of alignment error. I just thought it would be very useful to be able to lift a piece out and put it back in exactly the same place (or repeat a job on another pre-cut item).
I once cut a set of runes and noticed it would be nice to be able to engrave the runes on a piece of 1/4" material, then remove them to do some clean-up or finish sanding (I wasn’t using masking at the time) and then put them back to cut them out. It is a lot easier to do surface finishing on a single plank than to do it on 25 small pieces.
I’ve never had any issue with the crumb tray shifting on me. Most of my parts so far have been small and the crumb tray seems to sit fairly solidly in the bed. I’ve since tried to move the crumbtray with my hands and it doesn’t budge. It is heavy and sits rock solid in its indents. Not even a wiggle.
Yeah, it’s fine that way, I do the same thing - lining things up under the lid camera when possible.
(I use these spacers, and can change them out for different sized bits of material … and somewhere buried forever in the belly of this forum are pictures of them that I can no longer find…)
I think that’s because you named them something funny (as in strange). I don’t recall what it was but several of us were scratching our heads wondering what you meant when you posted. @rpegg likely will remember.
Great idea! Along with @Jules spacer sticks. I’ve been measuring each time. Something so simple as spacers hadn’t come to my mind yet. Doesn’t work for things that I’m setting on top of spacer blocks without the crumb tray though. Will need to come up with spacer trees.
I have many things with parallel sides floating around in my work area, I take something a bit shorter than needed, push it up against the front of the machine (not the lip on the bed), and put a couple of strong magnets down along the edge where needed. I can then remove the piece as it takes significant effort to move those magnets.
I have been doing exactly that. I bought a number of 4* ceramic tiles to engrave, but they have become a parallel standoff from the front and provide a convenient right angle on the side if needed. Then the strong magnets provide several other fixed locations that tightly define the location of the work. As long as the GFUI or Glowforge don’t crash or otherwise go strange on me I can remove and replace at will.


 I knew