That is so awesome, thank you so much. I was literally about whether the colors derived the order of operations yesterday.
These instructions will work for Linux as well. The one change will be the part after “cat >”. For my version of Ubuntu, “cat > ~/.config/inkscape/pallettes/GFPallette.gpl” should work.
Open Inkscape and press “shift + ctrl + p” and see where “user config:” points to and add “/pallettes/GFPallette.gpl” after that. BTW, “The ~ (tilde character) shorthand command refers to that particular user’s home directory.” -source: Wikipedia
Or, use any of the kajillion Linux editors that can save plain text files.
3 Likes
I just wanted to bump this thread up to the top now that people are taking their deliveries.
This is good info for streamlining artwork into the GFUI and didn’t want it being forgotten!
5 Likes
Thank you. I was getting ready to go looking for this again
2 Likes
Yes, this is a very helpful and important concept for everyone. It works on engraving, cutting and scoring. So each object in your design with a different color gets imported into the GFUI as its own separate operation. So a red filled square and a blue filled square will be different operations that you set for different engraving settings. A red outlined square and a blue outlined square with appear as different operations for cutting. I’ve noted that some folks are still grappling with this concept.
5 Likes
I made an updated Affinity Designer color palette that doesn’t require you to dive into the application package contents and doesn’t require administrative privileges. I also assume this would work on Windows.Glowforge.afpalette.zip (1.0 KB)
See the image below for where in import the Glowforge.afpalette file. The button is a little small, but you want the small menu button to the right of the brushes tab.
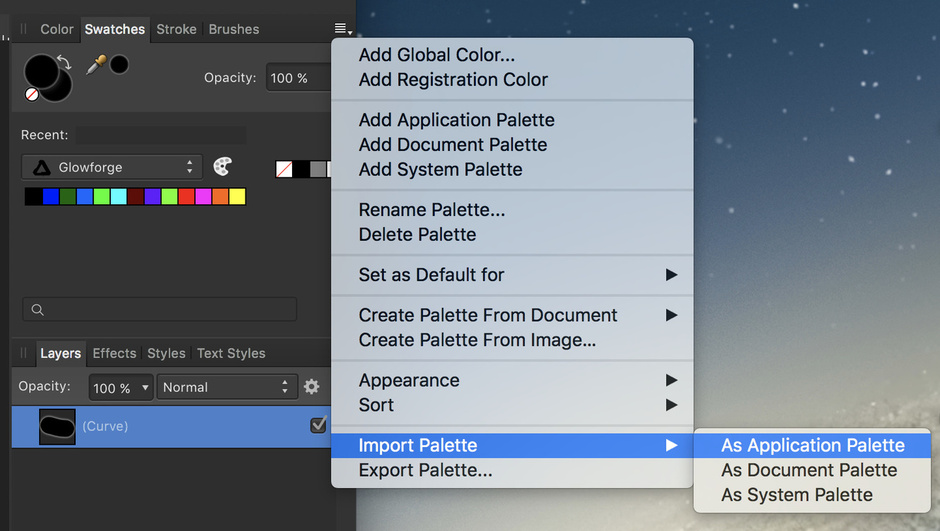
Also, if you import it as a System Palette, it works across your Mac in other applications as well.
34 Likes
Nice and thank you!
I have got to get back to playing with Affinity Designer and do your palette import.
1 Like
That’s going to be great for the AD users to have, thanks for sharing it! 
1 Like
xoxoxo
this has saved such a head ache
3 Likes
Thanks for figuring this out! I had bookmarked this awhile ago and just found the need to add it to my Inkscape on Windows 10. For anyone else using Windows, I couldn’t save directly into the directory, but could move it in after I had made the file. I found my paletes folder here: This PC > Local Disk(C:) > Program Files > Inkscape > share > palettes OR C:\Program Files\Inkscape\share\palettes if you don’t want to click through;p
3 Likes
I was laboriously making up an AF Palette when I came across yours. Thanks!
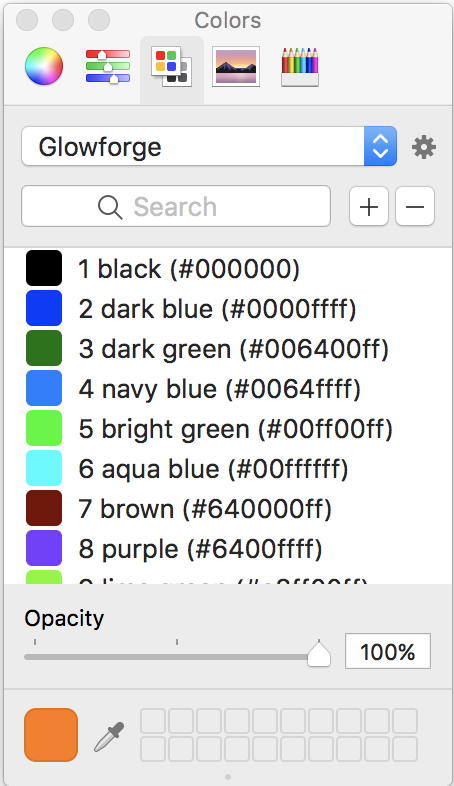
I noticed that you fixed the error in the original post and echoed in the earlier CSV Affinity Designer palette, for Orange (12). Should be #ff6400 and not #64ff00. I haven’t checked the other contributed versions, but you will want to make sure that the second to last color actually looks orange.
2 Likes
Thanks for pointing that out. It’s been sitting there long enough. The RGB was good but the hex not.
I’ll fix it now.
1 Like
So I just started up the Glowforge last night and I noticed something I’d like to change. In cutting out the plaque, it cut the perimeter, and then the little triangles. But they are all grouped into one “Cut” feature. What determines that order? And is there a way to fix that? Or is that just how things are when you get them from the catalog?
The line color defines the order. So in from-scratch designs it’s a general practice to cut from inside out & use different colors so you can do that in case something moves (air assist pushes it, slight warp causes a drop, etc). GF has said they don’t see any real difference in cutting order so their designs have single colored line cuts. The actual processing path/order within a color is determined by the cloud software and is a proprietary algorithm it seems.
To fix it, you’d need to replicate the design in your design software - either trace or draw. Then you’d have full control.
2 Likes
Dang! I was hoping to have one cutting feature control multiple different color lines but then have the color mean the order in which they are cut automatically! But instead, it looks like from earlier in this post, color only means the order things are loaded in the software.
2 Likes
Color determines the default order in the glowforge app, and the order in the glowforge app is the production order. So you can control the order by using color in your design program, and when you load into the glowforge app, that order will be recognized.
However the glowforge app is also flexible, it gives the option of manually re-ordering things if needed.
2 Likes
You can also move each different color in relation to one another within a single design (or move multiple colors at one time).
This is quite handy for those rare times when you decide you do not like how something looks and have enough scrap to play around with some alternative arrangements. Or when doing batch work on scrap material (design in simple grid, bump and shift around holes)
1 Like
Thank you VERY much for this quick workaround. I was trying to add the one that @mpipes provided but could not seem to find the right paths to the folders. This one worked great, and I will appreciate using it.
2 Likes
@marmak3261 Thank you so much for working through this for Inkscape.
Finally took care of adding it to pallettes this morning, and bringing it up within Inkscape.
Time for someone to get serious here, and prepare projects for the arrival of our Glowforge.
3 Likes
When I loaded that swatches file into Illustrator CS6, I only got 13 of the 26 colors. Any thoughts ? I am currently in the process of placing a screen cap of the swatch pallette that @markmak3261 posted and recreating and adding the colors that are missing.
On a side note do we know how many steps that the GF App can handle before it chokes and errors out?
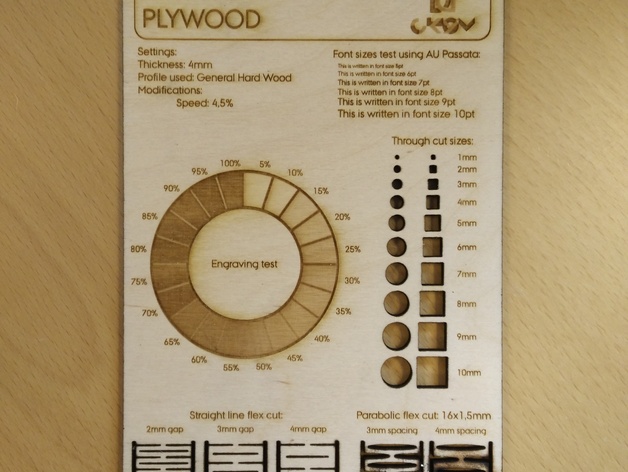
This is what I’m trying to program. The circular engraving test alone will use 20 different steps.
As I understand it since we cannot save settings, that it would be more effective to create high res raster PDF instead of an SVG (with grayscale to test engraving darkness). Because I want to cut a test swatch across all my supplies, as well as use it as a quality control reference for cut quality assessment. (I don’t want to waste my life setting each operation manually every time I want to run a calibration / QC check).
14 Likes