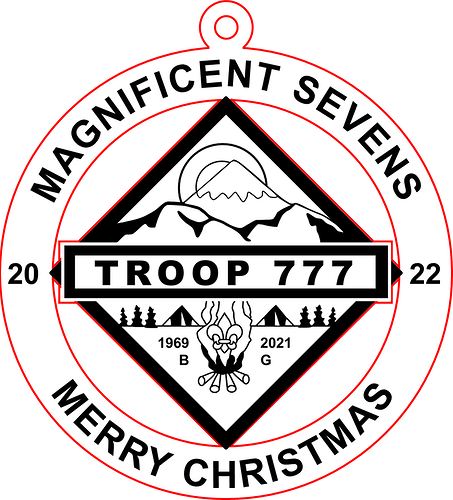
I have searched for an answer to this in this forum, read the material suggested and still have not found an answer. This is the first time this has occurred.
I have a file, in both PDF and PNG formats. I used the color black to denote the engraving and red for the cuts. When I import either file into GFUI, I see only one step, engrave. I have other files that are very similar and they create the desired steps w/o issue.
I have also imported both files into Inkscape and saved as SVGs, but still get Engrave as the only option/step.
Any ideas how to overcome this?
Thanks,
Eric
Your “red” outline is also a bitmap. It needs to be a vector to be able to cut.
How do I convert the red line to a vector, or for that matter the whole thing? I thought that by using the PDF format that would have been handled.
At the heart of all imagery there are two incompatible ideas. One is a vector that goes from one point to another and is the same at any scale but is limited to the amount of detail. The other is an array of squares as pixels, each pixel has a color but no real relationship to others so the detail can be anything limited only to the number of pixels. This is also called a raster. A PDF and SVG have both rasters and vectors.
When engraving the machine can read each pixel in a raster and adjust the power to match but following a bunch of pixels of the same color to cut a line, not so much, for that it needs vectors. Some programs like Gimp and Inkscape can follow those pixels of similar colors and create those vectors but they have to be there for any cutting.
What would be the best or easiest way to achieve the desired file? Remove the “red” from the PNG and import the now modified PNG into Inkscape and add the vectors for the cut?
I tried using Inkscape to convert the PNG to an SVG but that still produced an engrave only image in the GFUI.
An SVG can contain both vector drawings and bitmaps (aka raster images). Converting a PNG to an SVG just gave you an SVG that contains a bitmap.
If you don’t have a vector representation of the drawing then you’ll need to use software that can “trace” the bitmap to generate a vector representation, I believe Inkscape has a trace feature, but I don’t use Inkscape so someone else will have to tell you how to do that.
Alternatively you can manually trace the bitmap using the pen tool.
The color will not turn raster into vectors. I use Gimp to create masks by the many methods available. Those are able to be turned into what Gimp calls paths. The paths are able to be exported as an svg as vectors only, but in inkscape the raster can added. Each vector needs to be unioned to itself to clean up some data.
And to spell it out for Eric’s benefit, it needs to be a vector line, AKA stroke. A filled vector shape will also engrave.
It depends on the nature of the file.
There are bitmap to vector tools, Inkscape has one, but it isn’t very good unless the bitmap is very high quality.
It may be better to recreate the cut shape with vector art tools. That’s fine for a simple shape, but this could of course be difficult if the shape is intricate.
I was thinking of recreating the cut shapes, however I’m not sure how to do it. Do I need to create a new layer and add the cut shapes to the new layer? I realize this may be beyond the scope of this forum and if so, please let me know so I’m not cluttering up things or unnecessarily using other peoples time.
Most of the engraving I’ve done has been by using PDFs or PNG files created with Word and GIMP. If anything was to be cut it was either setup in the file I got or I cut it.
Mixing rasters with vectors from scratch is new to me.
Before I forget, I want to thank all of you for responding!
Maybe I’m misunderstanding but a filled vector will also give you the option to cut. I use them all the time.
… and unfilled vector elements will engrave as well. That’s all I ever use.
True!

That is probably the way to go. But since you already have a raster image with combined black (engrave) and red (desired cut) art I guess you need to get the red out of the existing art, too.
The best way to proceed does depend on your starting point, and the software you know. If you can share the image or even part of it we may be able to give you more detailed advice.
IMHO this topic is fair game for this forum.
Thank you! Since I was on a deadline I asked someone I know who is a bit more familiar with Inkscape and she was able to convert the red to vectors. She also sent me the directions she followed. What she gave me was an svg that had 5 layers, 1 image, 1 image (raster of the cut I wanted) and 3 layers of the cuts I wanted. Imagine the fireworks when I ran it. Went into Inkscape and displayed the layers and removed the extraneous ones and now I have what I need without burning down the house!
Original art:
Bottom line for me is that I need to take the time to learn the tools to get what I need. I already knew most of what was shared here, however it’s the details like once you think you have a vector how to save the file so you have the vectors…
Again, thank you all for your input. I learned something new and had other knowledge reinforced. A good day all in all!
Just looking at the image you provided, I can see that depending on how the red vectors were set up, you might end up with extra cut lines. I’m glad you got it sorted out.
Once you get a little more practice a chore like this will be no big deal at all. It’s very rewarding.
Inkscape is a good tool to learn, because it is free. Many of us here also use the Affinity apps from Serif.
If you are familiar with Gimp I would definitely use that. What Gimp calls a Path is the vector you are looking for. Exporting it properly as an SVG is somewhat trickier but the ability to make any mask a path gives it much more power than In inkscape.
One last piece of advice. If you have Glowforge Premium, you could have created that tag design in the Glowforge interface. Here’s a link to the Glowforge tutorial on that (the part of interest is where they add a little hole then create an outline).
Personally I prefer to do it with a graphics program as others have showed you here. Just wanted you to be aware of this as an option.
Thanks! I have premium and am taking small steps in the sense that I’m not on the machine all the time so when I do get on it I take a look and try different things, but, I never seem to have enough time to fully investigate and “master” much. I’ll keep that “trick” in mind next time!
I have tried that and wound being so frustrated, mainly because the documentation I found was not kept current, i.e., menu options had changed, presumably steps were changed as well and then the saving it correctly. More time spent on it will make it easier in the long run.
I am using two screens and for Gimp and Inkscape. They can make a huge difference as all the floating windows can be located there while the first window is your working surface, and many times you can see what is happening as they change while you work. Where they put stuff changes much more than the processes. A double screen will do more than going half blind trying to think of which one should be in your face,
This topic was automatically closed 30 days after the last reply. New replies are no longer allowed.
