I have no idea how this happening or if it’s been an issue the entire time. I’ve had my basic unit for about 6 weeks now and have some really great success cutting and making product…but I am getting a little annoyed at this particular issue I am having lately.
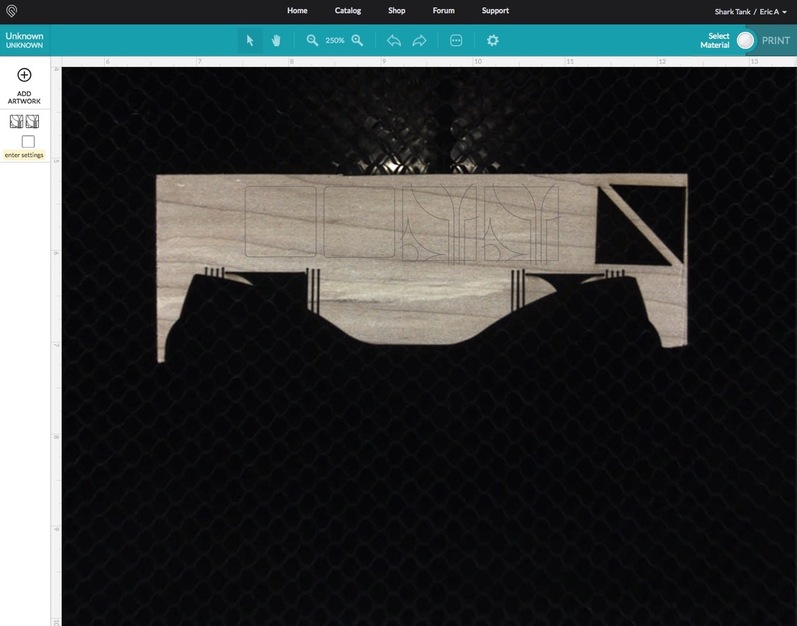
I have tried to position my material under the camera to avoid fisheye warping and place my design in line with the material. It seems to cut ‘larger’ on the left side than the right but the final product is correct. Maybe the design is being displayed smaller than it should?
Here are some screen shots of before the cut, then after the cut. This is from a fresh reboot of the machine and a very tightly controlled file. I’ve checked if there was debris under the bed, under the lid and in the channels of the front drop down front panel. HELP!!
No, they are exactly what they should be dimensionally, what I am annoyed about is the positioning and representation of the vector work on screen vs the final position of the cuts.
Gotcha. There are lots of threads in this forum already about this issue (including my own). Not saying you shouldn’t post your issue too (I think you should for GF to know how prevalent this is), just curious if you’re seeing something different than those other posts?
I’ve read about the shifting camera preview post cut but this is hard to anticipate when my materials are super expensive (rare wood veneers). It’s extra problematic when I try to gang up cuts with different scraps to increase material usage.
You’ll find that each Glowforge has it’s unique imaging profile. So your results, for example, will likely be different from mine, which will me different from @csader’s and so on. The differences may be slight or significant. Looking at your results above it appears you’re within spec. That’s not to say it’s not annoying. It is! But it doesn’t look like anything is wrong with your unit. Just a guess, but you’ll probably get a pasted response from Support saying “…we’re making improvements to accuracy…” And they are. I’m not saying it’s a cop out or something. They really are working on it. I’m just saying that if you’re worried, you probably don’t need to. It looks okay from here.
You can find tips on how to compensate for your specific imaging profile throughout the forum. (I’m sure somebody will post a link or two.) Should help you out while Glowforge gets accuracy… accurate.
Yah, I figured it would be the case. Just posting to show that it’s likely a common problem among other units. It seems to be a lateral shift only, not vertical. Just a shift to the left and not the right. I guess I can just push my graphics towards the right side to avoid this issue.
For a point of reference, how do you do ‘critical placement’ when there is no edges to justify the work? I’ve used many other Universal and Epilog systems before and their beds have edges.
Perhaps it has been mentioned before, but where alignment is critically important, I set the job up completely, then run it on scrap cardboard to see exactly where it will land on the material on the bed in order to do the actual job on the material I am intending to use.
I’m guessing it’s not going to be that simple. Try a small test on crap material in each corner of your bed. That’ll show you the differences you can expect throughout the bed. You’ll likely find a variance in Y as well as X.
I could probably run it at 1/100 power to get a preview of where it runs. I kind of wish there was a red dot ‘dry run’ feature like on the Epilogs do when you have the lid up.
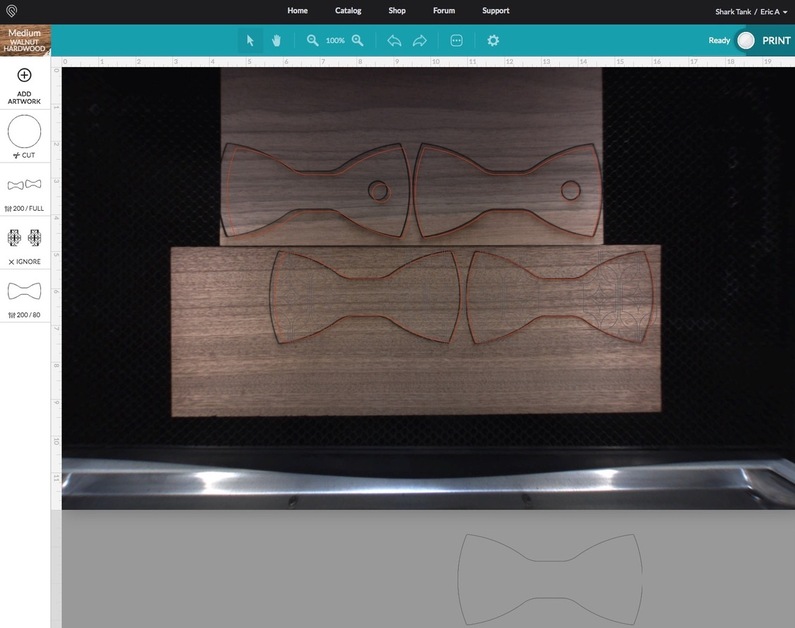
it looks like you are manually selecting proofgrade material settings. Are these scraps of proofgrade material?
I can’t really tell from the pictures, do there have masking on them?
if these are not masked proofgrade, have you measured their thickness and entered that into the manual settings?
I noticed on the first one that the material was not yet selected.
what browser are you using?
If the Glowforge thinks the material is thinner than it actually is, it will display the material larger on screen than it really is. Being in the center lessens that distortion, but does not eliminate it.
Also, Safari is known to have issues when scaling.
They are not proofgrade materials and I have measured them with a digital caliper (.065"), I don’t have masking on them since the bits would be very small in the end and they will be combined with other woods for inlays on work, the masking would be a pain!
I had cut this pattern before and I wanted to test it to show so I hadn’t selected materials before the cut.
If you did not enter the 0.065" measurement in the Unknown Materials box at the top of the thumbnail column your lid camera was focused incorrectly, and that can introduce errors (big ones) in the pink Placement Preview.
That might be what you are seeing. Make sure you enter the correct material thickness for anything other than Proofgrade materials with a sticker.
I make sure in the actual cut settings, I often will select walnut/maple veneer to see what GF has recommended and the adjust my settings to suit the woods I am cutting.
My complete SWAG (scientific wild-ass guess) on this is that there is a disparity in material thickness causing at least part of the issue. I suspect that if you have not selected a material, that the thickness defaults to 0. Proofgrade veneer, masked, measures 0.0385.
The material thickness (not the focus height for an operation) must be accurately specified to get a correctly-sized image of the material.
Also, even if you enter the correct thickness, any little bit of debris on or under the crumb tray, or if it’s not sitting perfectly flat in its grooves, can cause alignment issues. The camera dewarping is very sensitive to height, and height is measured from where the top of the crumb tray is supposed to be.