Chuckle! It actually does do it …scared the crap out of me the first time it happened.
Why are you defocusing the engrave? Is it to make it cut less deeply? There are other ways to do that with some of the other parameters besides the focal point height.
Well, it sounds like you are trying to use too strong a setting if you are getting a lot of char with the engrave - you can take the power down on your engraves, or even more effective, reduce the LPI value.
What happens with the LPI (Lines per inch) is that the higher values cause the beam to travel in shorter steps, so it’s continually burning over an area that was already engraved. That makes a lot of mess.
Any LPI value over 195 or so is reburning an area that it has already travelled over. So just set the LPI to 195. You get full coverage, and only one pass over the area. (You can go lower, but below about 170, you are going to start to see gaps in the coverage. That can make a nice effect if you want something banded or are in a hurry to test a design.)
Usually with 195 LPI, you’ll get a medium toned caramel colored engrave with very little char in the engrave. Or you can reduce the power, or increase the speed. (You’ll want to run a few tests for that, see which one you like best, then save the settings in your custom settings for that material.)
oh, by clean I mean more of a smooth engrave. like I hate when its all jagged and you can see lots of lines. Im also not looking for a deep engrave either. Thse settings work perfectly for me if only it didnt cut offcenter
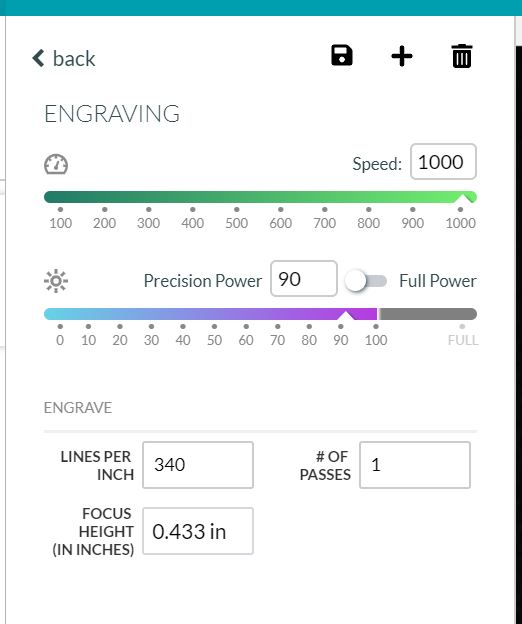
Okay, I’m not being clear - are you putting the 0.433 in on that screen, or are you entering the number up under the Unknown Materials slot at the top?
If you enter it in that screen for the engrave, it will override other values. But what you need to do is enter 0.433 into that screen for the Engrave, and then go into the Cut operation and enter 0.125 for the focal height for the Cut. Then run both operations at the same time.
Im putting the .433 in the engrave settings and then using my medium acylic as the material. For the cut setting its on proofgrade. But I will try your suggestion and use my own cut operation
The theory is, if you enter your material thickness at the top (.125), then only put .433 in for the engrave operations, it should not “offset” those engrave operations.
It sounds like you’re doing just that, and it IS moving the engrave operations.
That doesn’t look like medium acrylic in your first post. If you are using a different material, yes, the value that gets loaded automatically for you into the focal point slots is going to be wrong, and the results are going to be skewed.
If you want more information as to why this happens, there is a brief summary here:
The one thing that always overrides the auto-values is to input the information yourself into the individual operation thumbnails. So for the sake of testing it to see if that is actually your problem, just test it once by entering the values yourself. (And use the actual thickness value for whatever material you are testing on.)
Well, in that case, I don’t have any other suggestions. Were you ever able to get it to align correctly? (Like maybe when using all of the default suggested settings, including not defocusing the engrave?)
Wait…I didn’t see this mentioned above…when was the last time you cleaned the lenses, windows and mirror?
Previously it did align correctly. Its only recently that ive been having this problem. And not yet. where are the lenses and mirror located? How would cleaning the window help?
Any buildup on the lenses can cause the beam to be deflected. The link I showed here is the cleaning and maintenance information, and it shows where all the lenses and mirror are, and shows how to clean them.
You’ll want to follow those steps periodically to keep the lenses clean…about every 40 hours of cutting time is recommended.
Thanks for all the help folks! In order to investigate this more, @moldparadise I have a few troubleshooting steps we would like you to try:
Turn off your Glowforge.
Check for small pieces of debris or dust.
Check the lower door to make sure it closes all the way. It may require some force to open, but open it, wipe any dust off the edges, and close it all the way.
Remove the tray and clean any dust or debris from the surface underneath. Pay careful attention to remove all debris from the four dimples where the tray rests.
Check the lid to make sure it closes all the way. Small particles of material, such as dust or debris, can prevent it from closing completely.
Check the surface your Glowforge is on to make sure it’s flat. Ensure it is not twisted slightly and that there is no debris propping up one side of the machine.
Turn your Glowforge back on.
We included an extra piece of Proofgrade Draftboard with your materials shipment for troubleshooting. Place the Proofgrade Draftboard in the center of the bed and print the Gift of Good Measure using the default settings.
When the print finishes, leave the lid closed and wait until the fans stop and the picture updates.
Please let us know once you’ve had a chance to run this test print. We will take a look and follow up with your next steps.
Thank you for letting us know that the trouble is persisting. Unfortunately, it looks like your unit is experiencing an issue that we can’t resolve remotely. I want you to have a reliable unit, so I’m recommending we replace this one. I’m closing this thread and I’ll be in touch via email soon to sort out the details. I’m so sorry about the bad news.