Dalek Marquetry - Laser (not) Made

Hello wonderful people!

I started out with several ideas for projects. One of the ones I was most excited about was making nerdy marquetry. I felt I might want to test out some of my project ideas at a local maker space before taking delivery of my Glowforge.

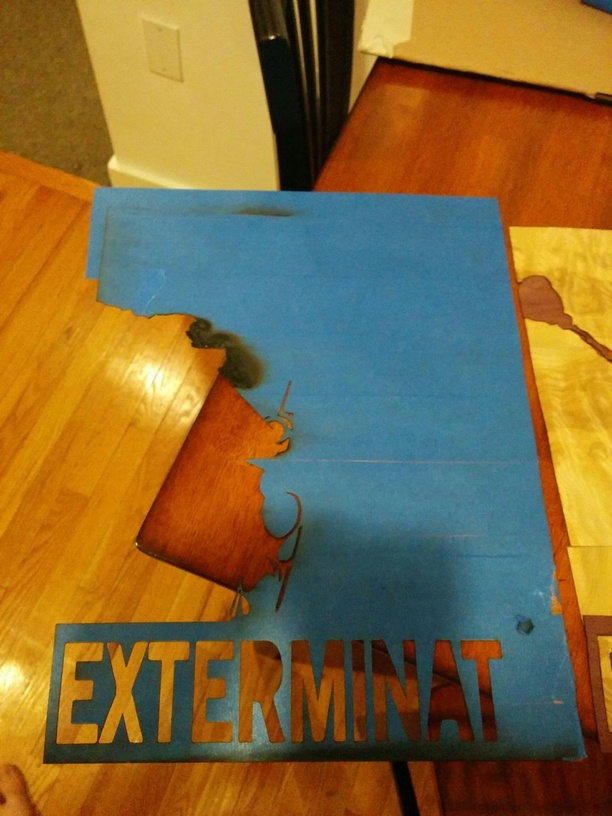
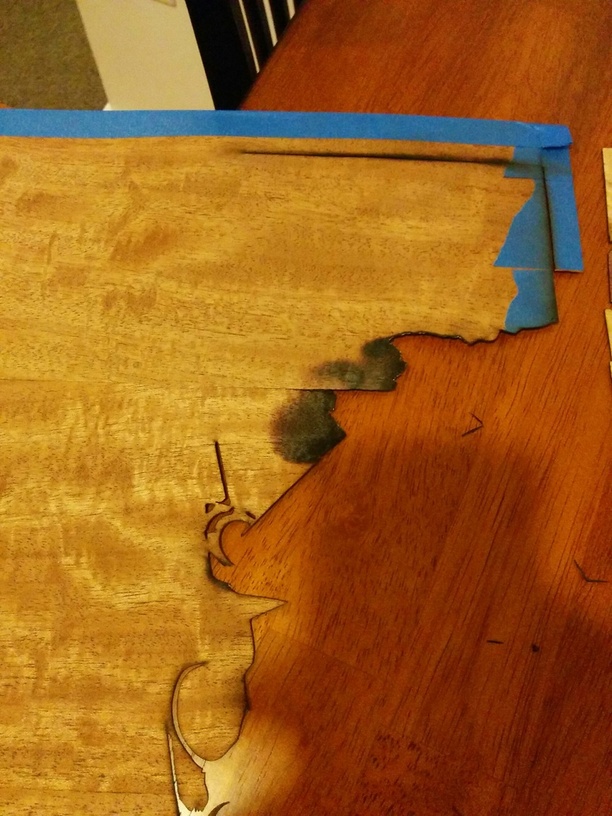
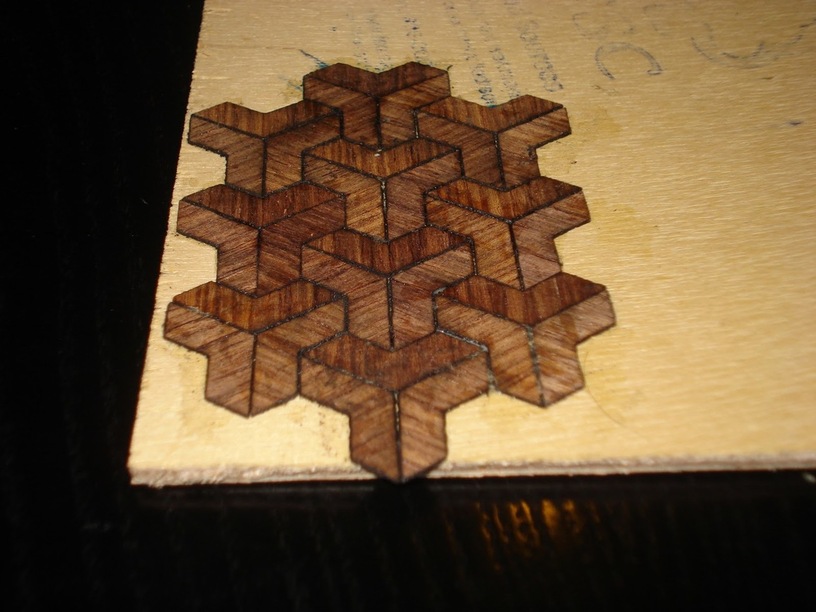
First project didn’t go so well :-/. Here’s as far as I got:

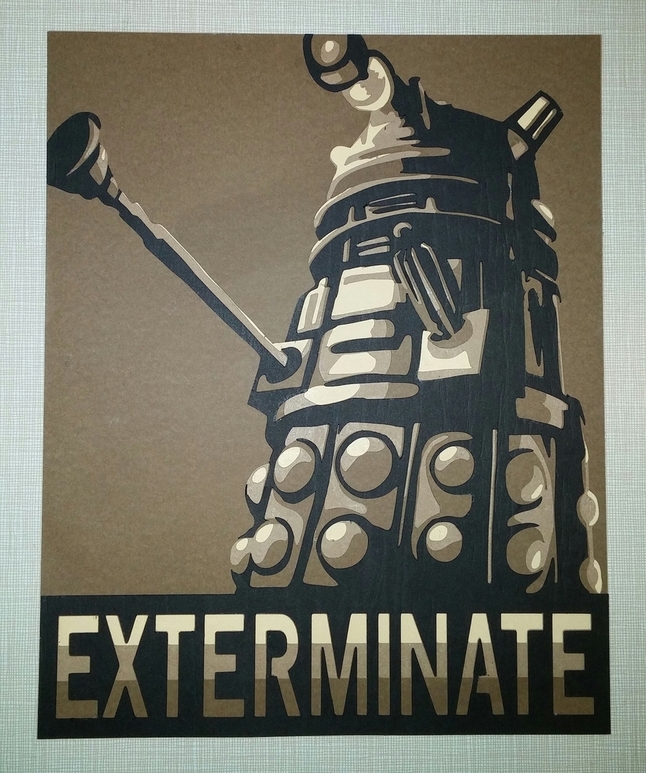
The original idea was to take this cut file and cut into 4 pieces of different 1/32" veneers (purple heart, maple burl, makore, spanish cedar), then arrange and glue them to make an interesting piece of Who-vian woodwork.

I knew I had been defeated long before I started assembling. The tech at the maker space didn’t know if this was going to be possible, but was willing to try.

The purple heart cut relatively well (not well enough), the maple burl was slightly worse, the makore caught fire several times resulting in emergency stops, the spanish cedar was not attempted.

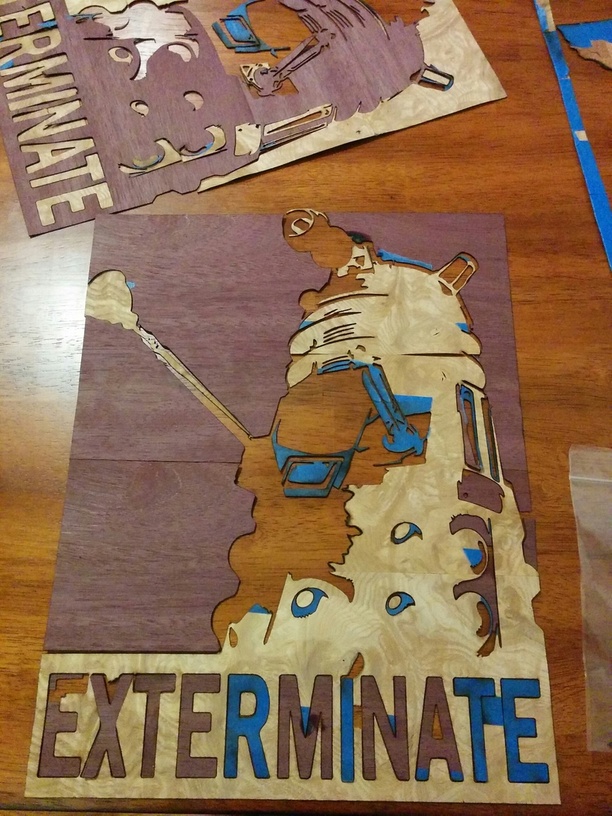
So, I decided to see how far I could’ve gotten had the cut project worked. Me and a REALLY AWESOME friend started working on the puzzle from hell, while contemplating “I’ve made a huge mistake” memes.

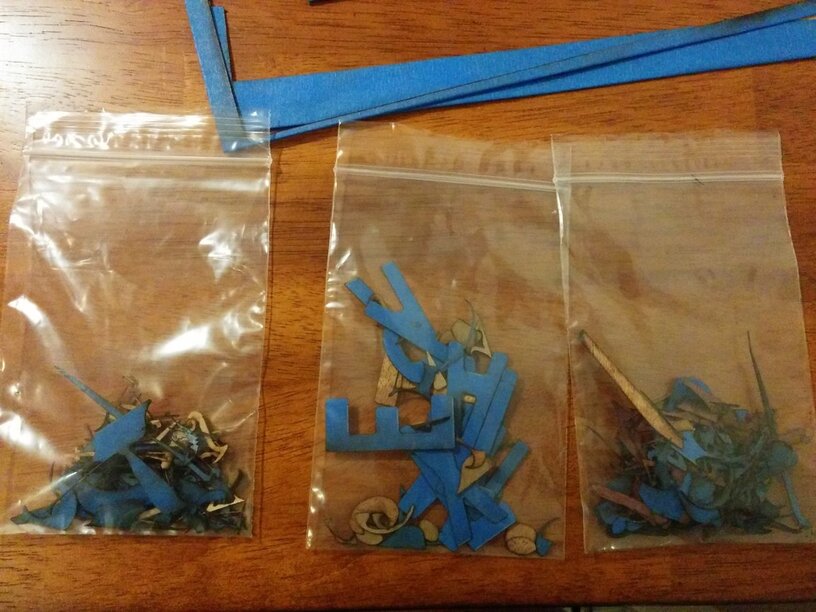
Thinking back, I had not anticipated the reality of what I’d been asking for, which was, in fact, several baggies of incredibly fragile precision cut toothpicks. Several of the smaller pieces had been lost to kerf, the ventilation system, and small fires consuming surrounding material. We lost more pieces to the masking tape gods, and the fragility of the pieces.

I’ve got several hypotheses about the (numerous) ways in which I went wrong, but I’d like to hear from people that have done anything remotely like this the ways in which they think I went wrong.

  1. Was this project feasible if I’d made small production changes (choice of materials, laser power, something else)?
  2. Is a simplified and scaled down project feasible?
  3. If so, what simplifications are the most important (number of woods, detail of cut)?
  4. What’s the smallest dimensions of a piece of veneer that are reasonable to work with?
  5. Are Daleks awesome? (Hint: yes they are)

DFTBA – Andrew :smile:

6 Likes

With my limited experience with lasers but knowedge of making stack type projects like this on a larger scale I think this would have been a fantastic example of what you could do with the glowforge. I would probably just engraved the fine details on the top piece then used a bigger piece for underneath for the drop shadow and outer shape of the dalek and then lastly a backdrop to mount everything onto. I have been enthusiastic about project like this in the past and while you do want to get every detail sometimes less is more. I have gotten way too intricate with some small details and in the end they made no difference on the final look of a much simpler design and actually ended up being a more reliable and durable product in the end. The more parts you have the more there is to fail. I also try to stick to a simple design rule that I learned a long time ago and that is you generally do not want to have any more than 3 contrasting materials on a work space. More than that and it usually becomes confusing to the eye and mind of people admiring the work. Don’t know if this answered your questions or not but I thought I’d share. I love the project you’re doing and good job on giving it a go. You are way more ambitious than me.

1 Like

@drew_matteson, welcome. We have been waiting for folks like you. What a great splash in joining the forum. Your username hasn’t even been indexed yet and you give us a great project. Bravo.

1 Like

Thanks!

@autumnleedavis, if I understand you correctly, you’d use a thicker piece of ply as the backdrop. Into the backdrop you’d engrave the space for the outline. In the outline, you’d use two different woods to set off detail. After getting all that assembled, you’d engrave markings for the small details. Did I get that right?

Great idea. Not sure what could stop the fires, but here’s an idea on how to wrangle the pieces. After you cut them, leave them in the bed and apply another layer of masking material to pull them out and keep them in place for much easier assembly. I use it for vinyl projects all the time. I get paper “application tape” at Sign Warehouse http://www.signwarehouse.com/c/perfect-tear. It’s a paper tape, similar to making tape, but available in all kinds of widths. I do need to do a little research on the glue, but being that it is very similar to masking tape, I’m hoping it will be laser safe. I’d say don’t press it down to tightly, especially if on wood, but I’m thinking of using it for all projects that require piecing together after cutting. I’m hoping the kerf won’t even be too bad for acrylic. Maybe even trying inlays with multi colored acrylic and heating them just enough to see if they fuse?

I’m going back about 8 years since I was taught marquetry, but I think a technique I was taught then, and with a feature of the GF, we can combine old with new tech. In classic marquetry production you sandwich the two pieces together and cut them at the same time. This is so the kerf is exact and the two pieces match exactly. You would also cut at an angle(11 degrees if I remember). Now I know that lasers are super precise, but maybe, and just playing with ideas, we can try something with the old technique.

(the below is someone who works with wood and CNC machines, NOT LASERS! So just spit balling, call me out on bad ideas please)

1 - cut our your first piece completely
2 - flip over and have the second colour underneath it
3 - use the GF software alignment to cut exactly where you left off, and only cut what you need for the second colour
4 - use @bill_laba idea on the sticky paper, and then glue your work together
5 - flip over again, and do your third, with third piece behind the combined piece
6 - repeat 4

the reason for the flipping is that I am hoping to make up for the angle on the laser. Now I know that the GF is suppose to be better at that, but if it is mild, it will help to draw the pieces together.

Again just spit balling, no laser knowledge. As for the fires, I hope the users with laser experience can answer that for all of us, because I planned Marquetry as well.

You are correct. I’m not saying that is the way it should be done or anything just looking at the project from a different perspective and the things I have done in the past and my many failures that’s the way I would attempt this amazingly intricate piece.

I don’t know a single thing about lasers or CNC routers or wood, but I make stuff like this all the time out of paper. My advice, with regards to the design, is to utilize layers and negative space, so you don’t have to deal with any small pieces. Small pieces are annoying because they got lost and damaged and are hard to align properly and are generally a giant pain. But a big piece with a lot of small cutouts in it is just as easy to deal with as a solid big piece. And the end result can still look as complex as if you dealt with all those tiny pieces.

I don’t know if that makes any sense at all; I took night time cold medicine about an hour ago so I expect not. If you don’t mind, I can make a paper version of your design to show you what I mean. And I’ll attach the file and stuff too so you can play around with it.

1 Like

We laser-cut veneers all the time. Burning means using too much power (or too slow of a speed, which amounts to the same thing). This could be because they just steered you wrong, but it’s also because if you have a high power tube (like 100W) then you just can’t turn it down very low without it turning off. It might have just been unable to handle the delicate material.

@Tony could show you some really amazing Glowforge veneer work…

4 Likes

Higher power laser cutters tend to have bigger motors and can move faster so it’s still possible to cut veneers without them burning. But it is tricky and you do tend to operate in the lower regions of power.
It’s definitely worth doing test cuts first to make sure you’ve got the right speed and power for each flavour of wood.

Also playing with the grain really makes a difference, this piece was done with 1 type of veneer but makes 3 very different colours. Veneer inlay test

2 Likes

Thanks @m_raynsford, I love what’s going on with that grain!

@dan, I’m really looking forward to playing with this with the GF. I suspect I just need time to fiddle with how this is designed and executed, but in a way that doesn’t work with the “give it to the tech” model of making.

There is a whole lot of veneer based stuff on my blog, I love it, it’s a very versatile medium.
I particularly like the layered veneer stuff like the wings.
http://msraynsford.blogspot.co.uk/search/label/veneer

1 Like

It is easy to get to caught up in how cool the detail looks on a vector, and forget that the final size is way too small for said details to matter. If you try printing out your design, holding it at arm’s length, and squinting to defocus your eyes, you will get a great idea of which parts of the design are the most important, and which bits just fuzz together.
I had a boss who used to hand-paint billboards in New York. One of his favorite sayings, in terms of details (and errors) was “If you can’t see it from times square, it doesn’t matter”. Which is to say don’t worry about the details that no one will see.

You may have been over-ambitious for the scale you were working, but I think what you ended up with is still very cool, and clearly a Dalek.

@m_raynsford Thanks for the link. These are really nice examples of veneer projects. I look forward to learning the techniques for creating some of these.

Thanks @m_raynsford! That’s awesome. I love how you handle leaves and feathers.

Okay, so I’ve been playing around with your design for a while. This is what I ended up with – had to take a lot of artistic license because the line art you posted got confusing when I started breaking it down into layers and colors.

It’s 4 layers, if that makes sense. 3 that are 8 by 10 and then top black layer, which isn’t ideal. When you’re making something from scratch, you can avoid even having those delicate of pieces, but by the time I was really paying attention to things I was tired of it :blush: So, if you want to avoid that with your next design, you just make that layer one of the under layers, rather than the top. So, my SVG file for it goes from light to dark, but you tweak the order to be lightest, darkest, light medium, dark medium. Does that make sense? If not, I can work on it again and do it properly for real. I tried to upload the actual SVG, but it doesn’t seem to work. If anyone wants it and can tell me how to do it, I’d be happy to try again. But here’s a PNG of the layers so you can get the idea about what’s going on.

So, the last thing to keep in mind is that you’re working with a limited selection of colors and shades, right? You probably don’t have the freedom with wood colors that I have with paper. You want to be very sure you pick a range of values (a range of lights and darks) not just a range of colors. It doesn’t matter if they’re totally different colors or not, you need lights and darks to create an easily readable image. You can figure this out really easily by picking your 4 (or however many) colors and photographing them in black and white (or adjusting the saturation as low as possible). If all of the colors look the same, or almost the same, in black and white, then you don’t have a range of values. Eventually, you’ll be able to tell without photographing; squinting can help.

Here’s the same design with a range of colors and values. It’s still easy to see the picture.

But here’s the design with a range of colors that are almost the same value.

If you want to be trippy, I guess you could use that intentionally for an effect, but if you want a picture that is ‘readable’, it’s not a good way to go.

This is a really easy approach to cut out and assemble all the pieces. You can make a really detailed design without having to mess with anything small. It also makes the kerf kind of unimportant; the cutouts don’t need to fit tightly together. The downsides are that it’s not inlaid. It still creates a cool effect and a nice result, but if you’re going for that specific inlaid look it won’t work. It’s also not as efficient with your materials. Take the lightest shade in my design – it only shows up in a few places in the end result, but it’s an entire 8x10 piece of paper.

14 Likes

WOW. Just…WOW!!

@erin WOW!!! that’s super-fantasitc-awesome-amazing :grinning: !!!

I think I understand the process you’re suggesting (wish I’d thought of it a while ago). If I understand it correctly, then I’ll definitely be using it for putting together paper craft scenes. I’ll also revisit it when the GF arrives (beam time is a bit expensive at the local maker space).

Thank you so much. Seeing this as a feasible project has really energized me.

1 Like

I redesigned and simplified the art for this project trying to take in the advice of the forum.

  • Two woods
  • Significantly simplified
  • Few skinny pieces

The art I’m going to attempt to use is below. I’ll update this thread when I get the chance to cut these.

2 Likes

I first thought you were designing for a lithophane which I recently discovered thanks to @m_raynsford and his handy Instructable.
This would work for that.