Defocusing the Laser: HOW will it be controlled?

So I read a lot of topics of the different applications one will use with a defocused laser; however, I haven’t seen it be stated on how this will be accomplished and by what control we will have of it. My past experience with laser cutters is that you assign a color (say red) and red means you are going to vector cut at 100% power and at 50% speed and 1000Hz (if you lowered the Hz down to 10 and lowered your speed, you’d essentially get a dashed line from what otherwise would be a straight line in Illustrator/Inkscape or SVG/DXF file…I digress). I just made these numbers up…but those are the settings the laser would use every time it ran along a “red” line.

Now, for the defocused part, how fine of control do we think we’ll have and how would it be implemented. For instance, say I want to make a larger kerf along one line? Would I make that line special in someway? What would be the parameter value that I would enter (i.e. the focus depth from some known datum)? Or would it be a percentage from 0 to 1/2"? Will we be able to say focus at this depth for this engraving area, and another focus depth at another engraving area (say for instance I want to make puddles of acrylic on the surface and move them around with the laser beam to make a texture like ripples or wave for a pond in a model train setup)? Obviously you’d want to defocus it and one would have to play around with the values but I’m just curious to see how some of you (@jacobturner, @rpegg, and maybe @dan :slight_smile: would see this being implemented).

Or did I totally just miss a section that the search didn’t find for me?! In that case, point me to it and I apologize in advance!

7 Likes

I would really like to know how this will be done too, we have had a few conversations about it here but nothing specific like “you change this setting to do this on your glowforge” has been given in respects to defocusing (at least to my knowledge). My guess is they are still working on this.

I see this confusion a lot, and it is understandable, since most people have experience using someone else’s laser, or a cutting service.

There is no magical setting assigned by default to any particular color. You have control.

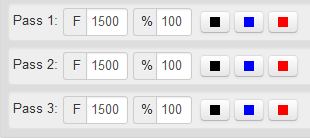
This is the interface on my laser. The image I have loaded has those 3 colors showing in the boxes as lines on the image. If I had more colors, it would show more boxes (and less if less). I choose the speed (F) and power (%) to assign, and select which colors I want to use on each pass. It shows 3 passes because I have 3 colors, if I wanted more I could add more (and cut one color multiple times or something). I can also assign multiple colors to one pass/setting.

The defocused laser is not yet implemented (last I heard). But it should show up in a similar aspect, as something you select when assigning power/speed.

Also… frequency is something in RF (radio frequency) lasers. The CO2 laser is a DC system, so we don’t have that setting.

Now… you CAN bake in permanent settings (the 1500/100 showing on each of my 3 passes in image is my default settings). You can include settings in the cut file itself, so that you do not have to remember them yourself. But ideally you save the file in a manner you remember what material to cut with (so filename says material type and thickness, or you have it in a folder for that material type/thickness).

What defocusing does for you, is just give you a larger kerf, and reduce your maximum possible power. So whenever you would want to hit a larger area… that is a defocused laser application. The lower power is a tradeoff you have to make, not what you are seeking, because you can just set a lower power, or run the laser faster over the surface for the same reduction in power applied. Defocusing is specifically about getting a larger kerf (area in which the laser is acting on the material… so kerf isn’t quite the right word, as that means area of material removed in a cut, and you are rarely aiming for a cut with a defocused plan… mostly due to the loss of max power meaning you cannot cut through much of anything anymore)

Since defocusing means larger kerf, if you WANTED to cut, at a specific kerf, you would need to specify exactly how far to defocus. So ideally they allow us to set not just a toggle for “Defocus? y/n” but rather a distance “Defocus? ___mm”

Then of course we would need a lookup table to tell us how large of a kerf to expect for each position out of focus. The focal depth is known, and in the FAQ… I cannot recall it at the moment, but I believe 70mm or so. And our range of motion around that should be 1.5" since that is our cutting depth, and we should be able to focus on thin sheets of paper, or large thick blocks. Though you want to focus in the middle of a thick block, so maybe we only have 0.75" of range.

Either way, you have to subtract your material thickness from the range of motion of the focal point, and that is your available defocusing range, and will determine your potential altered kerf.

If you design a laser system to plan for defocusing from the start as an application, you can use a lens which is concave instead of convex. Then everything is defocused, and you get more “play” in the application. But I haven’t heard of such a thing being done.

To pair with the greyscale engraving, I hope we can set the defocusing to be dynamic along any one line or gradient. Because then you can cut caligraphy (a line which changes in thickness as it moves) type of works. But again… that depends on how the team implements things when they design the feature.

5 Likes

Pretty sure I’m on the same page with you @jacobturner. I didn’t buy the laser for this feature but it just seemed like people were coming up with applications for something that I hadn’t fully understood as something we could control! Thanks for posting the picture, while different than the system I had used, I think it stills explains the point.

I am so glad you’re here. I didn’t have a clue about any of this stuff; When I purchased my GF, I just knew I could do something with all the graphic design stuff I know using Illustrator—You keep showing up on these threads and I’m seriously learning a lot from your expertise (as well as many others of you knowledgable people)!

Seriously—thank you.

3 Likes

Seconding that on @jacobturner’s expertise and generosity with his time on this forum. Thank you!

2 Likes

Im pretty sure some of the applications people have come up with for a defocussed laser is a lot more than just a larger kerf. They were talking about truly defocussing the laser so much it in fact is not really cutting or engraving at all but in fact heating, melting or burning/similar surface marking. Cooking bacon, melting/shrinking special plastic “Shrinky dinks”, bending acrylic and sintering etc.

I imagine you GF secs will aim to add a focal length(or adjusted focal length) as an advanced option to the colours of lines that you can customise. But I imagine this will be an advance feature with little to no support, so will require a bunch of trial and error with materials/applications.

The defocus gets you the larger kerf. The not really cutting is from lower power. Which you can obtain without the larger kerf by just moving faster and running at a lower power.

But, without also having the larger spot size (a better term since we are outside of cutting), doing things like cooking bacon would be rather annoying I imagine, since even though you are moving fast to reduce power, there are still limits to how fast the motors on the gantry can move, so it would take longer if you are cooking a smaller section of bacon at a given instant. As well as requiring a far more precisely tuned power setting to cook without burning.

But… if you can find that absolutely precise power and speed setting, and are willing to wait for a longer total time to raster the target area, you can do shrinkydinks and heating things without the defocusing.

The only defocused application I have seen so far which absolutely required defocusing was the multiple layer acrylic cut and heal. The healing method would be very hard to replicate without a variable spot size.

If the feature is put in, I could easily see a special section in the forums being requested, as a full sub-community emerges just to play with defocused applications. There is certainly a lot to play with there. I am still enjoying the idea of the caligraphy style variable line thickness.

It occurs to me that this concept of what defocusing really means can apply in reverse as well. If you are engraving a very large section of material at low power for shading, you can defocus for the larger spot size, bring power levels up, and complete the raster engrave faster. This would be an interesting feature to have available for people doing larger art pieces, but would need some experience to choose the modified power and spot size appropriately, and you will likely need to go back through and tough up around the edges, since a larger spot size means there will be some corners you cannot get in to.

1 Like

Awesome information as usual, @jacobturner, just wanted to clarify a couple of points about the actual numbers you used: The lens focal length is 50mm (straight from Dan ([quote=“dan, post:3, topic:1231”]
the focal length of the lens is 50mm
[/quote]), and the focus range is 1/2 inch.

1 Like

What many lasers include in their driver is an additional Z offset setting (z-axis). As @jacobturner mentioned, it’s not simply ON/OFF but instead it’s + or - X mm. So + 0.05mm could be a setting.
You’d think that if GF wanted to add this to the driver/app, it wouldn’t be a huge deal. However it might not be a feature that all users need and it also requires the users to really think about the material too as there’s a possibility that with enough Z offset you can plow the head into the material.

@Tony is thinking about this UI now. Related - this thread is really helpful because you’re talking about things you want to do with the software, so we can take those into account as we refine the design.

Being someone who is new to lasers, I would love for defocusing to be as automatic as possible based on the design that I am printing. On the other hand being able to override it in the software when selecting a specific line in my design will probably be something I get into once I have become familiar with the machine.

For what that’s worth… Just my two cents. :slightly_smiling:

Focusing will be automatic. Defocusing is going to start out purely experimental, so don’t worry about it too much.

Defocusing is low-priority, but I do like to toy with it.

Since I’m mostly having the laser draw for me so far, I like the ability to change my line width.

This week we put a chunk of wood that was too thick to get far from our laser at all. It ended up rendering the drawing in what looked like crayola.

Not what we were going for, but I can think of applications.

Caligraphy style varying width along a line remains my favorite concept for what to do with defocusing. And with variable power combined with the defocus (and a LOT of precise configuring the variables) you could even maintain constant depth/color.