TLDNR: This is less about the pencils I riffed off of @marmak3261 and more of a design execution issue I ran into with Corel Draw, Inkscape and the GFUI. If you’re not a Corel user it may not interest you much. No settings are discussed but I’ll drop a post in Beyond The Manual for the pencil engraves & foam board cuts. When I post those I’ll update this post.
I’m part of the local Makerspace and both the space and I will be hosting tables at the local MakerFaire in October. The space’s table will be general in nature highlighting all of the different groups and activities we support. My table will be focused on lasers and CNC. So I thought I’d make some lasered pencils riffing off @marmak3261’s Bay Area MakerFaire pencils.
So I took his template, modified it a bit and cut it out of foam board. I made the slots shorter to fit standard yellow #2 pencils with some room for longer ones but not as long as the pencils his jig is capable of handling. I also added a targeting reticle in the upper left corner of the board. That allows me to remove the jig and go back at a later date and still hit the pencils. This is critical because it’s hitting a 0.145" tall flat on each pencil. I use copies of the 20x12" artboard in Corel to also lay out the pencil engraves but just ignore the slot cuts when doing the engraves and change the targeting reticle to a light score.
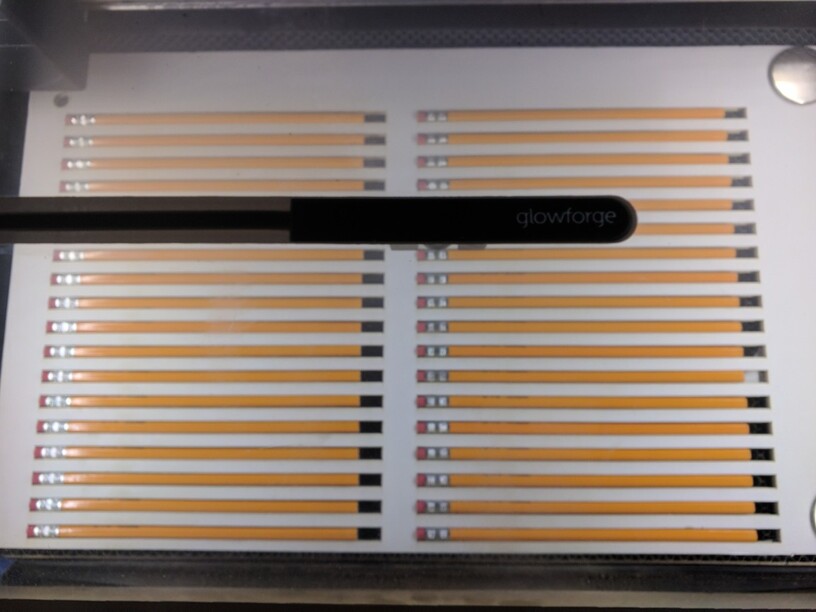
Using the jig file and a piece of 20x12x3/8" foam board I cut the slots and target. The GF can be adjusted to just cut the foam board. The cuts actually create a bowed kerf in the foam between the skins which helps the pencil to tuck in with a small push.
After removing the foam slots, I replaced the board and loaded 36 pencils. I also placed a couple of neodymium magnet discs in the corners to help make sure I didn’t disturb the jig when I placed or removed pencils.
Here it is loaded with pencils (Amazon Basics - about 10 cents each in bulk).
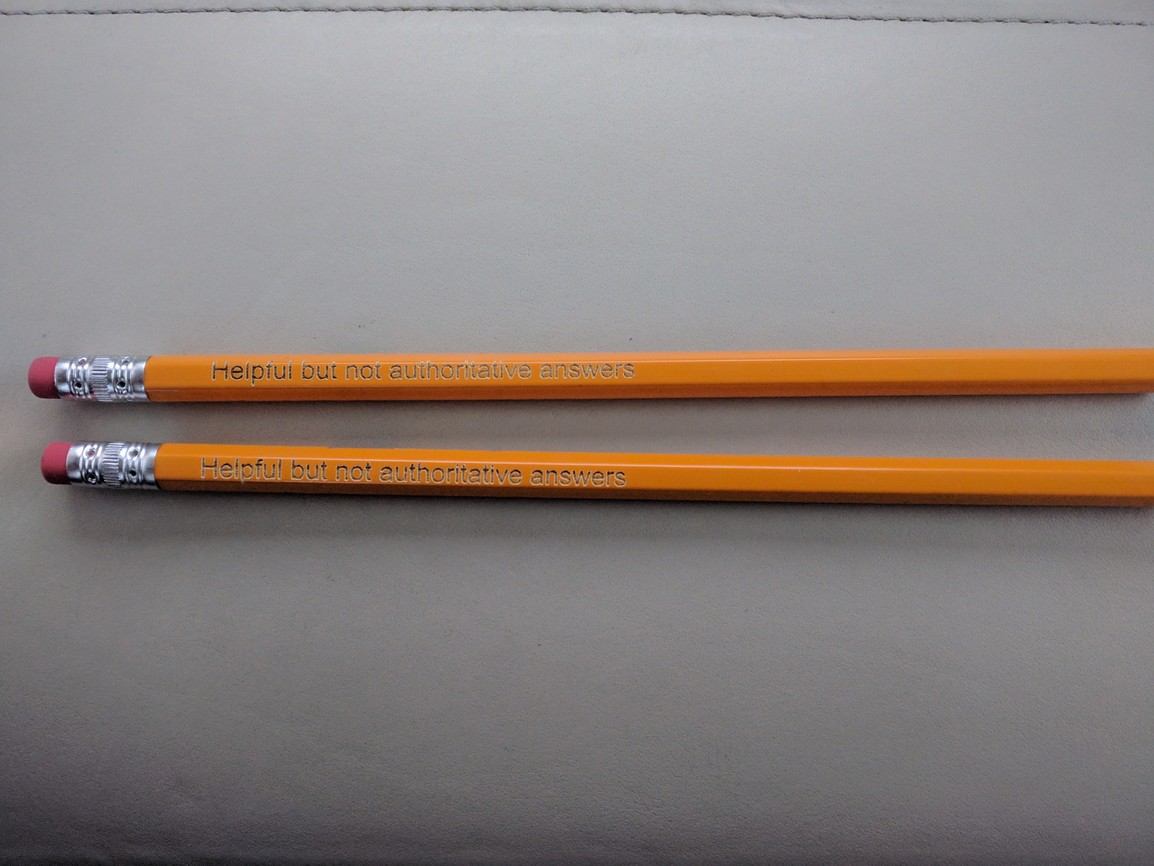
Since this is an homage to @marmak3261, here’s the resulting pencil engrave “Helpful but not authoritative answers” ![]()
The engraves take about 30 seconds per pencil or about 18 minutes per sheet. Pretty quick to do a 96 count pencil box.
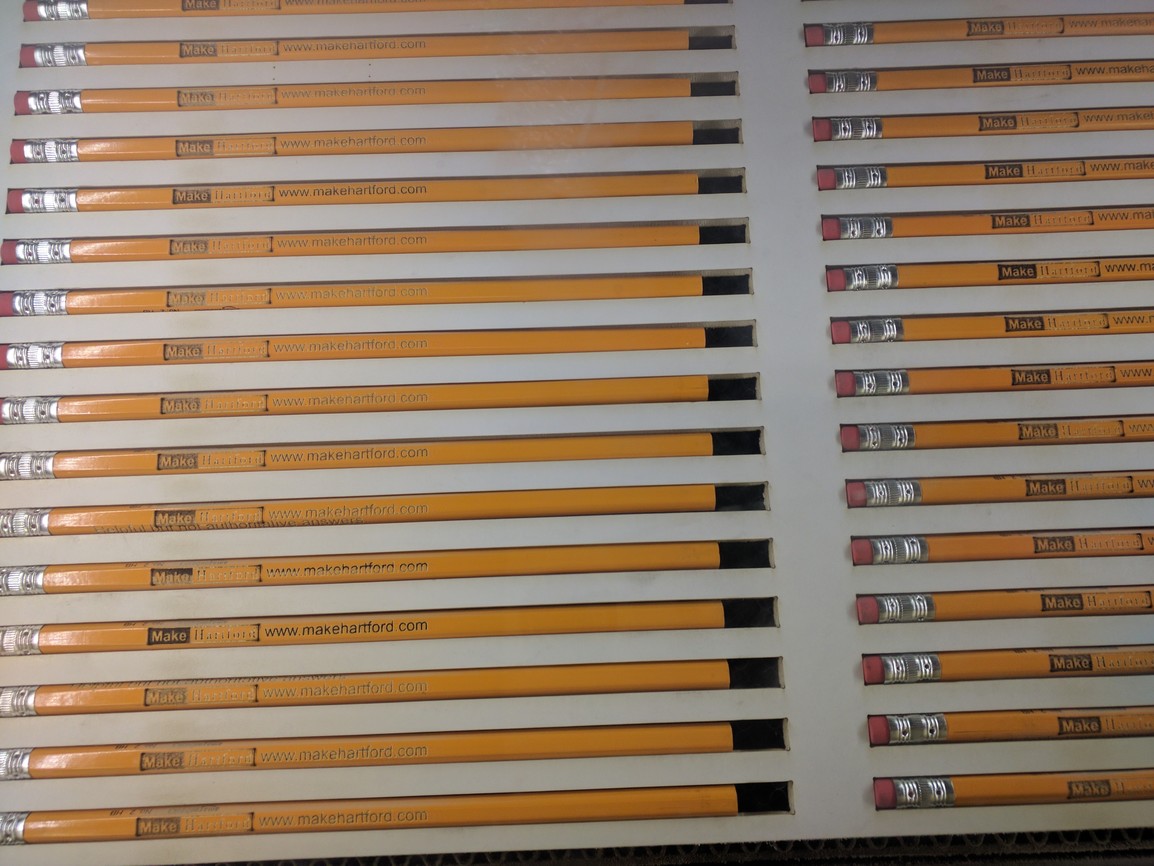
To dress them up further I decided to add the Makerspace’s logo and web address on another flat of the pencil. The web address is just text and no issue. The logo could just be a bitmap that I engrave but I’ve used it before on other lasers and projects where I wanted the speed of a vector engrave. So I went that route.
The logo consists of the name spilt across two engrave styles. “Make Hartford” is broken up as “Make” which is engraved in relief (the area around the letters is engraved away leaving the word standing proud of the background) and the word “Hartford” is a traditional recessed letter engrave.
To accomplish this on the GF (different than my other laser setups) I need to create a filled box with the unfilled letters subtracted out for Make and then a traditional filled (but no stroke) letter for Hartford.
Here’s what I’m trying to recreate.

Since the flat on a pencil is pretty narrow I decided to drop the tagline as even for the GF I expect it would be difficult to render so everything is readable.
Using Corel I create the large box and add two text blocks (different fonts and styles so I’m keeping them separated). Then after sizing to the pencil width for the box height I draw another box that I fill, null the stroke and place behind the word “Make”. Then I change the text to paths so it’s now a vector object vs text and add a stroke and null out the fill. That shows me the letter outlines with the underlying box’s fill showing through.
Then I use the Corel Object Trim operation to remove the word from the box’s fill. This is the same as Inkscape’s Difference function. It subtracts the top object from the bottom object. So what you end up with is a filled box with a null filled internally shape.
This is different from simply placing the word object on top of the filled box. In that case the laser sees a box filled edge to edge and another shape on top of it. But when it lases it will burn the edge to edge filled bottom box and in this case would not burn anything in the word object, but the word object won’t be in the material because the bottom box took out the material.
The Difference or Trim functions create a new complex object. The box is no longer filled edge to edge but rather filled up to the edge of the letters. The shape of the letter objects create a boundary for the box’s fill. The laser should run up to the edge of the M, stop lasing while it passes over the vertical leg, fire a bit until it hits the downstroke of the letter, stop firing again until it reaches the other side, fire again until it hits the next leg, stop firing, etc., etc.
To verify that I had a new complex object with no fill in the letters I clicked the object and slid it over another box filled with a different color. The entire thing moved - the letters weren’t a separate object and the white space showed the new color as I slid the box over the other one.
Good. Ready for the GF. It should lase up to the edges of the null space, engrave the word “Hartford” and then score a box around the words. Saved as an SVG and loaded to the GF.
The GFUI shows the box & “Hartford” as engraves and the outer box as a cut (to be switched to a score). But the engraved box is solid. It did not recognize it as a complex shape with “Make” subtracted from the solid box. It renders correctly in Corel but not in the GFUI.
So I open the SVG in Inkscape and it renders correctly in that view. Huh.
Next I create the same object set using Inkscape’s Difference function. Both the Corel created and Inkscape one look the same. I save the SVG and load it to the GFUI. The Inkscape drawn “Make” & box display and lase correctly as a box with relief (raised unengraved) letters. The Corel created one in the same file is still just a black box - full edge to edge engrave.
Something is amiss in the Corel Save As SVG function in dealing with Trimmed shapes. Inkscape can handle them correctly rendering them properly but the GFUI doesn’t “see” them right.
So I copy & paste the Inkscape version of the Make logo into Corel and it’s a mess - jagged curves vs the smooth shape in Inkscape & the GF. The internal format Windows is using to cache the copy before pasting is not keeping the integrity of the object.
I don’t want to just fix it in Inkscape because my jig and pencil engraves are all built on a 20x12 artboard that Inkscape thinks is 20.00x by 12.00y and it’s not a percentage alteration. Obviously related to the inch to metric and PPI conversion setting Inkscape is dealing with so I can’t just grab the whole thing and resize it correctly. My jig will be misaligned.
So I create the Make logo in a fresh Inkscape document, save it and then open it in Corel. From there I copy (Ctrl-C) from the new doc and paste it into my pencil jig Corel doc and it transfers correctly - no edge jaggies.
Save it again as an SVG and reload it to the GFUI.
Success! The GFUI sees it as a complex engrave shape of a rectangle with a non-engraved internal set of letters. It engraves correctly. Happy happy joy joy. This has been a multi hour process of discovery because there were trials using grouped and non-grouped versions of the logo & the web address, splitting the logo, etc before finding the issue with the way the Trimmed (Corel) SVG object is interpreted by the GFUI vs the way a Difference (Inkscape) object is.
Here’s the result. A tray of pencils with @marmak3261’s wisdom on one side and MakeHartford’s logo on the other.
So, lesson learned: if using the Corel Trim function does not work in the GFUI (don’t even need to lase - just look at the thumbnail rendering) then just recreate it in Inkscape and bring it in via opening the Inkscape document in Corel.
I did not report it to Support since Corel is not supported and using Inkscape works correctly. It’s a price I have to pay for the other features in Corel I think are better than Inkscape.
Oh, btw, I did not choose to just create a bitmap of the Make object and engrave that because then in the GFUI it would show up as 36 separate objects to be engraved. As a vector since all 36 copies are the same colors I just get one (that shows in the thumbnails as a stack of 18 x 2) that I have to tell the GF how to deal with. The engrave would be better because then I wouldn’t get the overburn marks on the scored box around the logo but needing to detail the settings 36 times is not something I want to do. So I’ll play with the score settings some more but will live with it until the GF team figures out how to stop the corner overburn.

