First, thank you for the months and months of laser tips and advice. I have never used a laser cutter myself. However, I am very familiar with Illustrator and I am looking forward to producing some great things. I am also familiar with wood working tools - not a pro, but I have built a lot of our household furniture and work in small and large(ish) scale pieces - and I have incorporated laser cut elements (that I have designed and had someone else cut).
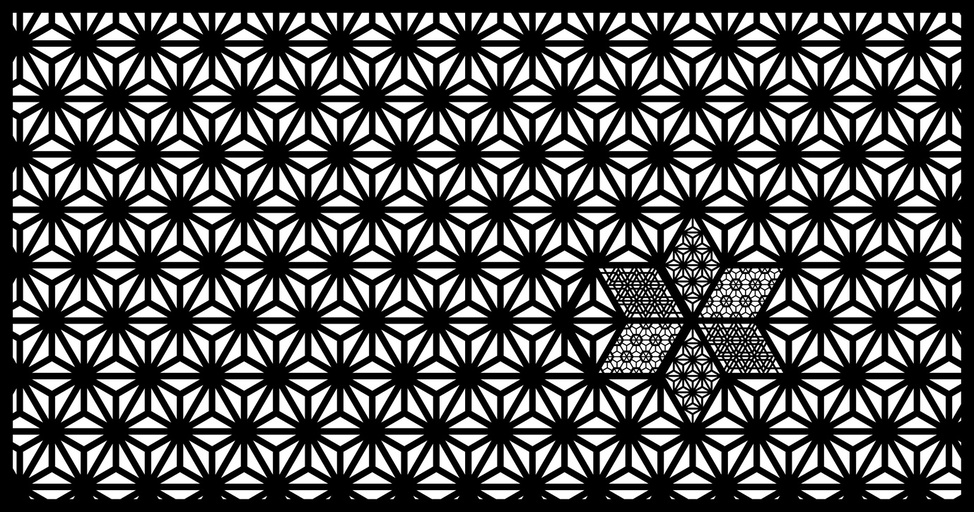
At the moment, I am designing a door for an IKEA Kitchen cabinet. The door has to be screened as it needs ventilation (it houses our on-demand hot water heater and furnace). For scale, this screen design is 482mm by 254mm (19” by 10”)
1 - Is the GF draft board in imperial or metric (I have seen reference to 5mm or 1/4”… but the two aren’t really the same). For this project, not really an issue, but curious.
2 Some of the bars on the screen are half a mm across. Is that toooo small?
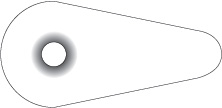
3 To hold the screen in place, I thought I would use some GF-cut, screw-in clips (rather than glue the screens in place because I want to swap out the screens from time to time). I was wondering if a gradient like the one below would make for a countersink? Clearly I need to test a bit to get the correct gradient location… but is my theory good to start?
I think that will be VERY tricky.
Even with a laser you need to take into account the strength of the base material.
At .5 mm there is just not much wood left to work with, and those detailed cuts close together are going to vastly decrease the strength in that area.
Not saying it can’t work, but I would definitely suggest you do some small scale tests before you commit a large expensive piece of material!
I have not received my first draft board yet but always always measure when it matters. Go ahead and get a decent pair of digital calipers now. You will cut a lot of things and 1/4" can range from .190"-.255" same goes for all other nominal sizes.
I think that would be pushing it but experiment. .5mm sure can be done in acrylic but is mighty fragile.
Yes, good theory and will work, you just have to work out the details!
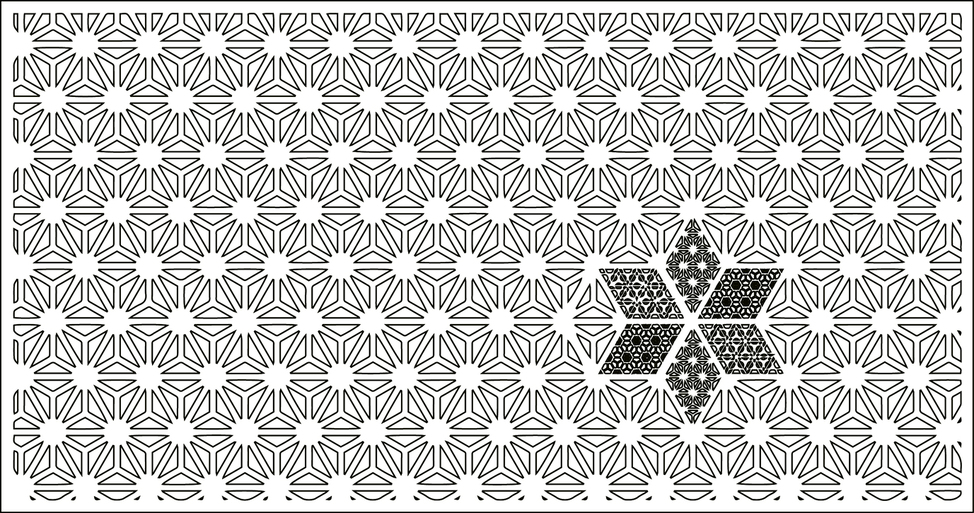
I don’t have a GF yet so I don’t know the specific particulars of what it needs to see to know what to do, but I think you may need to change the screen file a bit so it more easily knows what to cut out. (I assume that the black lines in your picture represent the wood that would be kept…)
For example, for the modified screen image below, you would say cut all black lines. In doing so, all of the white triangles will fall out. However, the frame around the whole piece, the narrow strips around each triangle, and the white “circle” areas would be preserved because they are all interconnected.
I like the design and think the Glowforge can pull off something like this with a caution toward how fine the material can get. As others have pointed out, the small star has design elements that might not work because of issues with the materials strength.
I would say black delrin would be your best bet on something like this as having the strength to hold up a little bit but I haven’t seen 1/8th " delrin and I haven’t tried to cut it that small. Acrylic might work, but would be pretty fragile. Wood or MDF would not be stable enough in my experience for such fine detail.
I has a rule of thumb for my designs when I am doing cutouts. You have to have at least the width of 1/2 the thickness left of the material plus a kerf width for any part if you are going to be successful with doing cutouts like this, say in lettering stencils or snowflakes like this. Now this rule works if the material is not going to have any stress and would work as an overlay with a solid substrate under it.
This works with materials up to 1/8" thick. If you go thinner like with veneer or paper, you can still do this. I made some fairly small inlay pieces with the 1/32 veneer. But those were inlays that had a matrix engrave to hold all the pieces.
I’d like to try this in a small bit of materials to see how it would work out and then what would be the constraints for the small snowflake in terms of size in relation to acrylic or wood.
Thank you all, @marmak3261 - Thank you for the idea with the veneer - that might help make the design work (though I may have to figure that the fine details are way too fine). I may have to make the snowflake much bigger.
I am attaching the full AI file here in case anyone is interested. It could be a nice cut for a Japanese style lantern paper.
I tell people who are new to 3D printing to avoid re-designing the wheel.
I had an engineer look at a sample screw and nut. (The one Makerbot uses as a sample) He then started a discussion about how the threads could be improved, so there would be easier to print. I stopped him after a minute, and reminded him that a screw was an off the shelf part, and inexpensive. It didn’t need to be 3D printed.
Same thing with countersinks I think. A countersinking tool is cheap and easy to use. Sure, have the laser locate or cut the hole for you. Save the time and effort, and wear and tear on the tube.
If you’re doing really narrow pieces, you will also have to experiment with cut ordering. I’ve managed 0.8mm in 5mm acrylic, but when I tried smaller than that some of the pieces worked and some didn’t, depending on whether one side was cut immediately after the other side or after the area had some time to cool down. And I have a piece of 3mm ply where I tried to make closely spaced scores and the whole thing just charred right through… (Also remember that with the current state of the software a very short distance between turns is equivalent to going much slower at the same power.)
I think this would be really cool if you just did the cuts of all the triangle and then did an engrave of the snowflake area and keep the solid material there. Then you would have the fine detail pop out and still have the air flow and the screen. I opened it up in Inkscape and it’s a good file. since it is 12x20, it won’t fit in a basic, but it would be a great test for a Pro passthrough.
I like the engrave idea. The final screens will be 10" by 19", so should fit in the Basic GF coming my way. For patterns, I usually design a larger area and then mask or use the pathfinder to cut to the final size - that way I can shift the location of the repeat to suit the design.
I’m not convinced countersinking with the laser is going to produce a fantastic countersink. I am sure it will cut parts better. faster, and safer than a bandsaw.
I wish I had a Glowforge to try it on. If it produces better results you can bet I’ll use it for that purpose.
First of all, that’s very, very cool looking. Nice work!
Second though, I agree with others here, that .5mm is fine and fragile, but basically risky to try unless you get your settings proper first with testing