Hey,
Question for you…I have a need to drill a 15/64th’s inch hole through the center of a 1/2" diameter delrin ball. Doing that will a drill press is…well…not easy.
So my specific question is - could this be done with the GF Pro?
More generally…the GF can cut and engrave…I guess a hole is just a circular cut? If it can cut a particular material would it be able to “drill” it?
I wouldn’t see it as impossible since the GF can cut up to 1/2" if you do the cut flip the object and do it again. This though will lead to the same if not more problems than doing it on a drill press. Getting the hole top dead center will still be an issue since you have to align your cut manually having to flip the ball over means you have to do this precisely twice. I think making a jig to hold your ball and then drilling it on the press will give quicker and more accurate results.
I think you’d have some trouble with registering on the flip side. Pretty easy to register based on corners with a flip, but not so easy on a round object that would need to be aligned perfectly since it probably wouldn’t achieve the through pass from a single side cut. Plus you’d need to worry about kerf extending beyond the 15/64" edge. And if you could flip perfectly, would still need to run a bit through to clean the hole where the beam converged at the end of the cut.
if needed on a regular basis, I would mold the object, cut in half and drill the center as measured from inside of mold. Then make a simple jig to hold the object and use the mold as a guide to align the drill press. The folks here are pretty smart though and may have a better way.
I honestly don’t know, but here’s the procedure I’d use.
Cut a 15/64 hole in some plywood
Remove the tray
Put something under the plywood so the top of the plywood is the height of the top of the tray (since you’ll need the full 1/2" focus distance)
Put the Delrin ball in the hole
Cut halfway through
Put a 15/64 peg in the hole
Put the ball on the peg
Repeat the cut
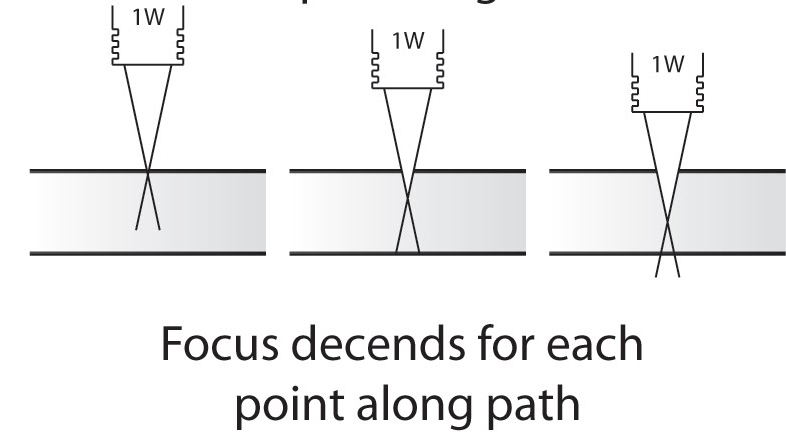
That should keep it perfectly centered. The problem is that the swarf will erode the top of the hole a bit so the final result will be a bit hourglass-shaped. Fun thought experiment.
@dan, can you explain the last part there. Why would the hole end up being hourglass shaped? And are you saying the hole will pinch towards the middle?
The laser beam goes through lens at the head and is focused to a small point where it has the most power. Above and below that focused point the width of the beam spreads out. Not a lot, but the sides of the hole will not be perfectly straight but a slight hourglass shape.
Why is that effect not consistent. I mean if I use a end-mill shaped like 2 cones tip-to-tip (the pattern I think you are describing) and use it to drill a vertical hole, I will still end up with a vertical hole the largest diameter of the base of the cones. Is the problem that he isn’t going all the way through the piece, which lets the laser shine past his end point and affect the distant plastic?
Ah, thanks. Didn’t realize it was so decolumnated. How is it that most industrial laser cut stuff doesn’t seem so angled? I just got a new 3D printer with lots of laser cut acrylic and the parts fit together without gaps, which one would expect with chamfered cuts; or is this effect tiny, and you would see it with some very precision feature (like fitting to a bearing or something) but not normal press-fit items?
It’s a fairly tiny effect. The picture is very exaggerated. The thicker the material the more noticeable it will be. Might notice the effect on thicker homogeneous material like acrylic. The charred edges on wood are likely to mask most of it until you get above 1/4".
We have issues with cuts being angled from industrial shops. We have micron level tolerances, though. So a <1deg angle will still have a relatively big affect. But that angle is determined by the focal length of the lens. The Glowforge has a 0.5" focal length (I believe). Industrial machines are bigger, so they can have a longer focal length, which decreases the angle.
Work Area: Focus range: 0.5″ (13mm) Autofocus: Completely Internal — Lens moves internally up and down inside the head by 0.5” (13mm)
I took this to mean that the focal length was 0.5", but its position in space can be moved up and down. But, from reading it again right now, both points could be saying the same thing. So I’m going to stick with my “Not Sure”.
Why is it hard using a drill press? You mean to hold the ball perfectly centered? That’s easy; just drill a 1/4 hole in some hard wood (or metal / aluminum) to hold the ball steady, and it will be perfectly centered. You probably have to hold the ball to keep it from spinning, but some gorilla tape should work just fine if you don’t want to risk injury to your hand.