"Drilling" with a laser?

Rob1,

I would suggest using a lathe if you have one. There is a youtube video that shows a jig that is used for making wooden coffee scoops. I don’t have access to youtube on my ship at the moment (long story) but look that up and you could use it for a drill press that will hold the ball tightly and allow you to drill through it. You’d have to figure a way to secure it but that would be MUCH faster than a laser and less energy and time spent.

Like many things, depends on the material. Very consistent for acrylic from a given manufacturer, wildly inconsistent with hardwoods, YMMV on other materials. It’s also principally a factor in slow/deep cuts, so it’s not something we’ve spent a lot of time on yet.

3 Likes

Just saw this picture on a CNC forum where someone tried to laser 1" thick foam. Not sure whether the foam should be lasered or not, but the point is it shows how being an inch below the focal point affects the cut. His words, " It was a REALLY nice cut on the top surface, right at the laser’s focal length, but here’s how the cut looked from the back side:"

5 Likes

Good perspective on what the beam does past focus.

So it’s great if you want to create miter angles! :grin:

1 Like

So, would all laser cutters have pretty much the same amount of X “focus / cutting / angle” (I’m sure there’s a correct term for it, but being a newb I don’t know it)…and as such, can we expect similar results from GF?

Or is every make / model different, and the GF could have a different / more narrow / wider angle?

The angle of the beam “waist” is a function of the focal distance of the lens, which on your Glowforge is 50mm. Varying the focus can affect this, though.

2 Likes

One of the things that I will be trying is 1 mm + holes to fit 1 mm wire, to use as low friction pivots for minimally loaded clock wheels. When you make a clock out of brass, these holes are drilled undersize, and then opened out to fit using a 5 sided broach with a very slight taper, from each side. This produces a slightly conical hole, going down to a minimal waist, which is desired for low friction. The characteristics of the laser cutter appear to be able to do this trick with no further effort.

3 Likes

I understand work on that scale. You spend as much time visualizing your intent, as you do accomplishing it.
When you get those settings dialed in, “Oh yeah baby,I got your number.”

If you cut a 15/64" hole half way through a sphere with a laser, wouldn’t you just have a 15/64" circle with a sphere around it and a plug on the inside? In other words, I don’t understand how you could flip it over and stick it onto a pin if the half-cut “hole” is actually just a deeply engraved circle.

Do drill bits “walk” when drilling delrin? I’m sure they must walk a little, but is it a problem? What am I talking about? Of course they walk, they walk when drilling wood. Drilling the top of a sphere is probably the worst place to try to use a drill bit. …Well, I suppose the point of a cone would probably be worse.

If you can go up to a hole size of 1/4", a square end mill in the drill press would probably solve the walking problem, if one exists. Perhaps a short carbide drill would be an option as well. Or, find a 15/64" end mill.
Here’s one that’s pretty close: http://www.lakeshorecarbide.com/230diapre-reamendmillfor60mmdiareamedhole.aspx

Clamping plastic spheres in a vise only to remove about half the diameter with a drill sounds like a way to get oval-shaped holes. As the material is removed from the sphere, it will become less structurally sound, but the vise will still be exerting the same amount of force on it. Consequently, the plastic will get deformed and press against the drill (or whatever tool you’re using). When the vise is loosened and the sphere is removed, the hole will be oval shaped. This is also an issue with metal, but it is less pronounced.

If you only need to do a few, drilling them “lathe-style” by using the drill press “upside-down” is a really cool idea. The three jaws of the chuck will not only hold better but will reduce the clamp-induced deformation too. A collet would be even better yet, and would mar the surface of the delrin less as well.

A 1/2" piece of acrylic with 1/2" (or maybe slightly smaller) holes lasered (or drilled and reamed, or whatever) into it would probably make a good fixture. Push the delrin balls into the holes (you’d want a little bit of friction, the hourglass-shaped holes might actually be an advantage). Put the fixture down and cut the first set of circles. Then pick the whole thing up, flip it over (don’t let the balls fall out, again: friction is required) and cut the other set of circles, this time hopefully producing actual holes.
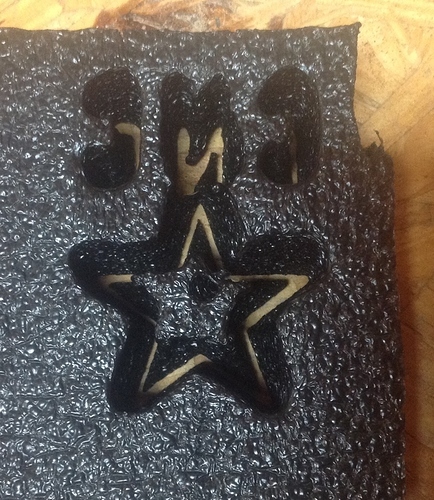
1 Like

I have 2 different lenses that I use. When I cut with the 1.5" lens, the focal length is shorter and can cut thinner lines as well as engrave with much detail. (I use this for small intricate patterns on thin material for my company)
Drawback is if I cut thicker material like 1/8 acrylic, it leaves the edges at an angle. Its not recommended for large areas of raster engraving since the lines are thinner, it doesnt take all the material in each pass like a thicker beam would.

The 2" (which I understand is what comes on the Glowforge) is more universal. It works well for engraving as well as cutting. Even 1/4" acrylic and wood has very little angle on the cut side. Raster engraving works best with this size lens as well.

1 Like

Not sure about all Delrin but an issue with what we use is melting and clogging on the bit not the walking of the bit