Careful hammering can get some really tight pieces to mate… I use mine almost every time I make a friction fit.
2 Likes
Is there a reason that there are only 10 sets of connectors, while the design calls for 12? Mostly curious, cutting extras isn’t a big deal.
Also, gonna repeat what everyone else is saying: the fits for the connectors is wayy too tight. Needed to use a bar clamp to force most of them in.
1 Like
So I decided to make this project last night. I used the same files and also used the same proofgrade draftboard. Just curious if you had some of the same issues I had while making this. First off, about halfway through I started to notice the amount of smoke from all the engraving was getting to a point where it was too much for my exhaust and it started to fill my apartment! Then towards about 3/4 of the way through, the GF had to keep taking breaks in order to cool down before it continued. Just curious if this is normal or if I might have some exhaust issues?
Also, are you able to show how the connectors are supposed to connect with the smaller circle connector?
Thank you for the post. I really love the design.
I made this as well using  draftboard and it was very smoky, more so than my usual laser projects. I find that draftboard in general emits a lot of smoke when lazed. What was the temperature inside of your dwelling as you made this piece? Also, check to see if you have any extreme bends in your exhaust hose on its way to the window.
Thank you for the reply. My home was around 70 degrees which definitely could have been a factor but I assume most people keep their space at a comfortable 65-70 as well. The draftboard definitely does produce a lot more smoke. I’ll see about getting the straightest line possible in my hose. Thank you.
I used baltic birch, and had no smoke issues. If you choose to do it as an engrave, be warned, it’s a really large area to engrave, you’ll probably want to clean your machine afterward. It’ll be a disaster area 
It is a disaster!
I cut this yesterday and while assembling it noticed the same thing: there are not enough connectors to fully assemble it. I need two more.
You should be able to assemble it with the pieces provided so that every triangle is attached on at least two corners. It’s not as stable as you might like, but doable.
Overall, I did find that a bit odd when I cut this out. The OP said the original model he used didn’t have enough connectors and his remix fixed that, but as you’ve noticed it isn’t quite true.
An icosahedron (20-sided polyhedron) has 12 vertices, with 5 triangles meeting at each vertex. The model on thingiverse has connectors each made of two slotted pentagons (one big, one small) and 5 little hooks. So you’d expect 12 big pentagons, 12 small pentagons, and 60 hooks. Instead you get 10 big pentagons, 9 small pentagons, and 50 hooks. Enough for 9 stable connectors, and 1 unstable connector.
Now if it did have that many connectors I might cry… My hands still hurt from forcing all of those pieces together.
1 Like
I just went ahead and cut out two more connector sets and installed them and it seems pretty solid. I had to use part of another sheet of draft board but I think it’s worth it.
I used a file to remove a bit of material from the tabs and a pliers to work the tabs into the pentagon shaped pieces and it didn’t kill my fingers.
Try using a hammer next time. Super effective.
1 Like
Need help in assembling this globe. Have been trying and can’t get this together. How do I get started? I printed two on these on Medium Draftboard and sat for an hour with 4 adults and made little to no progress. Any advice on how to position the pieces to snap together and how the polyon pieces with with the circular pieces and the map slabs.
@evansd2, @nathan2 , @Primalmoon, @jjmacdougall, @kirruu.berry, @CharlesDarwin
Hey guys, I printed two copies of this on proofgrade medium draftboard and am having trouble even getting started to attach the connectors.
I have the map laid out as shown in the diagram, but how to connect the pieces is mind-boggling to me. Any directions - pictures or video would be best but can do my best with a text description of how to put this together. Thanks so much in advance for any help with this!
Wow that is awesome.
Here’s a related older thread that claim a how to.
@wesleyjames In the link you sent, the pieces are quite different than the Globe discussed in this thread ( the one I made). For example, the connector pieces are wooden angled slabs instead of straight screws and the circular pieces don’t include a point. Thanks for sharing the link… am not finding it helpful in this case though.
Hmm…sorry about that then. I saw the design here and recognized the basic layout and just search for the globe type. It’s been a while since those other designs were fresh and I didn’t stop to compare.
Scratching my head here…just exactly where do the circular notched pieces go?
Never mind. Once I actually cut the pieces, it was obvious
1 Like
This is my rendition of @CharlesDarwin version of this project.
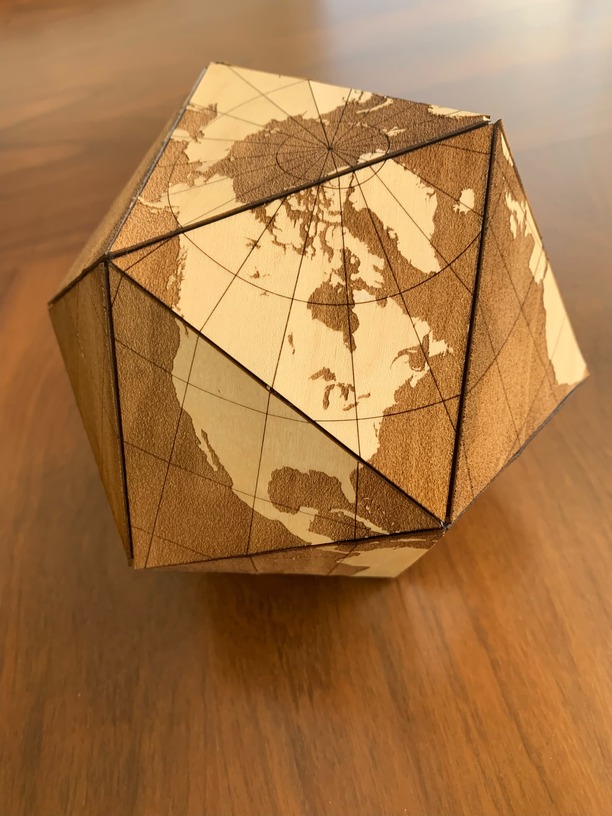
I favored the corner reinforcements design instead of the lateral clips in @geek2nurse design, but I also wanted a clean rendition of the map, so I engraved ![]() self adhesive veneer at 103% scale to try to cover a little more of the panel joints.
self adhesive veneer at 103% scale to try to cover a little more of the panel joints.
7 Likes