Has anyone engraved on those 3 inch Diecast metal cars? I can locate not one thread about the subject,
I realize I would have to remove the honeycomb tray and probably a spray Cemark on the cars.
Has anyone engraved on those 3 inch Diecast metal cars? I can locate not one thread about the subject,
I realize I would have to remove the honeycomb tray and probably a spray Cemark on the cars.
Since they’re all painted, you might not need Cermark. You’re right about the tray, but since car surfaces are - for the most part - not flat, it might take some fiddling with focus.
Then again, a custom logo on the side of a matchbox panel truck WOULD be pretty nifty…
Interested to see what you come up with!
Thank you my sweet!! I miss seeing you— not here that often. I hope you were able to read my post that @CMadok posted about me winning the lottery.
Tomorrow I will work on the cars and post some pics.
Love and Hugs!
Elena
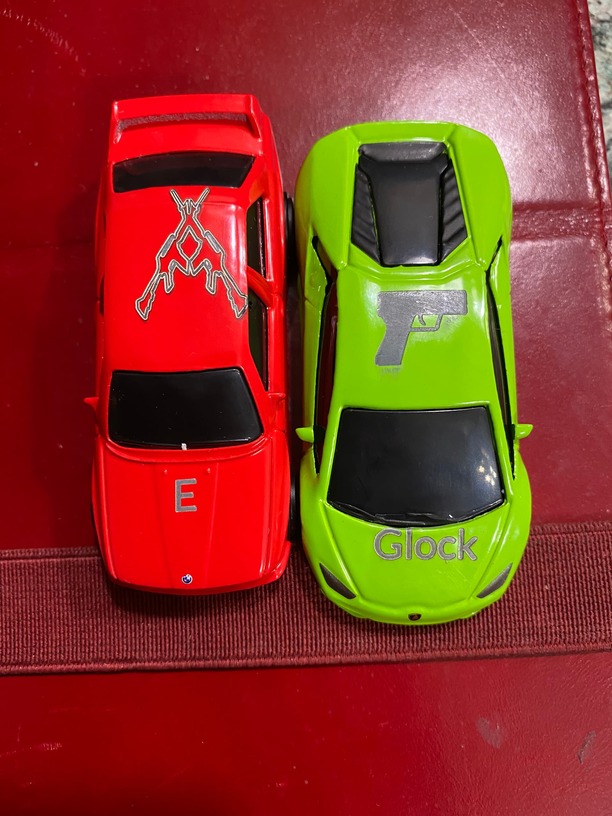
I don’t know if there’s something wrong with my laser or the cars moved during engraving.
Red car used MacBook settings
Green—used iPhone settings
The ARs were scored
Everything else was engraved
Hmmm…
Are you having the cars up off their wheels when you laser?
Weirdly, the “E” on the red car looks properly centered, though it COULD be a focus thing? The roof IS higher than the hood, which part did you use for “Set Focus”?
Maybe make a cardboard template with rectangles for the wheels cut out, then you can practice without going through a ton of cars?
In either case, kinda neat idea…
That’s a great idea to have the wheels lift up. I did tape the cars down. I did all engravings four separate times. The first engraving was the ARs. As you can see that was an epic fail. The second was the E. Third was the handgun. Finally the word Glock.
I centered everything perfectly. I did not even use set focus.
My new business involves scaled dioramas for these cars.
did you use the camera to find your center or have you found the true center?
For the record - I ALWAYS use “set focus” (Really…)
By the way, science now thinks that dinoramas actually had FEATHERS, not scales…
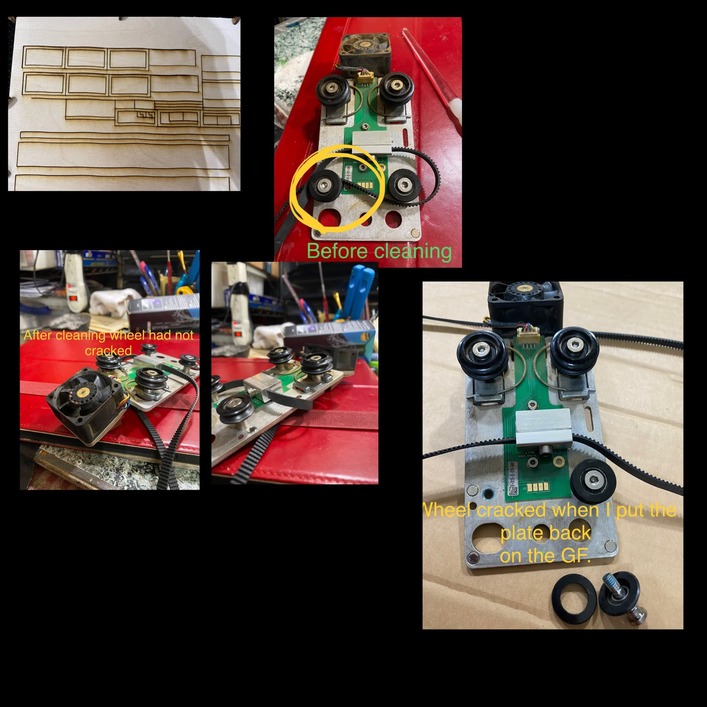
Here is an update and some interesting trivia.
Monday evening after the car engravings I printed another project. Immediately I noticed all of my horizontal lines were not straight.
Tuesday I discovered the front carriage wheel had a hairline crack.
Here are some interesting stats on my machine.
In less than three months—66 hours.
This morning I went to Etsy and purchased carriage plate wheels. I paid for expedited shipping these will be here Friday,
Talked to support told them about my machine and they are sending out two new wheels but they will not get shipped out until next next week because the GF distribution warehouse in Kentucky is on vacation this week.
Today when I talked to support I learned two interesting facts. GF does not sell the carriage plate wheels in the spare parts section because in the past people have purchased them and sold them for lots of money.
The carriage plate belt is not available through Glowforge.
people have definitely bought “spare parts” on the site, then resold them (often when GF was out of stock).
I just used the camera. Next time I do an engrave on a car I will use set focus.
I believe it is extremely rare that a 53-year-old woman is now playing with 3 inch cars. If you didn’t know —-I am a woman. There has been a few times or more than a few times somebody here in the forum thought I was a man because of the name.
One time somebody sent me a private message and they asked if I was the country singer Jimmy Wayne.
Actually, I thought you were a westie because of the photo!!!
ROTFLMAO!!!
Not only are you incredibly HANDSOME—- you are extremely witty!!. Women love when a nice good looking man makes them laugh!!!
Nice to meet you, Jimmy.
I asked about the camera because frankly I never trust it. I engrave on a wide variety of specialty items and have found that the camera often lets me down. So, I use tools.
In this case, when you have removed the crumb tray, I use the a targeting template.
Now to make the template.
With the crumb tray installed, place a large enough sheet of scrap wood or really anything, even card stock. It needs to be big enough to be pushed all the way to the back of the box and still cover where the car will be placed. And then slid to the right, up and over the edge of the crumb tray and just barley BUT NOT ACTUALY touching the gantry arm of the laser head (a piece of metal coming down from the arm almost to the bottom of the box at an angle toward the back).
Now in GF, take the measurements of the wheelbase and tire size and draw the 4 boxes to cut for the wheels. Using the camera, make sure the wheels will be on the template and cut it.
Once I have the wheels drawn, go to the dashboard and then copy that file. Never use your actual wheel file, if a box gets moved accidentally the template is useless and you’ll need to start over.
Now you can take out the crumb tray and as long as you place you template against the back and just adjacent to that gantry arm, the wheels will be in the exact place as on your screen.
Place your artwork according to the squares on your screen, setup your engrave (ignore the wheels squares), set focus and go. It may or may not look good on the screen but that’s okay. As long as the template is aligned in the same way as it was cut, it will work.
You could put several sets of wheels on the template and get production going.
I hope this helps! Good luck.
If you have any questions. Email is Ronnie_weaver@yahoo.com
That’s way more involved than it has to be…
When you create the artwork you plan to engrave. enclose it in a simple rectangle that is the size of the wheelbase of the car (meaning wide and long as the wheel track). You want it sized so that when you put the car in to the cutout, it can’t roll. Then, on the GF, set the artwork to ignore and cut out the rectangle. Remove the cutout without moving the larger sheet of cardboard (tape it to the crumb tray if you’re not sure you can do that). Then set the rectangle to ignore and the artwork to engrave. Then put the car in the cutout and engrave. Your engrave will be perfectly aligned with the car.
NEVER EVER USE THE CAMERA FOR ALIGNMENT. The camera is on the top cover, the top cover moves every time you open the lid, so the camera alignment changes every time you open the lid. The camera is only good for gross alignment not precision.
From the bottom of my heart— thank you so very much for helping me. I really do respect the time and effort the both of you all gave to me!!
Hugs,
Elena
Hi Elena,
I’m Sharon. I feel like I’m meeting a high school classmate I hadn’t seen in years since I have been on this community for a long time as well. We were original adopters. Just an fyi I received an email from cermarksales.com stating that they are having a cermark price increase of 5% March 1st; so if you need more you might want to order some. ![]()
Thank you so very much for letting me know!!