I already opened a ticket with Support to try and figure why the error happened, but that is not what I am asking here.
What I am asking here now, is how are you all going about recovering from this scenario? My HD print that was to take 8 hours, errored out at around 5 hours or so. Is there anyway to resume an engrave after an error where it left off? I got the generic error message restart glowforge or refresh your browser.
Here is what I decided to do for now. I went to graphic program and cropped the remaining portion to be printed, created a new design with the unfinished print still untouched in the GlowForge. Since the original was resized after I created the original design, I have to try and align and hope that the calibration done 2 days ago means it will line up close enough not to ruin the entire print. I tried to make sure I errored overlapping rather than risking any space between the appended images. If I’m lucky the darker portion of my print where it left off, no one will notice the lack of continuity that will likely occur. It says 2 1/2 hours left and I’m about to press the magical button and try not to get an un-magical error again.
Is there a better way next time this happens to try and recover? Thanks!
Honestly no. It’ll never be perfect. Your way is about as good as any.
I wish I had better news for you. I find that it’s best to accept that it’s blown and start over, that way you don’t waste even more time. That being said if you have the time or this is your only bit of that material sometimes you just gotta give it a try.
There are a number of approaches one can take to salvage a error, depending on the situation.
After the fact:
In situations like yours, I apply a sheet of masking over the target area, set everything up and start an engrave at very low power and max speed – the idea is to color the masking without burning through so you can see how it will line up. Once you’ve secured your material (I block my edges so that the material cannot move), start the test engrave and cancel after you’ve seen enough.
If you’re dead on, remove the making without moving the material, close it up, set the desired engrave power/speed and push the magic button.
If you’re off, do not open the lid, rather select your entire design in the ui and use the arrow keys to adjust as necessary. If you ran the full calibration routine a week ago, hopefully you measured how many up/down and right/left arrow presses it takes to manually align the image to the material. Once you’re lined up, open the lid, remove the masking (if desired), set to desired speed/power and press the button.
Before the fact:
Run the full calibration to determine the number & direction of arrow presses needed for proper alignment and write it down somewhere.
If possible, add registration marks to every project file you create, either at the corners or in unused areas and score them into the material as part of your production run. The Noun Project (and GF Premium) have a number of cross-hair patterns that are perfect. Along with #1 above, this makes boo-boo recovery a snap.
Another approach is to include a scored bounding box around your project. If the line is out-of-bounds anywhere (and won’t score), stop and adjust your design and material so that everything is back in-bounds.
dwardio, your after the fact is ingenious and I think will be good to know next time. I’m not familiar with this calibration counting and registration marks. Think I’m catching on to the scored bounding box. I’ll see if I can read up on it and think on your response more. Plus I will click on the full calibration link you provided and see if I see something that makes it clear.
As far as the 6Ps, I’ll be more prepared next time and thank you for your service if it’s 7 ps for you.
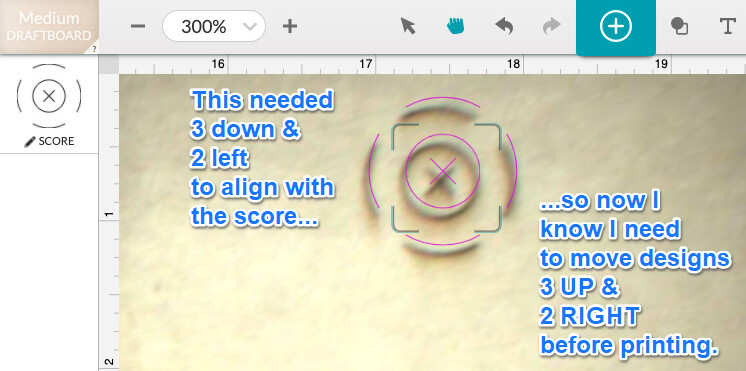
Pick a crosshair design and score it onto a scrap of PG. Zoom in using the UI to 300% to more easily see the pattern and resultant score. Do not open the lid at any point in this procedure.
Once it’s complete, without changing the zoom factor, see how many arrow clicks in X & Y it takes to align the design with the score (3 down and 2 left in this example).
To verify, move the design those number of clicks in the opposite directions (3 UP and 2 RIGHT) and re-score. The new and old scores should now be perfectly aligned.
Bear in mind that “3 down and 2 left” is correct at this magnification level. The step sizes change as zoom level changes. So don’t calculate the steps then change zoom, or you won’t be able to use the step counts.
Probably too late for you now, but for future reference, the machine will print to within 1/1000" every time, which is ~1/4 of the width of a single pass for most settings. Do not touch anything. Position the remaining portion of the design over the original in the UI, scaled and positioned so it overlaps perfectly. Ignore the original and resume on the cropped portion.
Another issue that crops up with raster images is that the algorithms used to convert the image to dots (in the cloud) will cause the edges to have a different patten than the same “pass”/line would have in the middle of a design, so even if you get everything perfect, it could still have a visible line. This shows up when engraving using the passthrough, as each section is calculated individually and results in a noticeable break between them. This does not apply to solid areas engraved using vary power or vector designs.