I am having alignment problems with two-sided engraving on my pendants. I’ve read lots of topics on the subject and have implemented most of them, with some success. I make sure when I flip the top side over to center it in the hole to compensate for the laser’s kerf. The most important one I’ve learned is to ignore the camera.
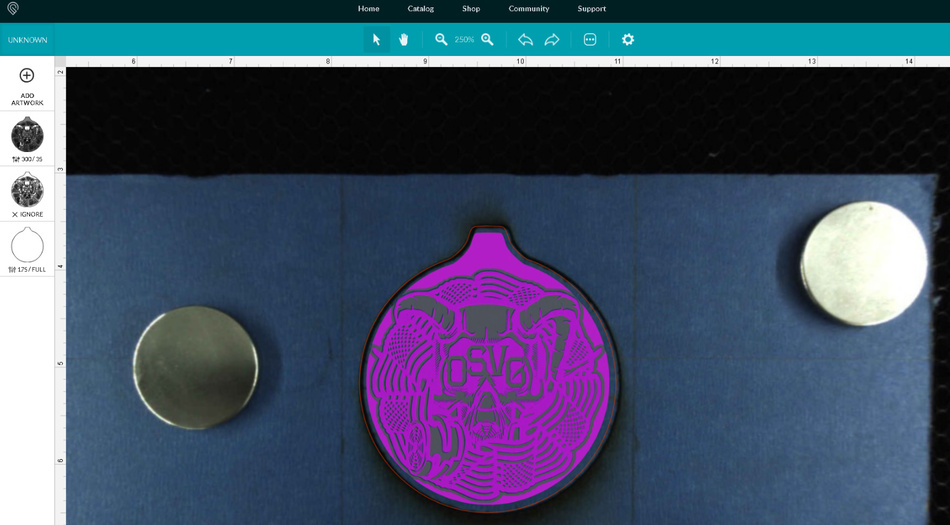
There is not a lot of room for error on the pendants I am making:
I’ve read about SnapMarks. I am wondering if that is something that would help or should I continue to look for other solutions?
With that particular design, you don’t have to worry about rotation after flipping. As long as: your art work is centered in the design file, and you don’t move the hardwood at all when you flip it over, it should be aligning perfectly.
Do you have the front side as one operation, the backside as one operation - run the front, ignore the back - flip, ignore the front and run the back?
Yes. I’ve employed many of Jules techniques and it goes very well, about half of the time. I really have to trust the processes and ignore the camera image after opening the lid, flipping the front engraved piece over, while leaving the stock in place and closing the lid.
After the front and back of one piece is done, I move the stock, left or right as needed and repeat. I don’t even move the artwork in the GFUI.
I have tried both aligning all the artwork in the same plain svg file and centering individually to both small (3" square) and large (12" X 20") document sizes.
I use 1.5" diameter neodymium magnets to hold the material in place and insure it is not warped and laying flat. I also use those little hold-downs (that I laser cut when I first find them here) on all four sides and only remove/replace the left/right ones as needed when moving the stock for the next piece.
But it doesn’t align perfectly every time. Today, still ignoring the camera image after the piece was flipped, the first one was way off, second only slightly and third worked.
I’ve read tips, cleaned everything, conjouled, cussed, prayed, walked it off and thrown stock across the shop. Somewhere, I missed something.
So that was the reason for my question about SnapMarks.
Snapmarks would help since you’re doing multiples.
How many of these are you making?
I think what I would do if I didn’t have Snapmarks (and I don’t on this machine), I would just cut the pendants out of the hardwood. Then, I’d have a file set up for multiples that would also be my jig.
Lay down some chipboard. Cut the pendant outlines. Lay the wood pendants in them, engrave the front, flip, engrave the backs.
Worst case, you’d have to cut a cardboard jig for runs down the road, but that’s cheap, quick and easy.
The thing you might be missing is that you have to make the cut first (in a jig material) then without closing the file,or shifting either the file on the screen or the material on the bed, run the engraves. The relationship that gets established in the GFUI is between the cut and the engraving, but it has to be established each time with a fresh cut.
The visual appearance of the bed changes depending on where the cut is placed on the various corners or the center. It’s a fisheye effect from the lid camera…it will be best right under the camera, and farther off out at the edges of the bed.
So if you do have multiples to do, JB has told you the correct process…make 1 file that has multiple cutout spots in it, with multiple engravings placed in each of the cutouts. (In other words, duplicate it in the file before opening it in the GFUI.)
Then you can cut all of the cuts out of a sheet of cardboard and that becomes the jig…as long as it doesn’t shift, and you don’t move the images on the screen, you can drop the items into the cutouts in the cardboard and process all of one side engraving first, then just flip them all over and process the other side. And they will all align perfectly.
This order is for 15 of the large pendants with both sides engraved and 60 small buttons with engraving only on one side. It’s ongoing and repeat business if I can get my processes down, accurately engrave on both sides and deliver quicker than his current source.
Cutting a jig might be a good option if I can get the size right. That would at least eliminate the kerf issue. Not sure that I want to take on cutting every pendant by hand though and only using the GF for engraving. Seems like I would only be using half of its capabilities.
I don’t currently have SnapMarks on my Plus. Might have to resort to CCPT and begging for that. Though that does not appear to have worked for others on this forum.
File 1: just the pendant outline cut. Cut all of your needed pendants out of your hardwood using this file. Just place it by the camera view. That’s fine.
File 2: is a full batch file. It contains the pendant cuts, and the front back engraves for as much as you can fit in the workspace, or however many you want to do at once. Everything is aligned in this file.
Once you have a pile of pendants cut from the hardwood, stick a piece of chipboard in there, hold it down with magnets, cut the pendant outlines, remove the cut pieces, insert your pendants, run the front engrave, flip, run the back engrave.
Sorry, misunderstood what you meant. I thought you were saying cut them by hand.
I initially tried to do four at a time out of a 6 “X 12” piece of stock, but the GFUI said no can do. I am okay with doing one at a time. Each engraved side takes almost 30 minutes as I am running at 340LPI. Even if I could do more, I probably wouldn’t as this old man needs regular bio breaks and standing over the GF for 4 hours ain’t gonna happen.
If I use the jig method you describe, won’t I still have the kerf issue?
Overthinking it. Possibly, been accused of that many a time. Regardless, there is still a gap between the edge of the engraved piece and the stock it was cut out off.
The only thing I can think of is to increase the size of the cutout so there is room for error. It’s not what the customer wants but… I’ll take more time re-reading what you and Jules have told me then do a trial run using your methods on a piece of mdf stock, instead of the walnut.
Thank you both for your time today. I sincerely appreciate it.
Was going over everything commented and had a couple of thoughts about what I might have overlooked.
The walnut is very hard and 3/8" thick. To cut, I have to make 3 passes at 175, FP. Is it possible I am blowing out too much material with that many cuts? Should I try decreasing speed and reducing passes? Or would it effectively be the same thing?
When setting the material thickness in the GFUI, should I use the stock measurement only or the measurement with the mask on both sides?
This, unfortunately, can only be determined through testing. I wouldn’t hesitate to do a single pass at 125/130/Full Power and see what happens.
The material height measurement should be whatever you’re sticking into the machine, preferably measured with calipers. If that has masking, measure it with the masking.