Ben, your designs have been great! Keep 'em coming!
2 Likes
You are one of the ones I was talking about in the OP. If I can just turn out three functional designs by dec. that will be something for me.
1 Like
Whoa. That sounds really cool! Any info or details on it further?
2 Likes
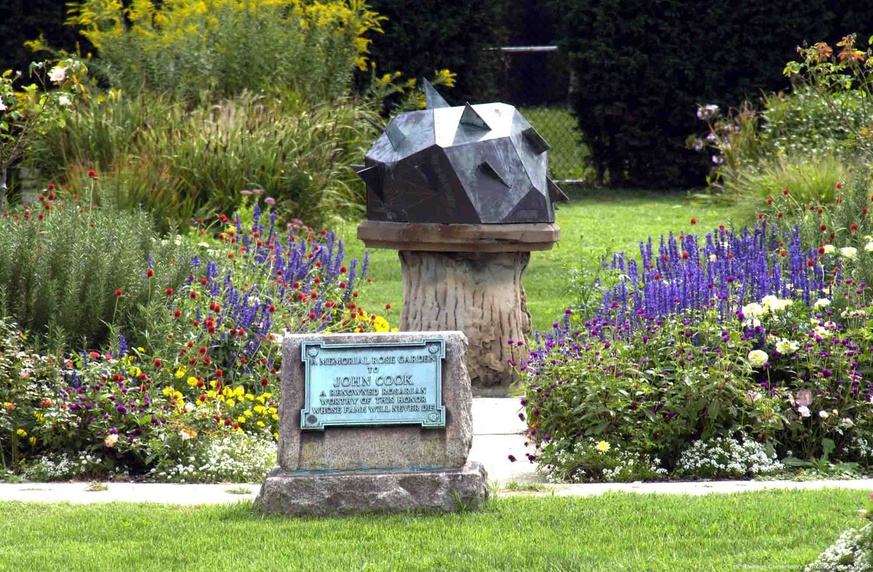
Here’s the conservatory’s website.
Here’s the sundial but you’ll need to scroll down to the Outdoor Garden section. Click on the picture and you can see a blow up.
Here’s a page with some info on the sundial itself which has been restored and corrected (the original is 130 years old and the math wasn’t quite right ![]()
10 Likes
Oh yeah sure! You just had to show me that, so now that I understand how they did it, I am drawn to enhance my design to include two offset faces to show the time in England (where my daughter is going to school right now) as well as at home!
3 Likes
That would be really cool - and another one for her so she has local and home times too. Talk about a conversation starter.
2 Likes
I started this thread but until now have not posted anything on my three.
My first will be to start engraving my knife sharpener handles. All the wood ones will get a small B# logo but I’ll be able to do custom work as well.
My second will be to cut and engrave a light switch cover.
And third, I need some nice pasteboard inserts for the boxes my sharpener comes in.
All simple but all much easier on a laser than anything I have now.
5 Likes
Finally got around to thinking about project number two.
I have a lot of game consoles. Currently all the accessories are shoved into a couple drawers, or strewn about the floor.
Downloaded Fusion 360 yesterday. This is the first thing I have made with it:
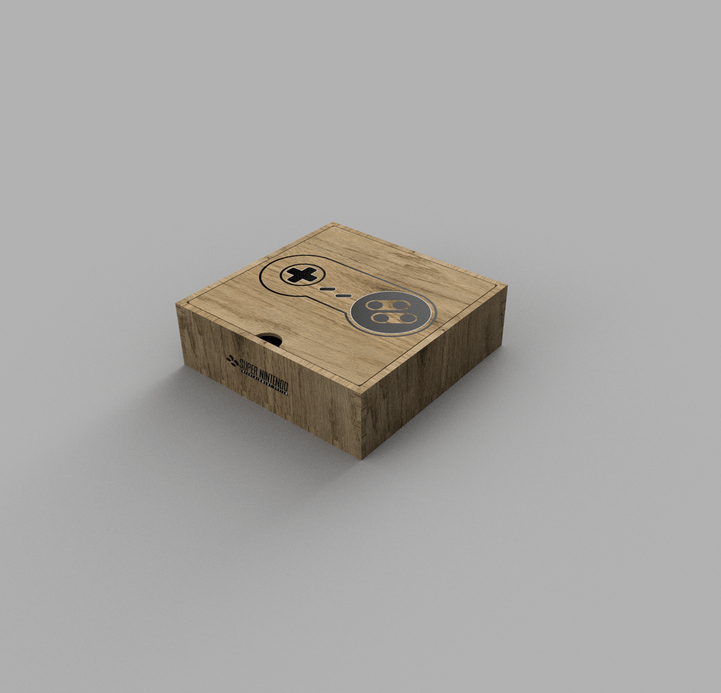
A simple box for accessories, sized to fit into the drawers of my entertainment center. I may add internal dividers to separate controllers from power and video cables and some sort of hand holds to easily pull the boxes out when needed.
16 Likes
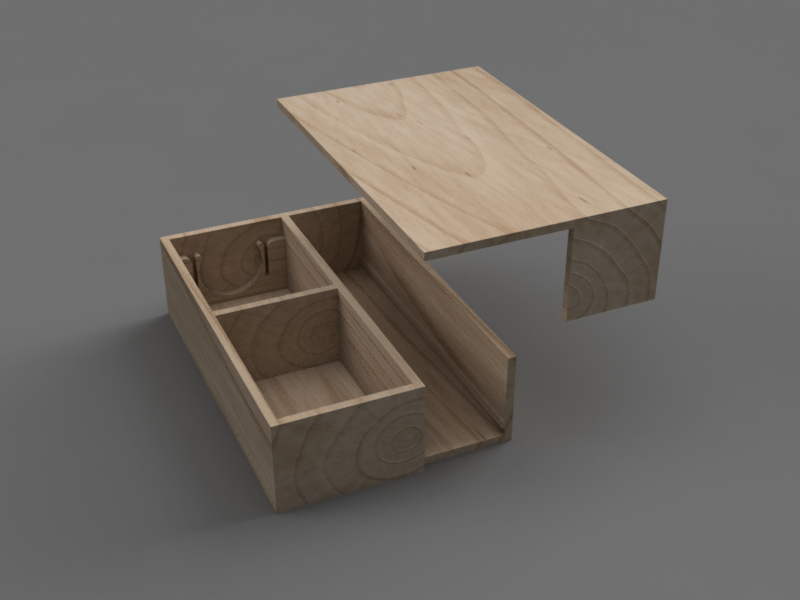
That looks to be a great first F360 project. You should make it parametric and share it. Sure it is just a box, but it looks to be a well thought out one. There is just no telling how many boxes and dividers I’ll make in the first three months! If I did a panorama of my workspaces, you’d understand. “You’ve been robbed!”
2 Likes
I love the idea of custom organizers (e.g. kitchen drawers). Thank you!
2 Likes
So I’ve been working on the Scythe organizer a bit. I’m trying to flesh out the faction boxes. I want a single box for each faction to hold all of the bits (mechs, character, wood bits) for that faction…
It’s not done of course, I need to figure out the proper way to do the lid. The slot on the right is for the four mechs with a channel to hold the base down and not let them move around. The bin on the top left is for the character and has a snap-fit to hold the base. I may need to overlay that with something so the base doesn’t fall out. The final bin is for the wood bits. The lid will be engraved with the faction logo, and the sections might be felted at the bottom to match the color of the faction.
It’s a rough design that will have to be re-done. It isn’t completely parametric, though I did use parametrics a bit. I imagine if I tried to change a setting it would go all wonky.
There is one game insert company working on Scythe and here is their mech/character segment:
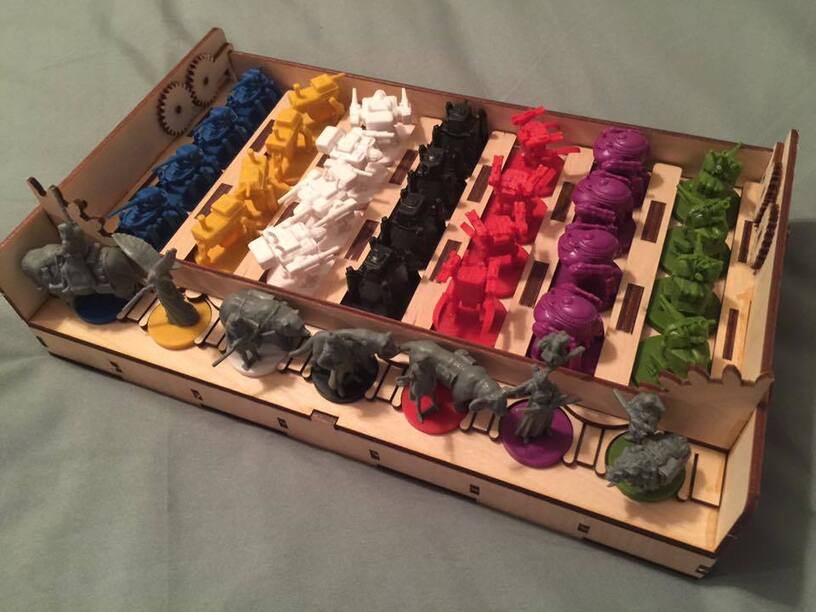
I want mine to be separate boxes for each faction, so that’s why I’m taking a slightly different approach.
20 Likes
Love it! Those spring loaded mech holders are perfect as I store my box on the side. Gotta show off the artwork. I do like your idea better if you can make everything fit. Flocking is another option for soft linings.
2 Likes
I like felt with an adhesive backing - I do an outline offset (inwards) to create a cut pattern for the felt from the file used to cut the wooden or acrylic pieces. It’s peel and stick simple. Lasers great.
7 Likes
I didn’t even consider laser cutting felt… Nice!
1 Like
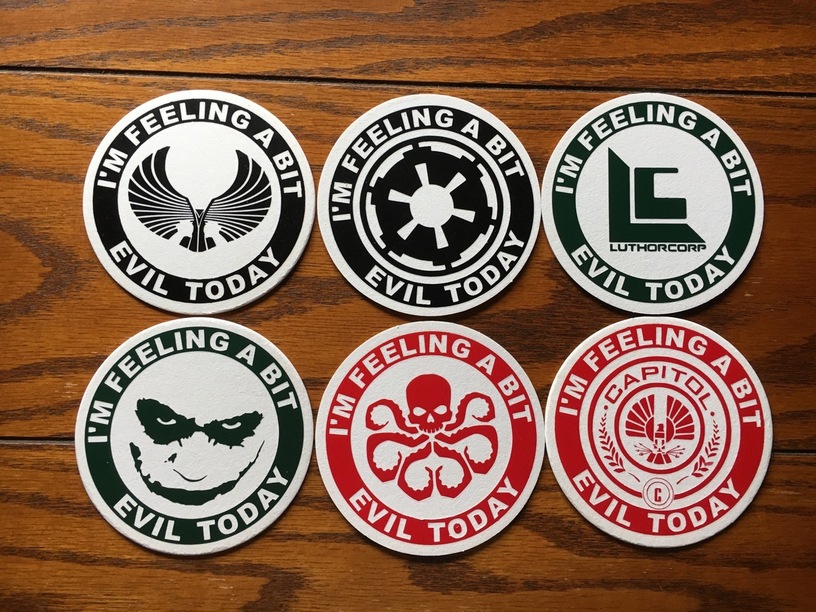
Here is what is likely to be one of my first projects. Combines my Geekiness with my love of Beer. We’ve got a lot of genres covered. Star Trek, Star Wars, Superman, Batman, Marvel’s Agents of Shield & Hunger Games so far. More to come! I designed these in the Silhouette Cameo software and cut them in Heat Transfer Vinyl - usually used for T-shirts and such. I pressed them onto cardboard bar coasters with matching Heroic and Evil logos on either side. I’ve made other coasters like this and the transfers have held up at least as well as the coasters. I want to engrave and cut them out of some hardwood or ply when the GF arrives.
I’ve included PDFs that (I hope) are ready for cutting. I’m not sure if the green outlines around the black areas will be able to be differentiated from the black. This is the plan:
1 Raster Engrave the black areas of the Heroic side.
2 Outline Engrave the green lines (if they are necessary for a crisp look)
3 Cut the red lines.
4 Flip them over and place them in the cut out areas.
5 Line up the Evil graphics using the red lines and the Glowforge camera.
5. Repeat 1 & 2 for the Evil side - turning off the red cut lines.
Please feel free to save and cut these for personal use. I have not licensed any of the corporate logos, so they should not be used for commercial purposes. In the Silhouette software, I used their trace function to get cut lines for the logos - It works very well for high contrast images. The software also has a fair text on a line function that I used for the circular text (it can be kind of finicky). I assigned colors for each item and printed to PDF. Silhouette Designer Edition can import SVGs, but can’t export.
I hope I understood the use of PDFs for the Glowforge and that this first project is one of many successful Laser Adventures.
Heroic Evil GF 3.pdf (1.5 MB)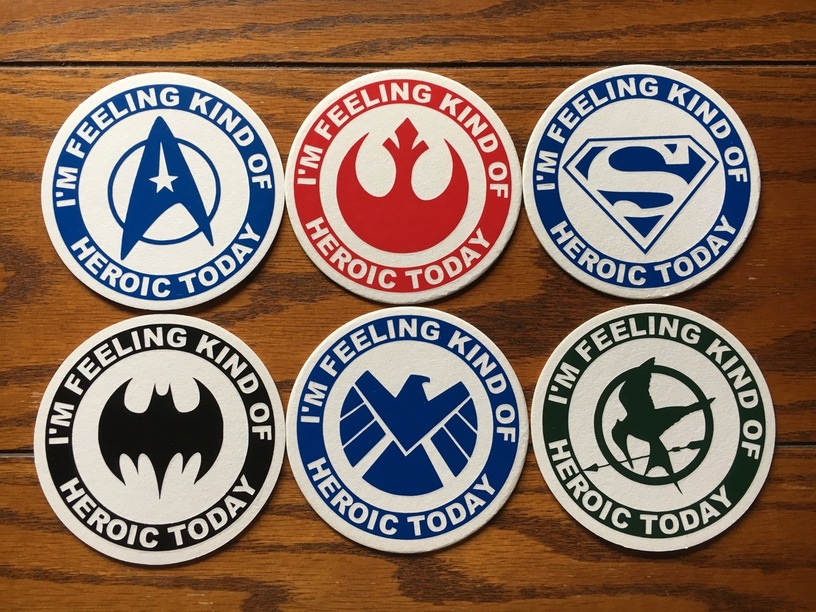
Heroic Evil GF 2.pdf (1.3 MB)
Heroic Evil GF 1.pdf (1.4 MB)
23 Likes
Oh yeah,
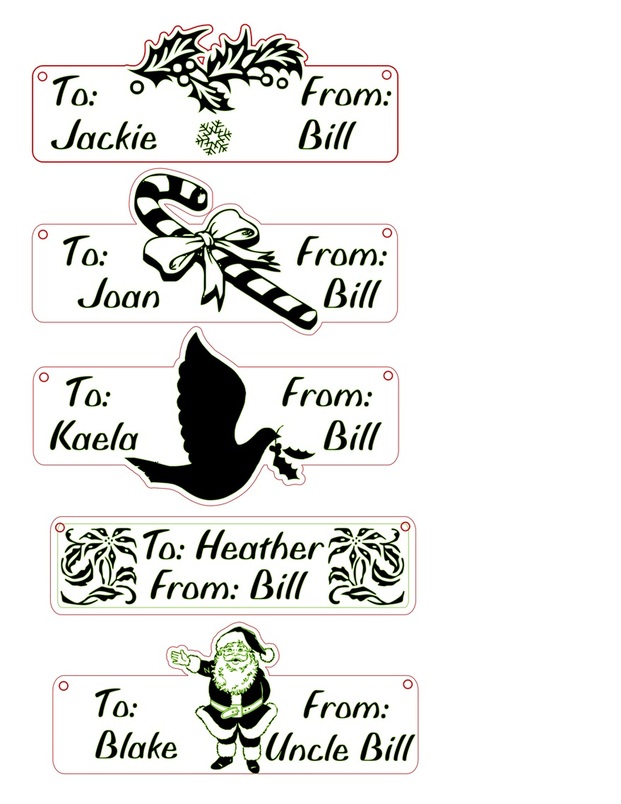
One more thing is in the hopper. I’ve begun to prepare some holiday gift tags - Just in case the 'forge comes in before Christmas. They’d be a great way to show off my new tool to family and friends. I’d say “introduce” them to it, but they ALL know about it. Probably tired of hearing about it. Same cut profile as for the coasters. Black engrave, green line engrave if possible & necessary and finally, a Red cut. The green lines may be a little to delicate, so I might have to remove them to get a good black engrave.
Also, the little red holes are made to run a cord through so they hang horizontally on the package. I might change their color and assign them as a cut just before the red outline cut. Just in case they shift a bit if the outside cuts first.
Here’s hoping for an early holiday present
17 Likes
I love these! Wouldn’t that be really amazing if we got it before Christmas?
5 Likes
Here’s hoping! I’m going to try to be more organized this year. Want to clear the decks in case it comes in before the Holiday. The graphics on these tags are actually just dingbat font files I put into the program. These aren’t always perfect, but shouldn’t be overlooked for quick designs. There are some especially nice flourish fonts out there.
3 Likes
Agreed! There are so many things I want to do that keeping a level head about the realities of shipping dates and the inevitable learning curve time requirements is getting harder and harder. It’s like I’m waiting for Christmas! 
6 Likes