Got it. Ditto back 
2 Likes
Warning…this will be utterly boring to anyone but someone like me that is a complete blank slate when it comes to lasers. ![]() However, I’m hoping others that are new to lasers and even to designing will find something of value in this post. Nearly 3 weeks ago, I mentioned something I would like to make if I had a laser. @jamesdhatch very kindly offered to use his laser to cut out my design for a wind catcher for one of my outdoor chimes. I created a rather quick and not very artistic design in Affinity Design (Mac version) and sent it to him. Jim cut one set, then made some recommendations to the finished design, so that I could learn from the entire process. I cleaned up some things, adjusted two letters of the rather different font, and made my first try at bridging the ‘eye’ of a letter. Sent it to Jim and he cut a second set, showing the results. He also made a point of showing different ways of using the laser…engraving, cutting all the way through, etc. Altogether, he made about 9 or 10 versions and sizes so I can have a complete record of the process. To me, really fascinating.
However, I’m hoping others that are new to lasers and even to designing will find something of value in this post. Nearly 3 weeks ago, I mentioned something I would like to make if I had a laser. @jamesdhatch very kindly offered to use his laser to cut out my design for a wind catcher for one of my outdoor chimes. I created a rather quick and not very artistic design in Affinity Design (Mac version) and sent it to him. Jim cut one set, then made some recommendations to the finished design, so that I could learn from the entire process. I cleaned up some things, adjusted two letters of the rather different font, and made my first try at bridging the ‘eye’ of a letter. Sent it to Jim and he cut a second set, showing the results. He also made a point of showing different ways of using the laser…engraving, cutting all the way through, etc. Altogether, he made about 9 or 10 versions and sizes so I can have a complete record of the process. To me, really fascinating.
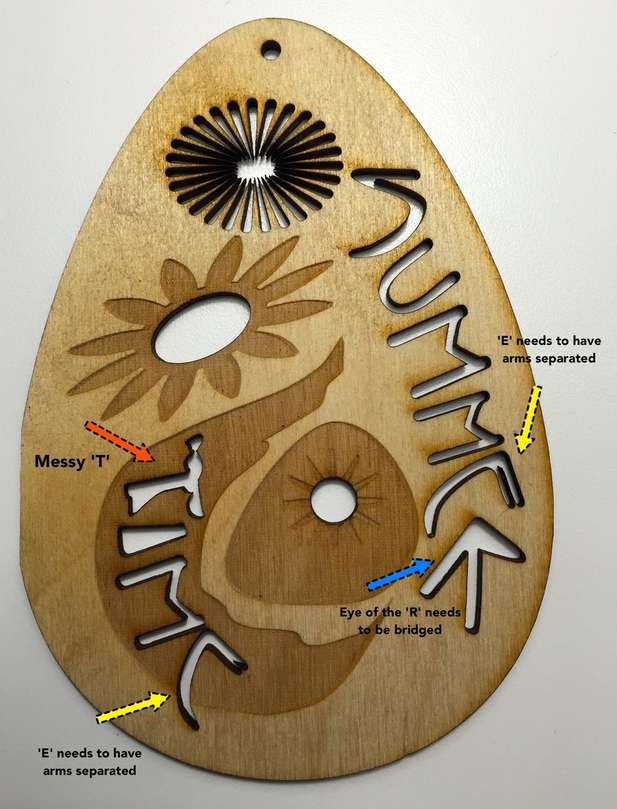
This is the first cut. I labeled the things that needed attention, fixed them and sent the design again.
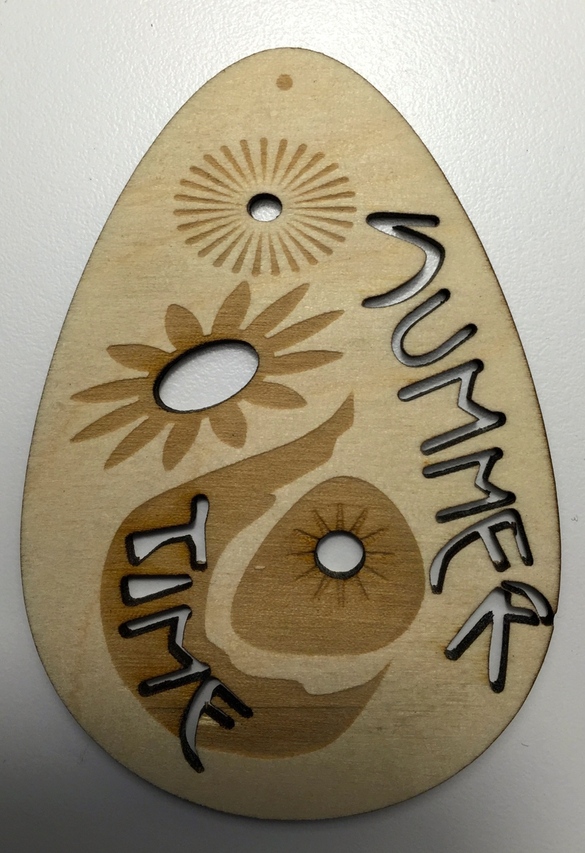
You can see here that I cleaned up the ‘T’…separated the arms on both 'E’s, and created a bridge in the eye of the ‘R’. One lesson learned here was that by making the eye on the R, it moved the letter too close to the edge, which pretty much just blew out the edge. On other pieces, not pictured here, the eye bridges came out completely because they were too thin.
So now, rather than just one wind catcher, I have enough to make a complete mobile which also serves as a learning tool. ![]() This is the very first thing that I ever made that has now actually been created using a laser. That makes me even more excited to get my Glowforge. I am so appreciative of Jim’s kind offer to make this happen for me.
This is the very first thing that I ever made that has now actually been created using a laser. That makes me even more excited to get my Glowforge. I am so appreciative of Jim’s kind offer to make this happen for me.
25 Likes
Thats awesome!! That link when it goes from your head to a computer screen is often hard to imagine at first until it comes out the other end of a laser. 
6 Likes
Wow, impressive collaboration! And how kind of Jim to share his time and expertise. It helps us all!
6 Likes
Nice! Thanks for sharing the process. It is helpful to learn these details. And thanks @jamesdhatch for taking the time to provide such valuable teaching for @Xabbess and, by extension, all of us.
4 Likes
THANK YOU @Xabbess for sharing this. As a fellow Noob, this is EXACTLY what I’m looking for. No assumptions, no skipping “whoops” steps. Thank you, thank you, thank you.
4 Likes
Thanks for sharing @Xabbess.
I think a bunch of us will burning through a ton of material learning lessons like this one.
4 Likes
Yep - until you see what comes out of what your on-screen design (vs what you think it should come out like ![]() ) it’s hard to know if you’re learning the design tool right. I like lasers for their speed of iterations. Design it, try it, fix it.
) it’s hard to know if you’re learning the design tool right. I like lasers for their speed of iterations. Design it, try it, fix it.
6 Likes
That’s contrary to most of my professional training from vocational electricity shop in high school to starting college for electrical engineering and then changing to computer science (programming). We were always taught to make sure you knew what the result would be before you turned it on/tried to compile your program. You could expect a smack to the back of the head if the electricity teacher heard you say “Gee, it works” when you turned on a circuit you just wired because you shouldn’t be surprised it if worked the first time. As such, it has become my nature to rely on preview tools and visualizing in my head what something will look like before I send it to my CNC router or vinyl printer/cutter. That doesn’t always mean I get the results I expected. It just means I spend a little more time upfront trying to think through the possible problems so, hopefully, I need fewer iterations to get it right.
5 Likes
I agree…after awhile you can get a feel for how the project will turn out. Ive been designing for lasers so long that I can tell if lettering or shapes will be placed right or too big or small etc.
However, when I design something new and even though I have the 3D model and know my kerf is just right etc, I still get a bit of a thrill when it cuts out perfectly and fits together…lol
9 Likes
Been there and no longer do that ![]() (I’m an ECE) Back when I was designing circuits, etc the cost of an iteration was ridiculously high in terms of $/time compared to what it is today. Fail fast is way more efficient in ferreting out detail issues than the relentless pursuit of first time correctness. Although the latter is more elegant, it’s not as efficient anymore. Same is true of software development - machine time is ridiculously cheaper than people time. Let it find the typos and gross errors for me & I just worry about the complicated stuff.
(I’m an ECE) Back when I was designing circuits, etc the cost of an iteration was ridiculously high in terms of $/time compared to what it is today. Fail fast is way more efficient in ferreting out detail issues than the relentless pursuit of first time correctness. Although the latter is more elegant, it’s not as efficient anymore. Same is true of software development - machine time is ridiculously cheaper than people time. Let it find the typos and gross errors for me & I just worry about the complicated stuff.
As Stephanie notes after awhile you get a feel for how it will turn out but for newbies, they’re on the front side of the “after awhile” curve. They’ve got no reference set of “I did this and this is how it turned out” to be able to predict it. If they had the opportunity to attend classes or training they’d get those examples but in this arena they’re most likely in a learn by doing environment.
The other thing that we sometimes forget is that not everyone thinks spatially - I first found that out with my wife when we built our house. I could look at the prints and visualize what the wall or space would look like but she couldn’t. She needed to see it in wood (at least the framing) to be able to figure out if it was what she was looking for. Lots of people are like that and can see the lines in AI/Corel/Inkscape but can’t see the 3D result in their head.
I don’t get as much stuff “wrong” anymore as I did when I first started out, but I still encounter the occasional “huh” moment when something engraves differently than I thought it would because the layering of objects & lines is more complex than I initially thought.
9 Likes
This is so great! Beautiful chimes, and wow, I really need to start learning these programs!
3 Likes
Affinity Designer does seem very capable. I’m trying out the free 10 day trial version, which is available on their website. ![]()
2 Likes
that looks pretty slick! id pick up a copy for $50 if it was also on PC.
1 Like
Nice project to demonstrate technique. I’ve done my best to try and understand designing for kerfs, but I have the feeling that until I have some time with a laser, I just won’t get it all down. @takitus’s point in the other thread about outlining and engraving does assist in learning the technique to do offsets. Still have lots to learn. @polarbrainfreeze’s chess piece design taught me a whole lot about leaving connections as needed for a piece to stay together.
4 Likes
One of the best shows ever.
6 Likes
Knowing your material makes alot of difference in the way you design too. When I cut mylar stencils, my bridge width can be no thinner than .03125" otherwise it will break. It’s different with craft foam…since craft foam receeds alot from the cut, bridges must be much wider. Wood and acrylic behave differently too.
5 Likes
That [preview] brings up an interesting thought, @johnwills. It’s been mentioned that he GF interface will have a simulation cut. I wonder if that ends up with a final preview. Issues such as @Xabbess brought up, like the counter she bridged in the letter R, would be available in a finished simulation preview.
1 Like
I have caught problems like that in the Preview Toolpaths feature of Aspire when preparing files for the CNC router. Some problems still slip by but I catch a lot of them before I waste material.
Funny you should post this. I almost ended one of my posts earlier this week with “So remember, if the women don’t find you handsome, they should at least find you handy.”
2 Likes