It’s been a battle and I’m a perfectionist so I will always be looking to improve but this is what o have so far.
My first post!!
Can’t figure out where to post a pic!!
Can’t figure out where to post a pic!!
Yes… how to I upload a pic!!!
There will be a flat bar icon with an arrow pointing up. Click that and then follow the instructions. Or just copy the picture and paste it Ctrl + v.
Thanks… I will try the arrow. I tried to copy and paste with no luck. I’m on my phone so maybe that’s why?
It’s hard from a phone but not impossible. From a PC just drag and drop to your open comment.
Got it… thank you!!
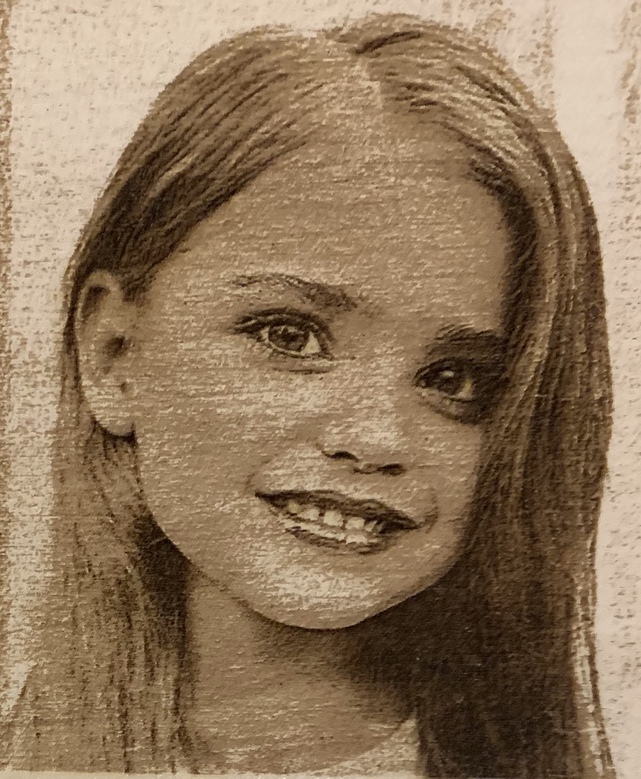
What a great picture to use as an engrave. Nice.
Thanks. I’ve been very busy trying to perfect it…
You are using variable power? It is amazing results for trying to do that. You might want to try using dithered dots at very high resolution, say 1355 LPI It will take a long time but the dots will be very tiny, all the same depth but more scattered in lighter areas and more concentrated in darker areas and a very clean look.
I used convert to dots for this but it def came out as more of an engraved look instead of a “print on Paper” effect.
Is there a specific way to set the print up that you are talking about as far as precision and speed?
I would live to try it.
There is a range adjustment with sliders at each end. One for too many dots on the right and the other for not enough dots. If the dark places get burned up you can move the slider to the right yo make the dark area less dark. The more you slide them together, of course, the less range of light to dark. 
Welcome. Your hard work is paying off.
This is the most challenging it seems. I would love to get these printed with the hugest LPI but I always run I to a problem. For example, the settings for this was 1000/90 10-90 dot range and 340 LPI. When I want to go up in LPI, it seems I have to adjust both sliders and/or the power level. I can’t seems to figure out what the rule of thumb, if there is a general one, is for adjusting settings when wanting to increase LPI.
I have noticed that the HD pic setting is 1000/full, 450 LPI, and a range of only 15-50. But when I try that setting, it looks HORRIBLE!!
Any suggestions?
Do some tests wi this…
Glowforge requires us to confine discussion of manual settings in their forums to the Beyond the Manual category. The current preferred practice is to either move the entire thread to Beyond the Manual or, to start a new thread there and, link to it from this one.
From what I can tell, it looks like you might be burning through the veneer surface of the material and down into the core. I’d reduce power.
There is no benefit to higher LPI settings, wood simply doesn’t support that level of detail.
The PG draft photo setting is about as good as it gets, as long as your source image has been prepared appropriately. Tons of existing discussion and also “official” tutorials on this here.