I have yet to create a project where the laser cuts all the way through. I tried something on The PG draft board and PG medium acrylic that came with my Glowforge and I ruined both boards because even after trying a second pass and increasing the power it just would not cut all the way through. The Good measure ruler thing came out perfect and my smaller projects that are like 2” come out great. Engraving and scoring is good for the most part. The two projects I tried that were about 6x8 inches failed…not sure what it is that makes the GF cut properly, but this is scaring me since I have only had it for 4 days.
Someone will come along to offer more help, but in the meantime double check the settings along the right hand side of the UI…make sure the power hasn’t defaulted to “1”…as that’s too low to do anything.
Thank you for your reply. I did increase power and tried more passes to see if that would help (still didn’t cut all the way) …even slowed down the speed…either I need to slow down speed more or up the material as harder or something (I thought the machine recognized proof-grade material and automatically set correctly, but hey if other folks are adjusting it, I wanna know What numbers work).
A functional machine will cut proofgrade materials with default settings.
I’ve had my machine since 2017, it still cuts just fine.
If yours is not, it’s either a setting issue, or the machine is not functioning to specification and needs to be replaced - unless you wish to accept it as-is and have to adjust settings every time you use it, and hope it doesn’t get worse.
I really would like it to just work properly. Your feedback and info about your machine is helpful. I’m still hoping I’m missing something that someone can help me with…I do feel like I shouldn’t need to adjust settings…especially if other folks are not needing to.
Support uses the GoGM to test if a machine is functional. If you say that printed just fine, there is no good reason other designs using Proofgrade material and settings won’t either.
If you can walk thru exactly what you were doing, taking screenshots, then perhaps someone will spot what is wrong.
If you’re still having trouble, definitely take a picture of your settings and post them. It can be hard to troubleshoot when you’re brand new and don’t know what you’re looking for. Hopefully, we can help you get back on track quickly.
If the Gift of Good Measure printed perfectly, it is an indication that the machine is working properly. Are you sure that the material is flat to the honeycomb tray? Are you certain the tray is in properly? Did you use the set focus tool and make sure that the beam landed where your artwork was to be placed? Did you double check that proofgrade settings were being used for the proper material? In my experience, using two passes is never necessary for proofgrade materials.
I’m so sorry to hear that you’re running into trouble, but I’d be happy to help. As @dklgood pointed out, if your Glowforge is printing the Gift of Good Measure perfectly with Proofgrade Material and Proofgrade Settings, the trouble you are experiencing could be related to the design, or the settings associated with it. I’d like to review some prints you experienced this behavior with.
Would it be possible to obtain the date and time of the most recent prints where you noticed cut through trouble? I’ll extract the log files from your Glowforge and review this print. I’ll send over more information as soon as the review is complete.
I’m in California on PST time. Okay the first time happened on Saturday night of May 9th (sometime after 7pm) and the second time was on Sunday (can’t remember what time, but I haven’t printed many things at all yet- maybe the afternoon?). I wish there was a way for me to extract the exact time.
I only used Draftwood on Saturday and used medium acrylic on Sunday. The images were both larger than anything I printed that came out well (small circles like 2-3 inches). The bad cuts were not circle shaped like the small stuff I had cut which came out fine. Both were an image of a SF Giants sign (tried it one size on Saturday, then a smaller size Sunday- still both larger than my good circle cuts) and the outline of the signs (I added the outlines via the Glowforge option that lets you insert shapes, fonts, or outlines) didn’t cut all the way through on them both. The engraving of the draftwood was also kind of weak on the right side for the first one I tried on Saturday.
Sorry for the long explanation. Just trying to give all the details I can.
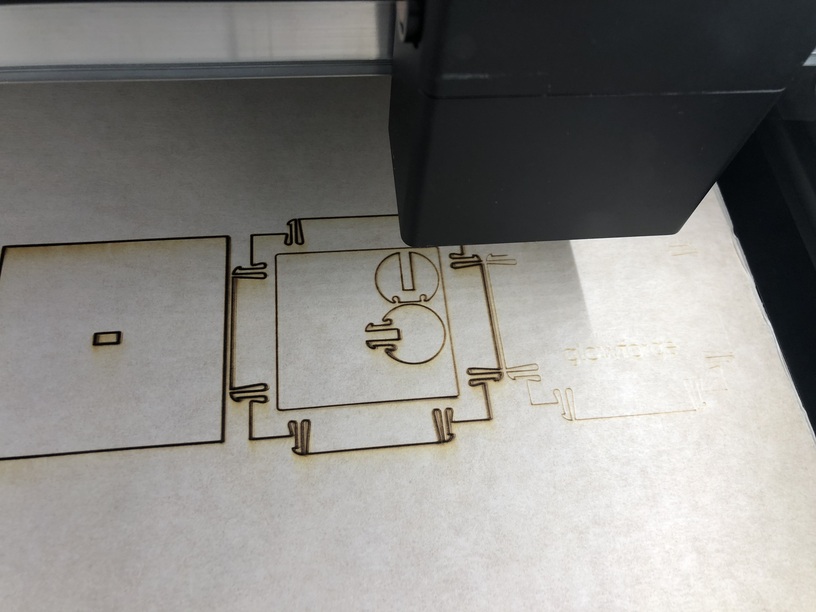
Hello again. So at 8:07 pm, I just tried making the GF Snap and Store Box using the settings that GF does for PG medium draftwood. Only the first box side cut well. The 2nd one was okay, but tore when I tried to pop it out…all the rest did not cut all the way through and even the "made by Glowforge text did not engrave enough to color the driftwood at all. Seems like anything in the left upper area does a good job…beyond that, it does not. I didn’t take it off the crumb tray and tried a 2nd pass of the last 3 images because it looked like the others did cut well. I lowered the speed and increased power and while it was stronger, it still did not cut properly. Here are pics I attached.
Just now followed instructions for cleaning lens in the head and tried Good Measure project on far right side near the PG sticker on my medium draftboard. I ended up canceling the print because it wasn’t firing up and doing anything. I will await further instruction from you at GF. I really appreciate your help and hope I’ve provided enough info to help me figure out what’s going on.
Just now followed instructions for cleaning lens in the head and tried Good Measure project on far right side near the PG sticker on my medium draftboard. I ended up canceling the print because it wasn’t firing up and doing anything. I will await further instruction from you at GF. I really appreciate your help and hope I’ve provided enough info to help me figure out what’s going on.
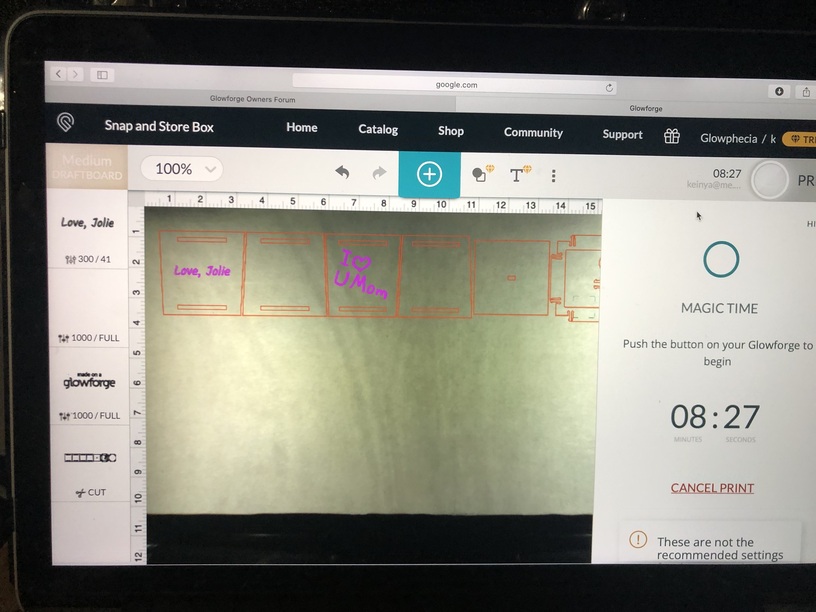
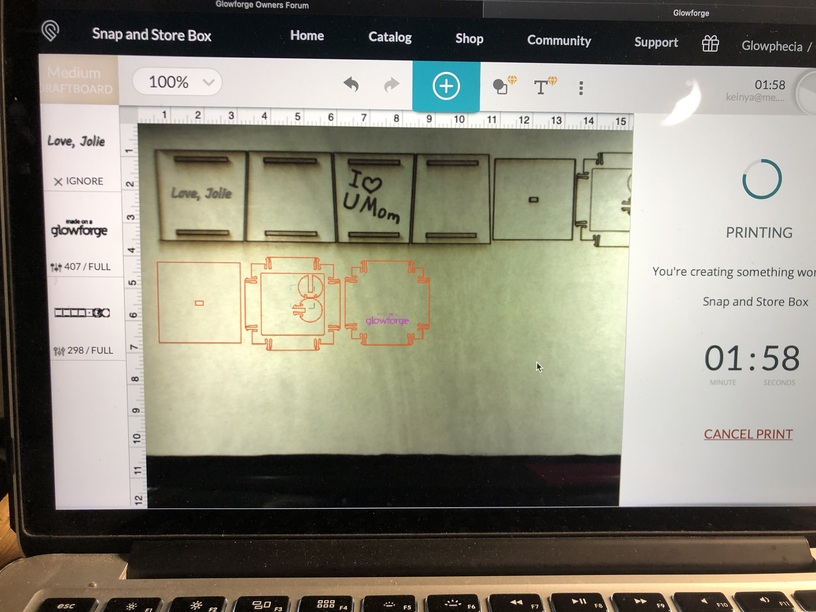
From your post above, the power is 1 which won’t even mark masking. Also, a cut speed of 298 on the first pass is way too fast. What happens when you use proofgrade settings?
Now that I’m looking at it, yes that makes total sense about the power at only 1. I honestly can’t recall making the power so low. Whenever Ive tried a 2nd pass (which is not often) I aim to make the power higher and speed slower. Maybe I just don’t know how to set numbers properly. Here’s a question though…when you put in a piece of PG material and try to do a pre designed GF project, don’t the settings automatically go to the correct numbers? That was what I thought and why I did not make adjustments when I first did the project and it was very weak whenever it needed to engrave or cut on the right side. If anyone who really understands how the GF works has time and wants to face time me and walk through this with me I will so gladly do it and appreciate it. That actually would help me a lot.
If you select manual to under certain conditions the power will be changed to 1. I can’t for sure remember when it happens. It’s to keep you from burning the place down. Forces you to select a better power.

 I will await further instruction from you at GF. I really appreciate your help and hope I’ve provided enough info to help me figure out what’s going on.