Hi, I am printing a simple message on a uncertified , non-proofgrade material. Since the material is about 1/2" thick, I removed the crumb tray and put material ( about 1/2" thick stained pine wood) on a non reflective cardboard. I focused the camera and after all usual stuff, it started printing. To my surprise, the print output has shifted drastically from what the Glowforge camera showed. Any idea what I am doing wrong? Please pardon ,my daily posts but I am new to this and want to learn the right way. I watch a lot of YouTube videos but not all of them will answer all my questions.
Thanks.
SunilActual_Glowforge_Camera_Capture.pdf (6.5 MB) Actual_Printing_In_Progress.pdf (2.9 MB)
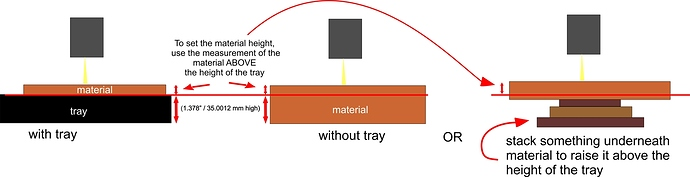
You need a thicker prop. Go for something in the 1.0"-1.25" range, underneath your 1/2" board.
(diagram courtesy @kittski)
4 Likes
Searching for an answer here in the forum will probably be better than Youtube videos. The surface you want to engrave must be within the 1/2" focus range of the lens which is between 1.5" and 2" from the floor of the Glowforge. As @Jules said, you need to put materials a little over 1" under your material with the honeycomb tray to engrave your .5" cutting board.
1 Like