Thank you @Jules I really appreciate all you are doing.
3 Likes
You can. Here’s a link describing how to do this:
Basically you just open a blank document, change whatever settings you want (art board size, mm or in, zoom level, etc.) and then save that file as default.svg here: C:\Users\%username%\AppData\Roaming\inkscape\templates. Obviously you’ll need to replace “%username%” with your actual username on your computer.
Edit: Sorry, left off the name of the file. That bit’s important. 
11 Likes
Great! Thank you! 
2 Likes
Continuing on the theme of making the artboard the right size for  , does anyone know if there is a way to make the drawings in Fusion 360 exactly 20x12?
This could be a step saver for F360 users as the accepts PDF as well as SVG
3 Likes
Thanks for the info!
Have you tried using a multi page pdf file with an image that would first be engraved and a vector that would then cut out around the image?
Here is an example of a two page pdf with the image which I plan to 3D engrave and the Oregon boundary vector to cut around the image.
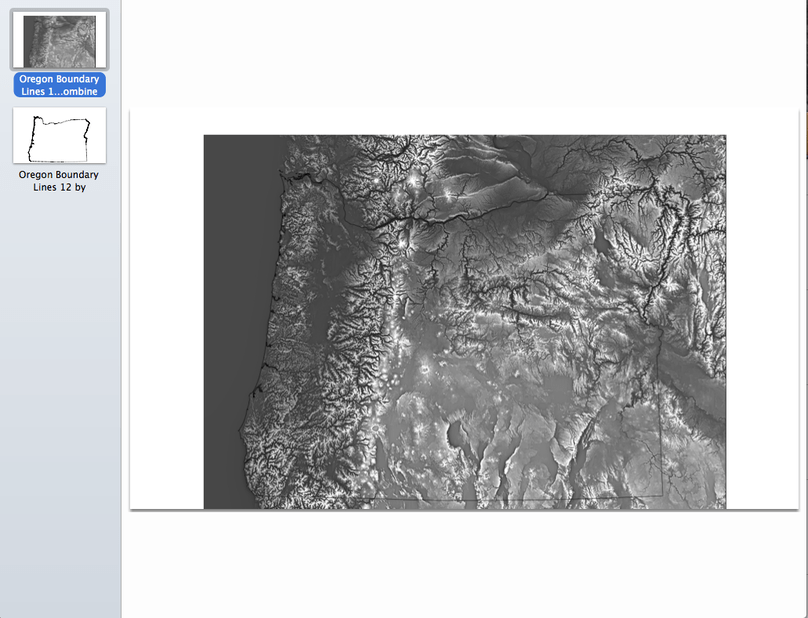
I have been working on a bunch of these and it would be nice to see if anyone has tested multi page pdf’s for first engraving then cutting.
5 Likes
For Affinity Designer, I found that you need to unset viewbox on export to get things to come out at the correct size:
3 Likes
Thank you for compiling this @Jules ! I was fighting with a design since yesterday where my logo, very small in the design, kept saving out in a strange distorted way. Turns out that I had my decimals set to 1 instead of 3, which made all the difference once corrected. I don’t fully understand what the SVG settings MEAN, but it definitely helped to check the forum and see what had been working for you guys.
Side note, I’m hoping that larger and more complicated SVG engravings (say, 18"x6") will improve over time. For my current project I’m able to break it into smaller batches out of necessity (always stalled at the preparing stage), but would have been much preferred to run the full grouping at once.
4 Likes
You have to break it into two files but then it works. I have not done topo’s but I have done two page PDF’s, well two one page by the time your printing.
3 Likes
That is a bummer if the GlowForge can’t handle a multi page pdf file! I was hoping to just load a single pdf, then fire off the GlowForge to do its work!
Maybe @dan can add this to the hopper!
While I agree it should be in the hopper for down the road, it is not that hard to split a PDF while we wait. I use Corel to do it.
1 Like
For me, they are separate to begin with then I am putting them together for ease of use!!!
Maybe I will just use the process @jules outlined where the image and vector are embedded together in the svg.
2 Likes
I’ve tried that and things got really messed up in the UI, for me. The images that I wanted to cut/engrave did not even show on the bed. I went back to setting view box back on and everything is golden. Can’t help but wonder if there were other settings at play at the same time that caused problems. Either way, whatever works is the key.
1 Like
Sorry, but that is not possible at this time. Drawing sizes in Fusion correspond to official drawing standards (like ISO standards, etc). You can’t currently make a custom size drawing.
3 Likes
Thank you so much for posting this!!
1 Like
Respectfully, that the opposite of what I’ve experienced over the past 6 months. With viewbox checked, everything appears in the correct location in the GFUI. Without it, all bets are off.
Placement is so good this way, last night I was able to re-cut a piece (still in place from the last job) after power-cycling the GFand reloading the app. YMMV, but I’m keeping it checked. ![]()
1 Like
Thanks @Jules for all the useful tutorials!!! Studying them in preparation for my Pro, which should be showing up fairly soon… 
2 Likes
one note to add for the Adobe Illustrator settings, in terms of having files that display properly when uploaded here to the forum (not really sure that it matters for use in the GFUI): If you are working in Inches, make sure the Decimal Places is set to “3” as in the examples in the OP. If you are working in centimeters, set it to “1”.
1 Like
What’s the “printable area” within the 12x20 artboard? I’ve got guides placed so that the PG boards are placed consistently on the bed, and I want to place the objects in Illustrator such that the maximize the area used within the printable area. I have approximately figured it out (from dragging and watching when objects change color) but if anyone knows the exact margins, that’d be awesome.
I’m pretty sure it’s different for each machine.
Best way to find them for your machine is to drag something over until the boundaries pop up, and then capture a screen shot of where they appear with the rulers up top and to the left.
I don’t know if it’s different (printable area) between production machines or not… I wouldn’t imagine so but I only have one Glowforge 
What I do know, is that if you are doing engraves, your margins are going to change dynamically with the speed of the engrave operation.
You could probably take a screenshot though of the margins as they exist, include the ruler, scale the screenshot so that the ruler matches and then place a guide based on that.