yea my mistake, it only helps if it is the other way around and the back is larger than the front. anything more accurate than one kerf you would need to cut a separate jig for the flip
2 Likes
If you need to flip items that are already cut out, like coasters, use magnets to set your holding boundaries.
2 Likes
Exporting SVG in Illustrator results in a file that has a big issues for CAD software.
In Fusion 360, you usually can’t successfully import exported SVGs. You will get a non-descript error. If it does import, it will be distorted, missing parts, or objects will be missing a wall/side.
1 Like
Yeah, I know. I use Save As. Some folks want to export though.
(Can’t really chat…system just crashed. The air is blue here.) 
There are different uses for SVGs. Basically, Illustrator exported SVGs are stripped down versions of SVGs, that are more suitable for the web. This site sums it up pretty well: The Different Ways of Getting SVG Out of Adobe Illustrator | CSS-Tricks - CSS-Tricks
Saving as SVG from Illustrator is fine, but the file is absolutely not ready for direct use on the web. When you “Save As…” from Illustrator as SVG, Illustrators primary concern is that you can open that file again in Illustrator just as you left it.
Export As… is very different. You are “exporting”, and the implication is that the file that is generated is no longer an Illustrator-friendly and editable file, but a new file specifically for some other purpose.
JPG is one of the options, for example. You wouldn’t expect to be able to edit your vector art after exporting it as a JPG.
SVG is an option here too. The output is vastly different than “Save As…”. Exported SVGs actually are pretty close to web-ready. There is no weird doctype, loads of metadata, or proprietary Illustrator stuff. Exported SVG likely will not open in Illustrator in exactly the same way it was in the original file.
3 Likes
Not exactly. You can turn off the Illustrator data when you save as SVG, but most CAD programs throw the Illustrator information away. Export as SVG is really more for web graphics.
Most CAD programs can’t properly parse the exported SVGs and it looks like the GF interface has similar issues according to a few posts (and it looks like you responded to one person who was having distortion issues). Save as solves many of Illustrator SVG headaches.
I’ve been building files in CAD for years, and Illustrator exported SVGs cause nothing headaches. The first question in the Autodesk and SketchUp forums when you post about SVG issues is if you exported the SVG from Illustrator.
The reason the 20x12 artboard was mentioned like it was, is because that was the recommendation from Glowforge. If you want to set things up in any random sized 3:5 ratio that you want, I say roll with it. Most people don’t think like that (in aspect ratios), so telling someone to start with a 20x12” artboard is just easier for everyone.
As for export / save as, I use export for almost all of my Glowforge docs and it works fine. My reason for doing it is that I can have multiple designs in an AI file on different artboards and export the individual artboards out to individual SVGs.
2 Likes
Agree. The 5:3 ratio is possibly the aftereffect of a design decision GF developers made - e.g. “let’s treat 20x12 as a fixed thing and use it to determine object placement in the GFUI”. That any 5:3 ratio works as well may simply be an artifact of the programming technique used and not the original design objective. The 20x12 was the company’s goal and the 5:3 is the fortunate coincidence, not vice versa.
3 Likes
Yeah, I tend to use Save As instead of Export for the simple reason that it’s what is recommended by Glowforge. They designed the system that uses it. They know what works.
Got no problem with other people doing whatever they want to though. If they would rather hit File>Export instead of File>Save As, it doesn’t strike me as being a big deal. Design your files and save them however you want.
1 Like
The 20:12 ratio is most useful when using software that can’t export SVG with non-pixel units, such as Affinity Designer.
With Illustrator there’s no particular reason to use that size as long as you uncheck “Responsive” when saving the SVG.
2 Likes
I’m going by my experience in the CAD world. So you are saying the official support teams and the customer forums for Autodesk, SketchUp are wrong when they say there is a difference between saved SVGs and exported SVGs from Illustrator? And I’ve had personal experience in CAD programs. One gives you something consistently useable and the other doesn’t. (Of course, I only have two years of experience with exported SVGs, since Adobe released this in 2015 with their web design features).
If I was creating SVGs for a website or app development, then I would definitely use an exported SVG because it is a more lean file. For artwork that is being printed (never used one in a printed piece though), sharing with someone else, or being used in CAD I’ll be saving SVGs, since they are more compatible with more programs.
And as an added bonus, by saving as SVG you just need to save one file, instead of keeping a SVG and an .ai file.
You keep saying this isn’t true and have done reasearch, but then you cite no evidence but your statements. (I’d love to see a comparison of the two being used with the GF). We both read the article I linked to and you see that exported SVGs are better for everything, which is not what I see. I see that both have their benefits and issues, and you have to pick the right one for your task.
I think we are going to just have to agree to disagree on this matter and let this thread get back to its original purpose. If you’d like to discuss further, I’m happy to do so under it’s own thread, via email or chat.
1 Like
I work in .AI files and export to SVG, and haven’t had any issues with GFUI importing them. I’ve been using export rather than ‘save as’ because save as renames the file I’m working on, so future saves go into the SVG file instead of the AI file, which can cause problems with my workflow (since the AI file is no longer the master). Also, export only writes out what’s visible, and since I work in many layers (and turn specific layers on/off), the ‘save as’ includes tons of hidden material, making the file much larger and more complex than an export, making them much slower to upload and process.
So while I can’t speak for anyone else, for me export works a lot better than save as.
5 Likes
That’s a good difference to know about.
I work in a lot of layers too, but usually discard un-needed layers as I’m done with them. Otherwise it confuses the other designers on my team when they open my files.
1 Like
I can understand that 20x12" or the metric equivalent maps 1:1 to the GF workspace. What do other 5:4 sizes do? For example does something 10x6 get blown up to 20x12?
What actually happens with some other random size that isn’t 5:4?
1 Like
In Inkscape, I created used A4 as my page size, placed a 25.4mm square against the top of the page and exactly 25.4mm from the left edge. This is the result in the GFUI:
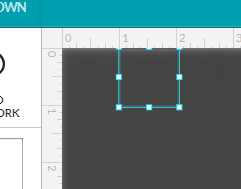
Edit to add: A4 in portrait orientation
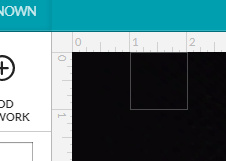
Edit 2 to add image with the square unselected since the selection box is a little bigger than the object:
3 Likes
So do I glean from that it simply aligns any page size to the origin?
I notice it’s a little off to the right, I used align and distribute to put it against a 25.4mm box. It’s shifted right a width and half of the stroke due to this.
3 Likes
Yes I noticed the selection box is oversized. Another thing that makes manual alignment almost impossible.
1 Like
That’s what it looks like to me. And it doesn’t seem to care about the page aspect ratio or whether or not it fits in the printable area. I’ll try a bit bigger and see what happens.
2 Likes
Yes. With A3 paper also it just matches the upper left hand corner position. One of the annoying things about this workflow is that inkscape X and Y origin is the lower left hand corner of the page, so in the UI, the position of the object is reported as X: 25.4, Y: 394.1
Now, I should try an object that doesn’t fit and see if it scales.
2 Likes