You can use the method above to align any engraving inside of a cut line that is shaped exactly the dimensions of the pre-cut item that you want to engrave on…and then cut that shape out of some kind of backing material (most people use cardboard - I like to use cheap BB), creating a jig for placement of your pre-cut item.
So the first half of the process happens on the backing material, you remove the cutout, just like above, only when it comes time to drop in the item to be engraved, you drop in the box or whatever you’re working on. (Creating a jig for alignment.)
The rule I’ve learned to use is: Files that are imported together stay together.
Once you cut, the ability to go in and interact with those cuts with new designs becomes much less precise.
I’ve used a Pazzles cutting machine for years and have been trained in this pretty well. The difference is, the Glowforge may overcome it some day. (The Pazzles and other cutting machines have these issues because dragging a blade through materials can make it a bit less predictable).
it means you can’t expect to cut, then adjust things, but once you recognize that it’s not that hard to adjust.
These tutorials remain amazing, @Jules. Thank you so much for having the time and exertise to make so many!
But I cant have the crumb tray in when I am using things above 1/2" and because the material is thicker than the cardboard for the jig I cant simply place it on the support im using to hold the item.
The only thing I can think of is an elaborate two story setup where I leave the middle empty and use stuff 1" tall around the outside to support the cardboard. Cut my shapes and then very carefully pull out those shapes and place my materials on the 1/2" or so support in the middle. Seems like a huge pain so I’m hoping someone else has figured out something better
That’s pretty much exactly what I did when I was test cutting that thick foamcore…I just taped a bunch of 1/4 inch ply offcuts together and stuck them at either side of the bed, and taped the foamcore between them. (Very scary looking setup actually, but it worked just fine.)
So you can make your side setup tall enough that the top of the cardboard is slightly below the object to be engraved (about 1/4" lower) then just reset the thickness for the taller object to be engraved and drop the boxes down into the hole cut in the cardboard. Make sure you put a piece of scrap wood under the cardboard the first time you cut it, so you don’t fire the laser into the metal underneath, but then you can remove it for the engraving part. And just keep reusing the hole - you only have to cut the jig once, then you can engrave as many boxes in a session as you want.
Once you close the app, you will lose the relative placement for this method, so that means either cutting another piece of cardboard the next time, or if you want to try to hit specific repeatable positioning after closing out a file, @takitus has a specific tutorial for it in the Matrix.
Either one of those should work. (It does add an element of challenge when you take it over tray cutting levels, but it can be done.)
Later Update: We have a report now that the full height of 0.50 inches is now obtainable! Yaaaaay!
I know it’s not what some people consider alignment. However it is a method to align things accurately. (Even if it means placing engraves on pre-cut objects by creating a jig first.)
I disagree, so I’m going to just leave it the way that I wrote it, because I did it for a reason.
This is a method that people can use to get better alignment even while the visual camera alignment methods are not at 100%. And the object of the discussion, and the title, is to get that information across to as many people as possible, so that they can benefit from it.
It might not be your preferred way of doing it, and that’s fine. You can do things the way you want to, for as long as you like. But other people might want to hear it, and not waste weeks or months just waiting for the visual alignment fixes to be rolled out retroactively.
I would just like to say THANK YOU for your tutorials…they’ve really helped us new folks to get a jump start on things. I think it’s so cool that folks like you so selflessly give of your time and energy…great stuff!
BTW, I had no problem sorting out the difference between your double-sided alignment vs. what “most people mean by ‘alignment’”, and I’m a complete novice regarding lasers and illustration programs.
Very good.
This is exactly the process I used for 2,000 tokens (with the exception of the square cut). @marmak3261 turned me on to positioning the file for each side together in different colors.
Thank you! Thank you! Thank you! Really a great tutorial, especially for those of us without a machine yet. I now feel confident that I can get that wooden nickel design for my dad’s train club right from the first cut to the last. So awesome!
Well, that certainly makes my life easier! Chuckle!
Thanks!
(I’m going to go ahead and leave the text converting step in the writeup though, because people using other programs need to know it’s a step that needs to be considered.)
NP.
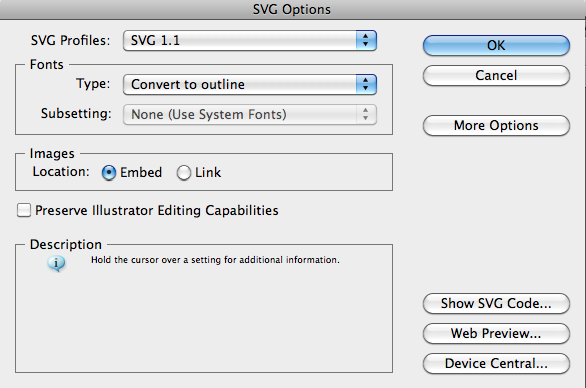
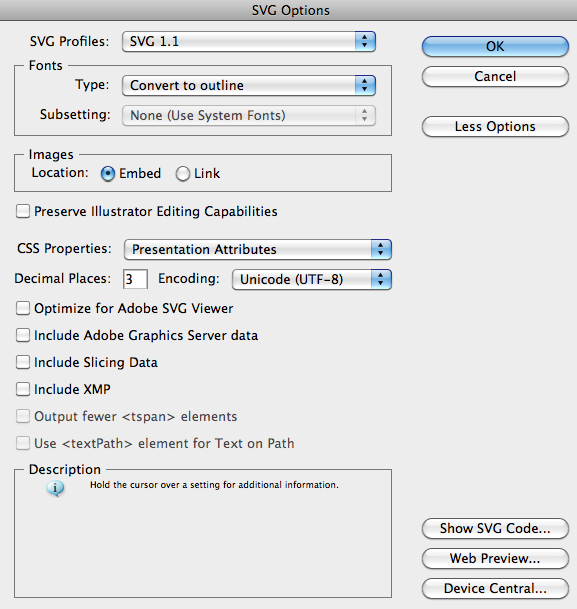
if you click “more options” you get to the advanced settings screen. These settings have worked great for me, both in the GFUI and to upload to the forum:
Of course, if your text is overlapping another design element, you will want to convert to outlines/expand before save/exporting (like in your writeup above), so that you can knock out the overlap areas with boolean operations (pathfinder).
Also just realized that I am running the slightly updated CS5.1 (version 15.1.0) and I don’t know if there are version differences if you are running straight 15.0.0.