So I got a replacement Glowforge this week and tried immediately to cut some medium PG acrylic name tags out. After they were engraved, the cut didn’t cut all the way thru around the piece. It seemed like the cut went all the way thru towards the center of the bed, but the farther away the head got from center, the worse the cut got. I’d say 60% of the pieces I cut go all the way thru, but even on plywood, 30-40% of the cut won’t even go thru the paper on the backside of the material. I thought maybe the material was warped, but it was pretty well flat. I tried a second pass and that too barely cut it. It’s a brand new machine, should I have to wipe down the lenses already? The lens and windows look very clean. I checked under the crumb tray to make sure it’s not off kilter. Not sure what to do. I have pieces that I need to cut for customers and am wondering if I should do 4-5 passes to make sure it actually cuts? Any advice is welcome. Being that I’m having issues with my replacement Glowforge isn’t increasing my confidence in the unit. 
Pretty well flat is not always good enough. If you can press on the edges of the material and it moves at all toward the crumb tray then it’s not flat enough. A very, very small amount of non-flatness will often cause what you are seeing. Many of us use magnets or other ways of ensuring the material is held down perfectly flat.
This all assumes you are using proofgrade and the material is recognized. If you use non-proofgrade then entering in the exact material thickness (use digital calipers) combined with the flatness is all important.
I’ve had an issue this morning where the default settings are not getting through the draftboard. I had to adjust it from the default 168 speed to 125. At 168, it was only getting a little pinhole all the way through at the corners.
My board is flat and I also recently cleaned the lenses.
What kind of magnets are you guys using?
Folks use different types for different purposes. I use these:
This type of magnet is extremely powerful and holds down proofgrade ply very well. But they are not for everyone. I have strong fingers.
There are many topics talking about magnets, their use and tips. Officially Glowforge does not suggest using magnets. But the crumbtray was intentionally made of ferrous material so that magnets would work. So read into that what you will.
Thanks for the tips! I went to American science and Surplus and picked up 7 magnets. We’ll see if that solves the problem on Monday!
They will be too strong for things like paper and maybe veneer. But for me, work well for 1/8"-1/4" materials.
I picked some on Amazon that are half the thickness. For medium ply, had to double them up, bit they work great. Nice thing is that I can use 1 for thinner materials. For paper/chipboard plain ferrous magnets. The rare earth ones are pretty insane…
Yes, it’s worth inspecting and cleaning your lens and windows, as well as the other steps in the cut-through troubleshooter. Would you please work through that list? When you get to the end and print the Gift of Good measure on Proofgrade Draftboard, please print it at an edge of the bed since that’s where you’re seeing an issue.
Also, do you know the approximate time/date that you printed the nametags? Thanks!
Yes, I was doing engraving and cutting around 11am-1pm central time on dec 16th. I did take the head off to check the lens and noticed that the side window had some oil or some kind of liquid on the inside of it. So I unscrewed it and cleaned the inside with a Zeiss Wipe. Didn’t seem to help any. I will try a cut on the edge of the material tomorrow morning and report back after making sure the material is totally flat
Thanks! When you say it didn’t seem to help, do you mean it stayed dirty? If so, would you send a picture please?
No, it cleaned the window, but it didn’t seem to help the cutting issue.
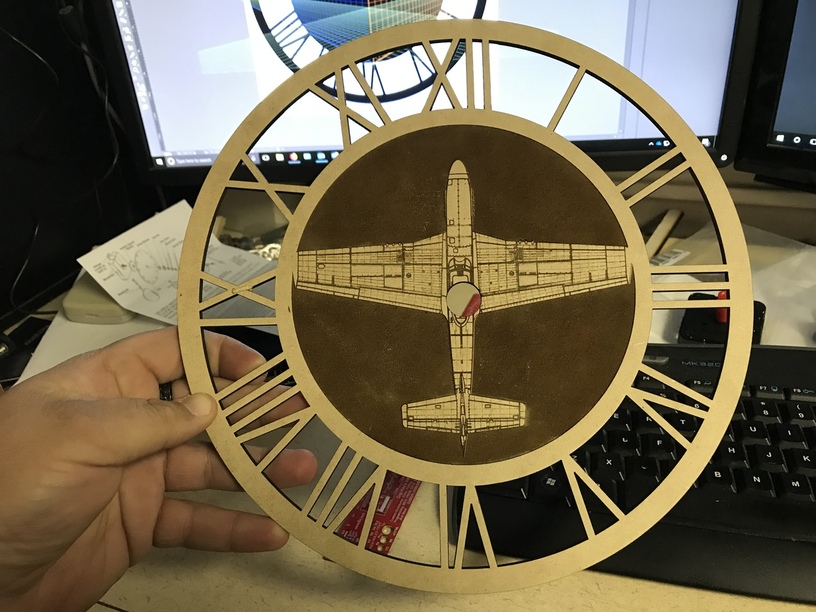
So, I’ve cleaned everything and made sure that the wood was COMPLETELY flat with magnets to hold the board down and I have the same results. Here is a photo of my cut. It’s an 8x10 cut on a piece of PG Medium Maple Ply. Any suggestions?
We’re having a similar issue with our GF. One thing we noticed is that the head units gets further away from the left side the depth of cutting and engraving lessons. We ran the same test design on the left side and on then right with drastically different results. I’m curious if you have noticed this same pattern yourself.
Yep. I flipped the board over and reduced the cut by about 1/8" and cut inside the first cut so it was clean and it cut like butter. Something about the bed on the right side isn’t right…frustrating for sure.
The other thing I noticed was, when the head moves over to scan the material before processing, the laser hits the far left side of the board…shouldn’t it be measuring in the middle? I mean, the laser is measuring right at the far left side of the board…about 1/4" away from the far left line to be cut.
Just did another cut on the left side of the bed and I got the same result…the right side cuts don’t go all the way thru. Every time I do a cut, I make sure to watch the scanning process and each time, the head goes to the far left of the work area…something isn’t right. I’ve made sure the material is 100% flat and it’s still doing it. I’m wondering if my crumb tray is bent or warped?
That would be a good scenario (easier to get a replacement crumb tray than replacement machine). Can you pull it out and check?
I’ll check as soon as I get done with my current project. Hopefully this cuts ok!!