Hey Everyone,
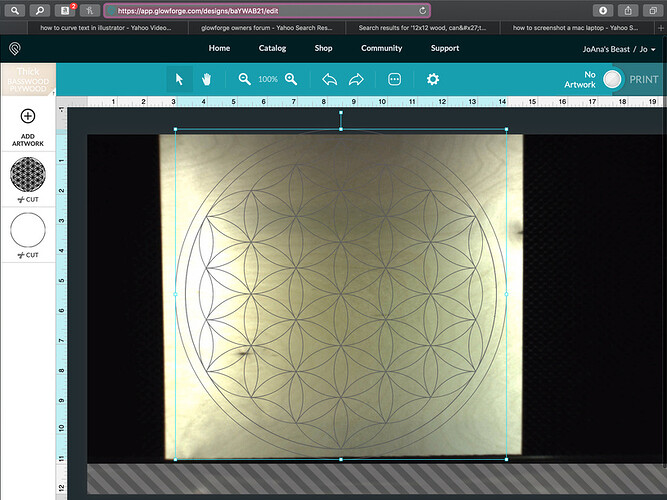
This may be a silly question but I’m trying to cut an 11"x11" circle out of a 12"x12" piece of wood. The issue I’m having is that the camera is not “seeing” the entire piece of wood and I have to shrink my design down to fit. I tried using the rulers on the placement screen (because I’m having export sizing issues also) and now 11" is coming out too big because the camera is not recognizing the board in the machine. I’m sorry if this makes no sense I will try to post a picture.
Work Area
Maximum material depth: 18" (455 mm) for Basic and Plus; unlimited for Pro
Maximum material width: 20″ (515 mm)
Cutting area: aprox. 11″ (279 mm) deep and 19.5″ (495 mm) wide
Maximum material height: 2″ (50mm)
Maximum material height with tray: 0.5″ (13mm)Shift the material down towards the front of the machine until it is below the gray bar area shown in your screen shot (looks like you can pull it forward about half an inch or so.)
Then shift your design down using the arrow keys on the keyboard until it grays out because it has crossed into the striped zone. Then back it up one tick with the up arrow.
You probably are still going to have to shrink your design just a hair…the actual size that can be handled vertically is about 10.95" not a full 11 inches. But that will get it into the cutting zone as much as possible. 
I remember seeing this, I guess I just ASSumed that it would cut an 11" circle since the proof grade material fills the whole tray
awesome!!Thank you, I had it right at the line to start and when it didn’t fit I moved it up, I will do the opposite next
I’m glad you resolved it! I’m going to close this thread. If you run into any other trouble, please start a new topic, or email us at support@glowforge.com. We’re here to help!
