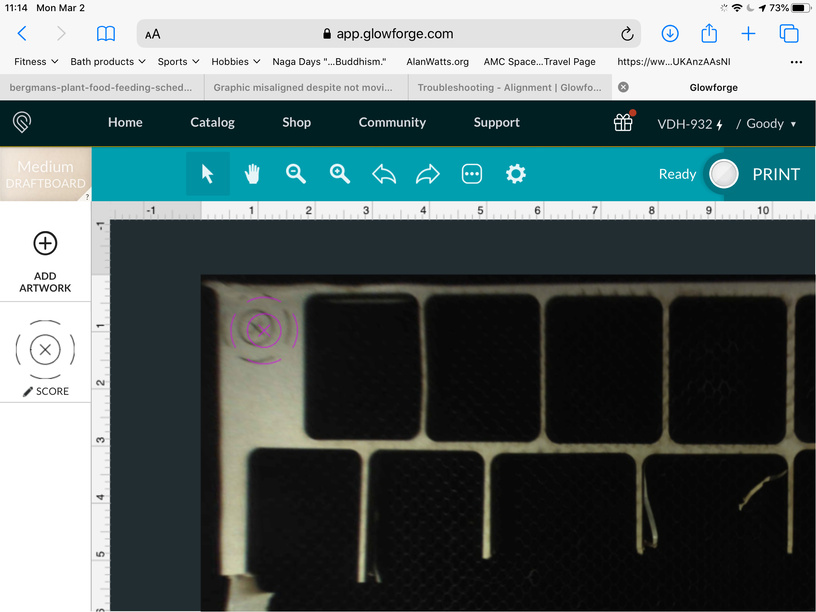
Ok ran the camera calibration and test print. Once complete I printed then”precision preview test pattern”. Once complete the camera took a new image of the bed, it looked pretty good (a little off but still “under” the artwork. Then I refreshed the bed image and it moved. I did nothing to the machine, table, lid, etc. attaching image.
Summary version:
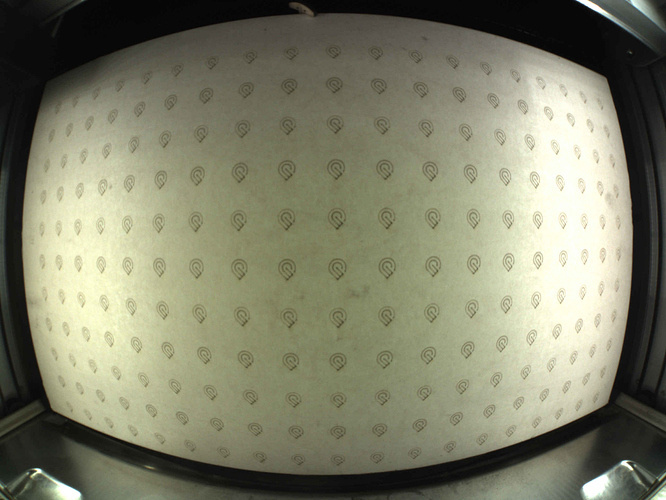
The lid camera sits to close to the bed for it to accurately capture an unwarped picture of the bed…it’s called “fisheye effect”.
This is what the folks at headquarters see when they see a picture of your bed:
Glowforge has an algorithm that recalculates that view and turns it into what you see here:

Which looks more normal for human eyes to work with. So the view that you see on the screen is a calculated result. When you are trying to place something on it, if it is out of sync, you’re going to place the design incorrectly.
It is completely normal for there to be more variance out at the edges of the bed than right underneath the lid camera. But Glowforge gives us a tool to compensate for the fisheye distortion out at the edges of the bed in the Set Focus tool. By clicking with the Set Focus tool right over where you plan to place the cut, it uses that value for the calculations and converts the view at that spot to act as if it is right underneath the lid camera instead of out in the boondocks.
So the correct procedure is:
- Click with the Set Focus tool exactly where you plan to place the cut. (Make sure the little rectangle falls on the material and not off in a cut hole somewhere. If it lands in a hole the calculation will be wrong and the view will be way off.)
- Place the design there.
- Print the design.
It should land pretty much where you placed the design on the material. (Can be off by about a 16th of an inch at the edges - don’t work too close to holes if you can avoid it.)
If you need to use Set Focus more than once, the view is going to change every time you use it. What isn’t changing is the material or previously placed designs…don’t shift them again after you use Set Focus in a different place, and they will still land on the material correctly. But any time you shift the design on the screen, you’re moving where that design is going to land on the material.
The view on the screen from Set Focus is temporary and resets to default every time you cancel a job, open the lid, or finish a print, so after the print, it might look like the print didn’t land where you wanted it to. Judge whether it did or not from the results on the material.
(It can be confusing until you understand that the thing that is changing is what you see in the screen view.)
Thank you for the answers everybody! Please note that if a design is moved between prints, it will not align with the placement of the previous print. Because the bed image updates between prints, it may appear that the next job will not match the placement of the previous one; however, your Glowforge should use the same calibration until the unit is rebooted, or a print is canceled.
I apologize for the inconvenience, but I’d like to ensure that the effect you’ve reported persists over this specific test:
- We included an extra piece of Proofgrade Draftboard in your starter materials shipment for troubleshooting. Please place it in the bed and open the Gift of Good Measure.
- Set the Score and Cut steps to ignore and just print the Engrave step of the design.
- Allow the print to finish, and wait for the bed image to update. Then, without moving the design or the material, take a screenshot of the Workspace that includes the design, the print, and the rulers in the app.
- Mac: Press Shift-Command-4 and click and drag a box around your image. You’ll find the screenshot file saved on your desktop.
- Windows: Click on the Start Menu and search for the Snipping Tool. Open the Snipping Tool > New then click and drag a box around your image. Click the Save icon and name and save your file.
- Set the Engrave step to ignore, then set the next two steps to Score and print the design.
- Repeat step 3.
- Set the Score steps to ignore, and set the last two steps to Cut and print the design.
- Repeat step 3.
- Send us the screenshots.
You may notice that an offset is reflected in the screenshots between steps, but the separate prints should land in the same position as the first print, completing the Gift of Good Measure print with the correct alignment.
@palsandpaintbrushes we try to keep forum posts to one topic at a time. If you’re having trouble, we’d be happy to help - please post a new topic or email us at support@glowforge.com.
1 Like
It’s been a little while since I’ve heard back from you @cjhovater. I hope that’s because everything worked out! If not, just let me know.
It’s been a little while since I’ve seen any replies on this thread so I’m going to close it. If you still need help with this please either start a new thread or email support@glowforge.com.