Hey there! My second ever glowforge project! I’m getting great cuts on my acrylic from inventables, but I’m having some weird hairline frosty looking marks in random areas on my cuts. This is happening on pieces I’m engraving as well as pieces I’m just cutting (like attached.) Has anyone encountered this before? Could it be the protective masking getting too hot and leaving marks?
1 Like
Could be flashback, got any more pics? also is the backing plastic or paper?
2 Likes
What masking are you using? Plastics should be removed. I only get those swirl marks when I have unmasked acrylic and the heat from the flashback gets to it. I use paper masking on the acrylic to avoid it. Though, I could also be completely wrong. I experienced the same issue with proofgrade acrylic when I didn’t have masking on it though (I thought it would be easier than removing it afterwards at the time).
6 Likes
What they said ^^^ – also, don’t clean them with alcohol, it can cause tiny cracks (crazing) too.
7 Likes
Oh yeah that could be crazing, it looks like that in some cases. Where’s that post I did?
here we go:
2 Likes
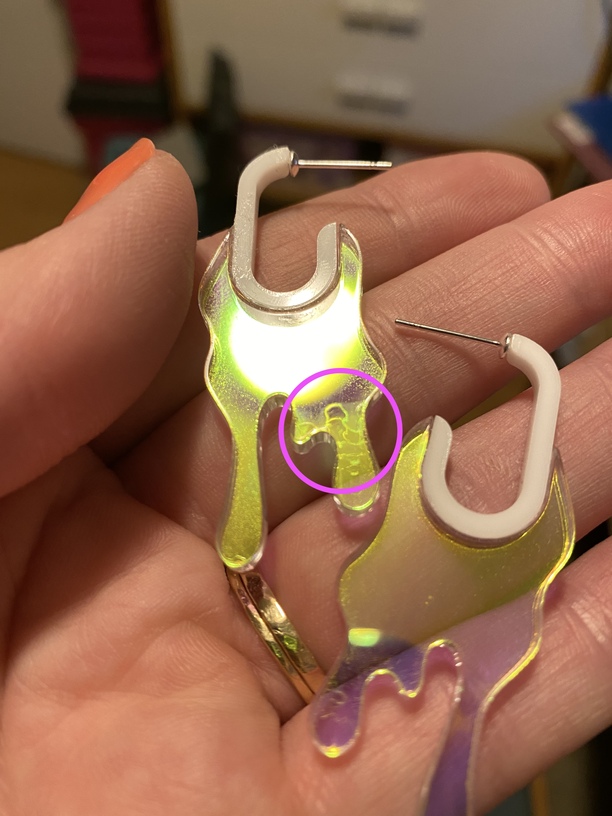
Backing is plastic! Here’s an example on mirrored. (Is artful nudity allowed?) I haven’t experimented with engraving the black of mirrored instead, just showing what these marks look like.
They almost look like glue gun strings.!
IMG_5588|375x500
TY! Ah so remove the plastic masking it comes from and use paper instead? Does painter’s tape fly?
Interesting! When I look at the iridescent one I posted from the side, the cracks are just barely on the surface–they don’t go all the way through.
Painters tape should work, but it’s thicker, so you might have to test if the settings still work. I used to use frog tape, but masking tape is so much more expensive than buying paper masking in the long run. But if you read the instructions that come with those other acrylics (I never ordered from inventables) it usually says to remove the plastic. I could be wrong on the one you have, but the stuff I order from elsewhere definitely says to remove the plastic, it’s only there to prevent scratching prior to cutting.
I would definitely search the forums about the plastic masking, since I can’t seem to find the labels that came with my stuff.
Ok will definitely remove the plastic! It didn’t come with instructions but that makes sense.
Interesting. I’ve never experienced the cracks of crazing, but I’ve had issues with hazing. So my solution to fix botched projects has been sanding, spraying with a 2k clearcoat, then sanding and polishing again…definitely would not work for something this small. And not worth the effort unless it’s something huge I already spents hours on 
2 Likes
I’m betting paper masking is going to solve the problem. Will try as soon as I can get my hands on it. Thank you SO MUCH!
FYI, while it’s much cheaper to buy in large quantities you can get rolls of paper masking from Amazon as well.
3 Likes
Thank you SO much!
1 Like
Definitely remove the plastic masking. Blue painters tape works, just align edges carefully. Spaces or overlaps can show up in engraves. You can also just put a sheet of copy paper under the naked acrylic. Keep a close eye it, or anytime cutting acrylic really.
1 Like
I went to a local sign shop last week and bought a roll from them for $30 (12 inch by 100 yards). They even offered to keep an extra in stock for me when I need it.
2 Likes
That’s one way to get people to check out your post ![]()
This topic was automatically closed 32 days after the last reply. New replies are no longer allowed.