Alright community of people smarter than me, I need help…my brain is taxed and I am struggling!
I am trying to engrave on a piece of oak that is .6 high. It is too high to use with the tray. I have five of the same thing that I need to be perfectly aligned, so I also was trying to cut the shape out of cardstock so I can place my oak in it and have it perfect. Now the trouble I’m having. I have a board in place of the tray, which is perfect for the height of the oak, however, it puts my paper in the negative. I can put something under the paper to raise it up enough, but then I’ll have to remove it to fit the oak, which messes up the alignment. I can’t leave the thing that raises up the paper, or the oak is once again too tall.
How do I do this? How do I have some kind of jig for perfect alignment, but yet not move anything and fit the oak in there? My brain just can’t figure it out. 
Love to help. But I’m a little confused. Why wouldn’t you just do the oak as one job and the paper (with the tray back in) as the second job? It sounds like you’re just placing the oak into the paper after they’re both cut, right? I’m sure I’m missing something.
I am making 5 triangle pin looms. They look like this (grabbed from the internet) 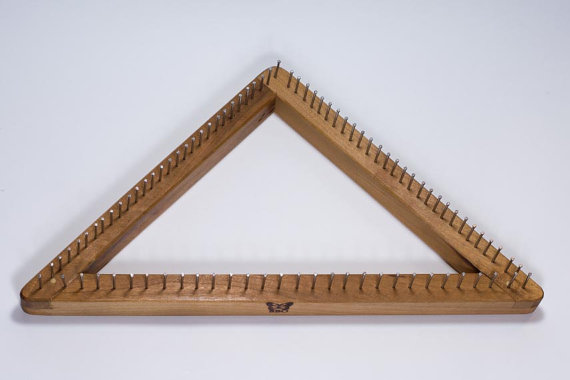
I’m trying to engrave the nail marks, which will save me from manually measuring, marking, and pre drilling every hole. I need the alignment to be as perfect as I can get it, and just using the camera isn’t good enough. I want to cut the triangle shape out of paper, put my oak triangle in, and have the nail holes engraved, perfectly, 5 times.
Does that help any? It’s hard to explain in writing…
My oak triangles are already made. I just need the nail holes done. Yes, it probably would’ve been faster to manually do them, but I have a laser!
Can I just put the cardstock in, set the height to what the oak is and cut out the triangle? Or would that mess up my alignment? I don’t have any extras to test out. They were too much work as it was, to make an extra.
Do you have some scrap that is the exact height of the oak that you could place on either side of the triangles and tape the card stock to it?
Actually, I guess I could test out that theory with some scrap, and a scrap shape…
But then I’d have to move it to put the oak in.
I was thinking that you would cut the oak shape out of the card stock so it would fit in the gap.
And yes, I’m having a conversation in the forums with myself. ha. This is how I think 
I’m not following…
You may be able to lie to the Glowforge about the height of your cardstock. Tell it it is 0” high. Also manually set the cut focus to 0”.
The laser will be a bit unfocused, but you really only need to mark the cardstock. And you should have it as high as possible while keeping the actual piece within the 0.5” height limitation.
While you don’t have extras of the wood parts, you should be able to iterate on the card stock
Also, when you think you are good, try setting the power on the final hole engrave to a low power and mask the top of the triangle. You can mark the masking to confirm it’s placing them correctly. You can test that marking power on masked scrap material first.
I thought about lying to it, but it’s still over a 1/4" off. The test with a super low power is a great idea!! I never thought of that. Thanks!
Ok now I get what you’re saying! I’m very much a visual learner. That might work. The only problem I can see with that is the air assist blowing my paper. I may have enough scrap wood to try that! Thank you!
I think I understand your dilemma and went through the same thing when making sets of custom 1" dice. Here’s what I would try…
-
Cut your template/jig material on top of your crumbtray (no reason to make this part hard
 )
) -
Attach the jig to the top of the board(?) that you’ll use to support the looms
-
Center the board+jig as best you can and use magnets/tape/whatever to make absolutely sure it won’t move during each cut (that air assist can cause havoc!)
-
Use a very low power score to check alignment. Adjust file location or jig (but not both). Rinse and repeat until perfect/close enough.
-
Place your loom in the jig and let the GF determine focus with red laser dot. If the GF misses the loom itself (common with odd/narrow shapes) manually enter the correct focus height.
-
Double/triple check alignment with the lowest possible power that will mark whatever masking your using.
-
When everything is ready, ramp up the power and fire.
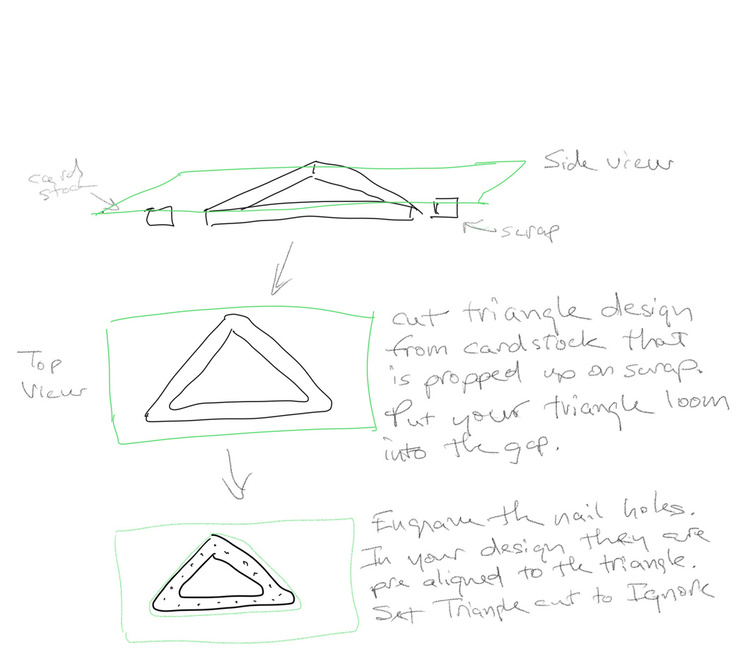
Btw, @cynd11’s illustration is another great way to do this…
Create two layers in your document - one with your holes and one with just the three corner holes. Make them different colors.
Put a piece of masking tape on each corner. Put the triangle in the center of the tray directly below the camera.
Do your best to line it up in the UI.
Set the UI to ignore the layer with all the holes and set the layer with three to the minimum settings.
Run a test print and see if it lines up.
If it lines up run it again with the correct settings for the holes. If not then adjust the triangle as needed and try the test run again.
Enjoy your new loom.
And this is why I love this community! Thanks you guys! I’ve been wrestling with this all day and my brain wasn’t coming up with anything new. I needed some new perspectives. I have several things to try now, and I’m determined to use my laser for this project!
These looms are for a local shop owner who’s teaching a class on continuous weaving. I may be making more.  This will make a few of the steps easier though!
You guys have been so helpful!! 
A totally alternate way would be to make interlocking edge pieces and cut several layers, ultimately stacking them. The nails would make excellent registration holes, your layers would be aligned quite nicely. You could make a very precise (and large) loom this way.
If you need to make several and the masking tape method works for you then you can surround the loom with magnets. Carefully remove the first piece and the magnets become your jig.