Hi all, me again showing my complete inexperience…lol. Okay I have had my GF less than a week and I have been learning as I go but just now I have hit a serious problem (at least to me) Everything has been going great until; I was trying to cut a simple design on a piece of prograde material (that I have already cut some stuff out of) and all of the sudden … when I start it up to do the cut job everything moves around like its supposed to but the laser itself is not coming on or cutting. I have no idea what happened…
Sometimes it’s easy to accidentally bump the laser power down to 1 (which does pretty much nothing as you’ve described). Try double checking your settings?
1 Like
yes when I did a search before I started the new topic, I saw that and looked at settings in app and it wasn’t at 1. I went back out of the file I was trying and tested it with a sample cut within the GF “library” and it cut fine but then when I started a new project and used a different svg file I wanted to engrave, its doing the same thing.
1 Like
Can you post a screenshot of the settings you’re using?
1 Like
Its the auto generated settings … but I just noticed if I change it to cut- the laser is working fine but when I go to engrave, that’s
when it decides to move around but not actually do anything. This is the second design Ive tried, on the first design it wouldn’t cut at all…I’m clueless. Here is the auto settings that came up when I tried to engrave the second design…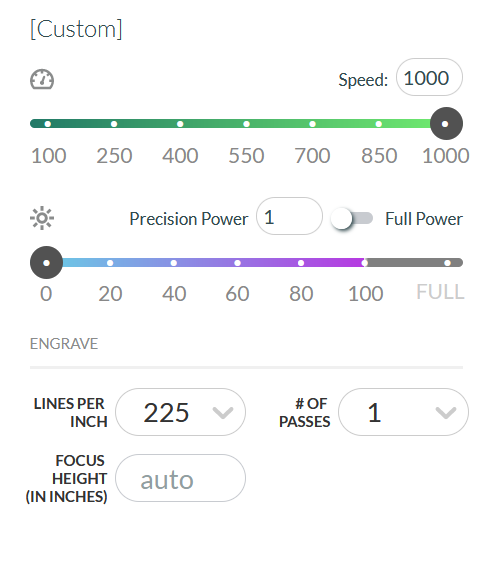
As stated above, your power setting of 1 won’t do anything. Change the power to the appropriate level.
If the machine cut a provided design library file, there is nothing wrong with the machine.
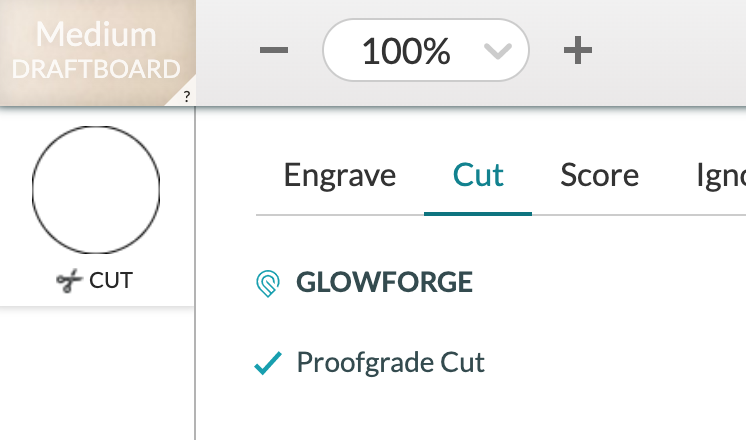
Do you see in your posted pic where it says ‘precision power’? It’s set to 1 which is too low. At the top of your pic it says [Custom] which is a sure sign that you somehow got off the auto-generated settings. It’s pretty easy to do and miss. To reset just first make sure your chosen PG material is selected and then choose Engrave, Cut or Score from the top Glowforge group, not the lower Custom group.
2 Likes
omg I’m such a dork! I was looking at the “full power” and didnt even pay attention to the “precision power”. What should that be set to? Because I was using proofgrade and just assumed that the auto setting would be correct… also I’m sorry …lol
1 Like
If you click “< back” above “[custom]”, then select the cut, score or engrave operation you want, the default settings for the proofgrade material you are using will be selected automatically.
okay I have done that and it continues to put the precision power at 1, no matter whether I select engrave or cut. Also when I changed it earlier from engrave to cut… it did cut the design and the precision power at that time was set at 1. I don’t know if I am misunderstanding the problem or not.
yes
I’m so sorry to hear about the trouble with the laser not appearing.
If your Printer Head is moving but you aren’t seeing the laser marking your material, there are two likely causes:
- The mirror in the Printer Head is not installed correctly and may have been damaged.
- The print power has been set to the lowest possible setting.
First, please inspect the mirror in the Printer Head
-
Follow these instructions to access the Printer Head mirror.
-
If you see damage to the mirror or the plastic handle (for example, if the plastic handle has been melted), please check the interior of the Printer Head for any additional damage. If you don’t see any signs of physical damage inside the Printer Head you can purchase a replacement Printer Head Mirror through the shop. Note: If there is damage to the plastic handle on the mirror, the mirror may be difficult to remove. You can follow the instructions here for removing a mirror that is stuck.
-
Once you receive your replacement mirror, please clean both the lens and Printer Head window, by following these cleaning instructions.
-
If you find any damage in the Printer Head, please take a photo of the damage and send it to us and we’ll follow up with next steps.
If the mirror looks good, do a test print
-
If the mirror is undamaged, please reinstall the mirror.
-
Place a sheet of Proofgrade material in the bed of your Glowforge and open the Gift of Good Measure design.
-
Before starting the print, please select the default Proofgrade settings. Once the material has been chosen you will see the word, “Cut”, “Score”, or “Engrave” under each step in the design.
-
When the print finishes, leave the lid closed and wait until the fans stop and the lid image updates.
-
If the design prints successfully, it is likely that the power was set too low on the previous print.
-
If you still don’t see the laser marking the material, please reply to this email including the date and time (with time zone) when your test print was run.
I see that you’ve already been working with the community to resolve this issue. Could you please let us know if you are still having any trouble?
It’s been a while since we’ve heard from you, so this post will be closed.
If you are still having trouble, please reach out at support@glowforge.com or start a new thread. We’ll be happy to take a look.