Hey, I just met you and this is crazy

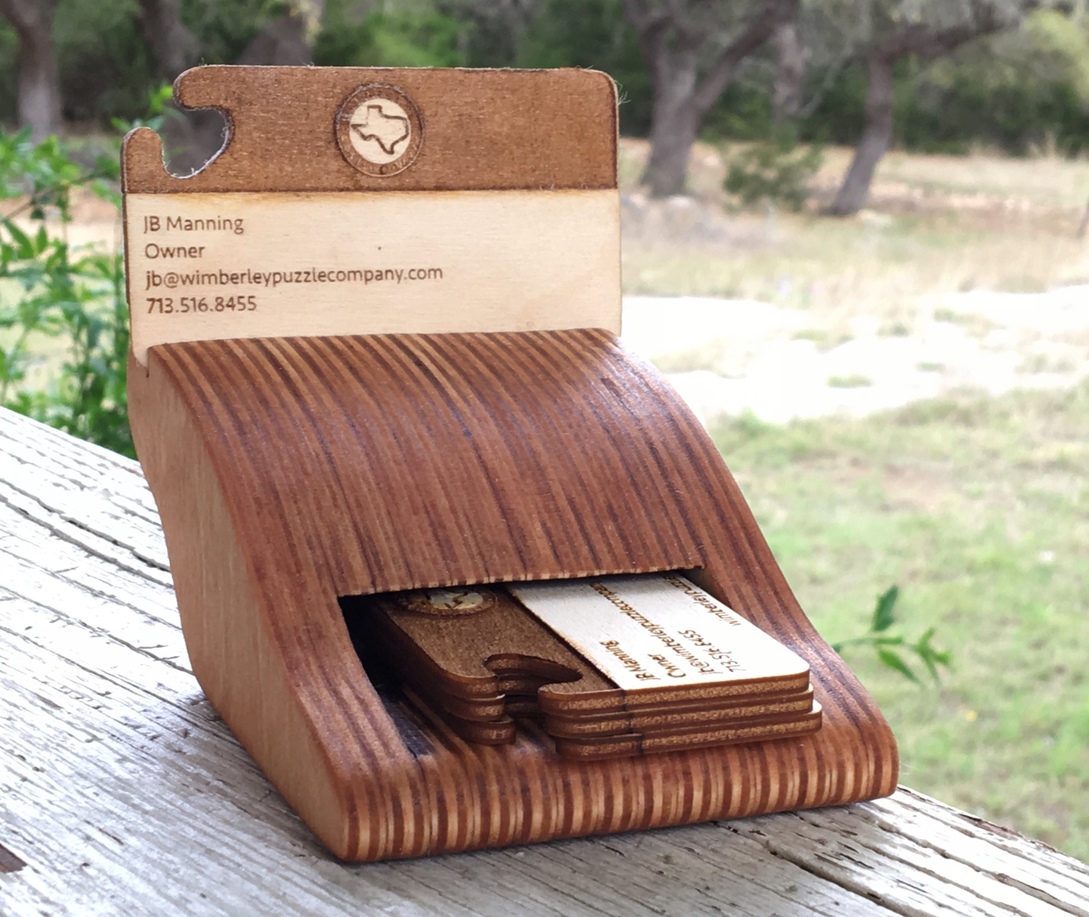
But here’s my number, so call me maybe!

I went in on a booth with my sisters store at our Market Days here in town (first Saturday of every month - it’s a destination kind of thing for all of the city folk… thousands of people) and last time my (horrible, made the night before) cards were just kind of (randomly) propped up. I figured last night, around 1am, that I needed a proper little display stand, or something.

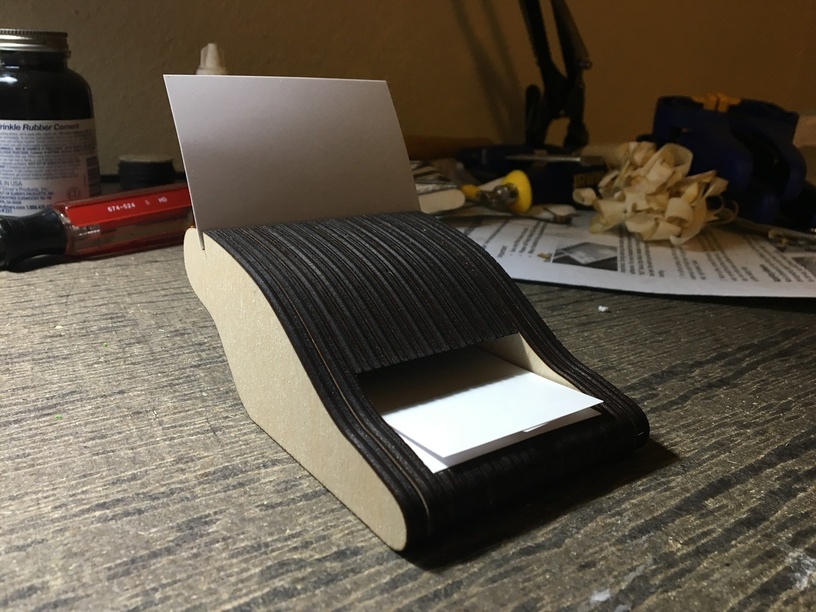
Cut and glued up this little doohicky. Leaves one card on display in a cut slot and the rest in a recessed hole. I cut the first one, and it’s like 14 layers of .250" baltic birch, so basically only a masochist would try to glue it up and expect any kind of accuracy. But, it looked ok so I figured the overall design was alright.

Back to the drawing board for a tweak; I made a couple of holes in each piece except the outer plies and then added in a couple of square dowels matched to the thickness of the wood (actually .230"). Life. Saver.

IMG_4940

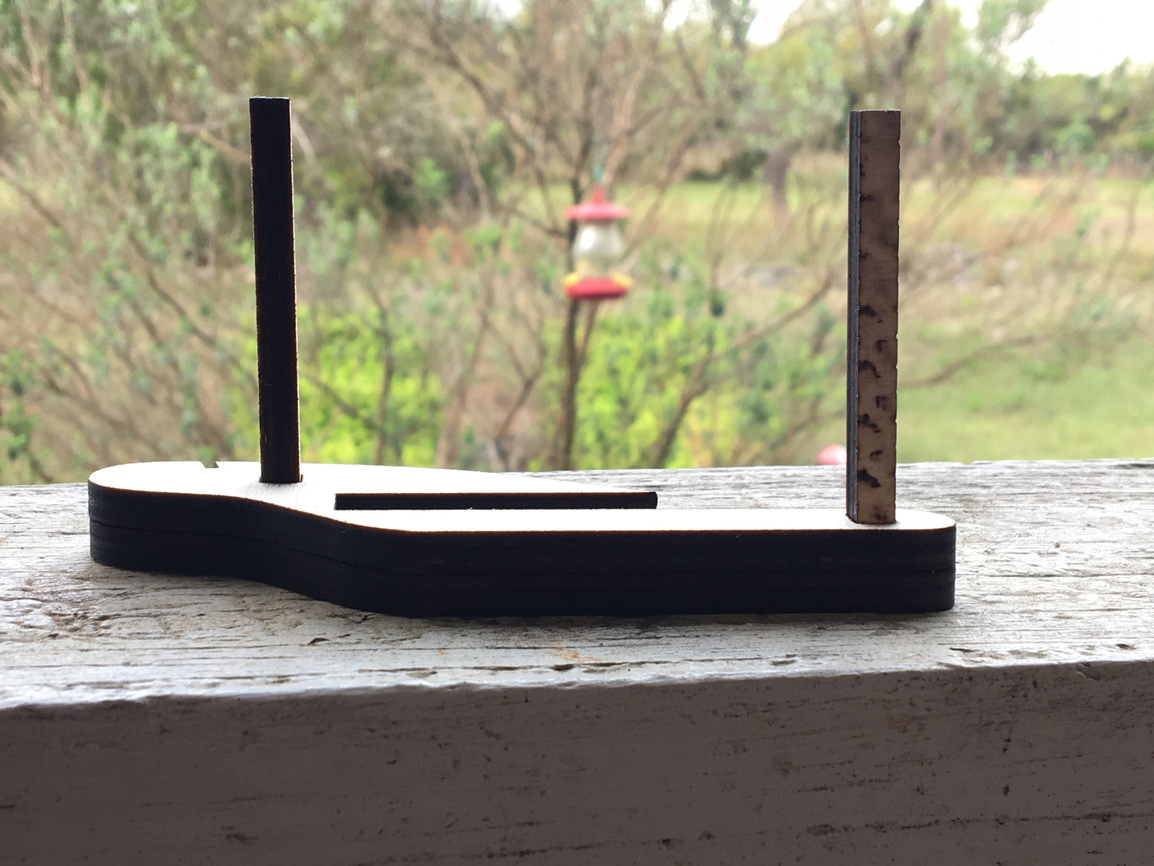
Glue. Slide down. Repeat. Repeat. Repeat. On, and on and on. Clamp.

I decided that I really didn’t want the burned laser edges, so I got to sanding. I’m not very good at sanding…

Then I decided that if I wanted to show it here as a business card holder, I should have… a business card (remember, the last ones were junk). I whipped up a quick, slightly better piece of junk (that is really just as an example for pics because it’s still junk) out of the thinnest wood (aside from PG veneer) that I had - 1/8" basswood. I didn’t design the slot for 1/8". I thought maybe a 1/16" would be about right… I dremeled away the bottom edge of the card so that it would fit in the slot. That’s how we roll 'round here. Make it fit.

My last step to pretending to be a woodworker was a few coats of pecan stain applied with a sock the pup got ahold of… the good: I’ll always be able to apply stain with this collection of socks. The bad: I’m relegated to flip flops all summer. The good: I can always claim cold feet.

Either way - fun little project and really the first “dimensional build” that I’ve done of anything with the Glowforge.

IMG_4942

74 Likes

Well, that’s just delightful! :rabbit: :rabbit2:

6 Likes

I like it. Original. Functional. Quite effective. Well done.

3 Likes

That’s Eggcellent! :rabbit:

4 Likes

Looks great and good job on the sanding and staining really transforms it. And the posts for lining up all the layers too!

2 Likes

It’s just beautiful! I’m really liking that layered look.

1 Like

That’s one of the perks to Baltic birch, I think. Is that the edges actually look nice if cleaned up!

2 Likes

Cool design! Kind of reminds me of an old typewriter.

2 Likes

Ooh, I can see that!

Nice design and a great write up! Thanks!

2 Likes

It turned out really nice! Love the pecan stain.

Will no doubt encourage more of us to try the layered project.

1 Like

I am very familiar with the we can make this fit method.

1 Like

Followed up with one for my sisters store. This one I cut a hole in the 6th layer so that I could slide the logo down into a slot and have it be secure without gluing. Finished with walnut stain on birch ply and then some shellac.

Not very happy with the finish of the shellac though? Any tips? I did a layer, lightly sanded with 400 grit. Then another layer. And lightly sanded with 1500. Just not a great finish :confused:

9 Likes

Love the swing! :smile:

I didn’t glue it primarily because that swing is pretty fragile. If it breaks, I can just cut another and stick it in.

Afterwards though, I thought maybe cutting a couple of small holes and then running some of the dark waxed thread through it and making an actual rope swing would be kind of cool.

5 Likes

We used steel wool to knock down the rough spots between shellac layers when we did a door once. It seemed to to a better job at getting a shine.

1 Like

Thanks! That might be worth a shot. Not sure why, it just came out kind of muddy.

I use a shellac/alcohol mix for most wood finishing. A 50/50 mix will go on smoothly and dry in 10 minutes. I use scotch pad for sanding - up to a gray one for a final finish that I apply by sandwiching it between my orbital sander and the workpiece.

Make sure you shellac is fresh though. After a year, it’s no good if it’s premixed (vs flakes).

1 Like

I take it your sister’s store is a bright and cheery place? Then yup. Because I think it’s the perfect finish for a darker store full of old things.

That’s a neat design and reminds me of the boxes dealers use in casinos etc. and I think you could do well making custom versions for others based on the one you’ve made for your sister.

1 Like