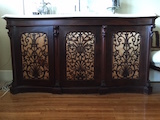
I was sharing the Glowforge website with a friend, and she found a serious project for me. She is hoping I can help her restore some broken wooden ornamentation on 200+ year-old buffet/sideboard. It’s been in her family for at least 4 generations and was shipped to the US from Ireland.
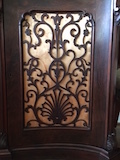
In the close-up, there is some missing scrolling she’d like replaced. Scrolling is missing on both the right and left side panels.
Might anyone have advice for how I should proceed on this project? I am completely new to lasers and have not yet learned to use 2D or 3D software programs. I downloaded Fusion 360 and am thinking about learning Illustrator. Maybe I should try to trace the missing piece from another panel?
Any advice folks can send my way will be greatly appreciated. Thanks!
Tracing the missing piece from a good panel is probably the way to go, assuming the scrolling is the same on both panels.
I would start by scanning or photographing the good panel, then use Illustrator or Inkscape to make a 2D path that outlines the missing section and cut it with the GF.
You will need to take some care when photographing the existing panel to make sure your lens isn’t distorting the pattern, i.e. if you zoom out too far you’ll get a fish-eye effect and the photo won’t actually match the pattern.
You should probably talk to an experienced wood worker (or ask in a wood working forum) about the best way to clean up the edges of the damaged scrolling prior to joining your new piece on. How much of the existing scrolling you trim back will obviously affect the shape of your replacement piece.
I can’t really see from your photo whether the scrolling is mounted on a panel (which will make it much easier to mount your new piece) or whether you will need to join the replacement to the edges of the existing scrolling.
Depending on how much sanding your replacement piece of wood needs, you may wish to use something marginally thicker than the existing scrolling.
I have contacted my friend for answers to questions asked in your posts above. She wrote, “The scrolling fretwork is free. The silk is a covering over the backing insert.” So, it appears that the new pieces will need to be attached to the existing scrolling. @Sam thanks for the tip for contacting a wood working forum. Great idea, I will do that.
@volivaa, the panels on the right and left sides are mirror patterns. It looks like a few more little pieces beyond the “candy cane shaped piece” and the “swirl” may be missing. I will need to take a close look next time I visit my friend.
Between the left and right sides, we do have a complete example of the fretwork. It just so happens that my friend has training in photography. I’ll talk to her about getting a good, even photo of the scrolling. @spike, might you have any suggestions on an app to use?
I, personally, would use CorelDraw because that’s the tool I’m most familiar with but Illustrator (expensive) or Inkscape (free) will work equally well.
I would start with the most intact panel. Bring that image into Inkscape or another 2D vector program. Draw vectors around around all of the existing scrolling. Then take the photo of the other panel (that hopefully has the missing pieces from the first panel. Bring that into same Inkscape file. You said the left and right panels are mirrored copies of each other so you will need to “flip” the 2nd image to match the first. Line it up (both in scale and location) behind the vectors you have already drawn and then add in the missing vectors. That will give you the artwork for one full panel.
You could either cut two new full panels or use the photos to help you determine just what sections you need to cut to just replace the missing pieces.
I probably don’t need to mention this, but make sure you experiment with an inexpensive wood before trying the real deal. Also, since she’ll have to glue it to the other wood, make sure no glue seeps around the edges. It won’t accept stain and will stand out as if it’s lighted from within!
Beautiful piece of art!
It does look like each panel is the same as the other one, so pictures of each and an overlay should have you all set.
But it also looks like each panel by itself is left/right symmetric. So a single picture, split down the middle, then the good side mirrored would also get you a replacement file.
You can of course step one further than repair.
With basic repair you can attempt to just cut the missing piece, and then wood glue to attach it in place without ever messing with the rest of the panel. If you want to preserve as much of the overall piece as 100% authentic, this is the route you should certainly take.
But, if you don’t care about it remaining flawless to the day it was made, and instead just appreciate the beauty… rip out the current panels (carefully!), and set new ones cut in a single piece in their place. But design some method of being able to easily swap out the panels, and then go wild and create as many custom panels as you want to swap out on a whim (can make seasonal ones, or special messages for events like graduations and birthdays…).
As for how you can design the easy swap… I would need to see the piece in more detail to have ideas that actually work. If the doors are thick enough, I would propose to cut a hollow section above the panel where you can slide it in and up, then let gravity pull down to rest in the bottom section. Snap on the outer scrollwork to hide the loose fittings required for such a mechanism.
Oh, you almost certainly need to contour the pieces after you cut them. You will have squared off corners straight out of the glowforge.
The ideal tool there is a router table. Lacking that, there are dremel heads that serve the same function (and full adapters to make a table too. Advisable, since using them without the table requires some experience and a steady hand).
I absolutely love adobe capture! that said, I do not think it is the right tool for this project. it is not precise enough, as it simplifies everything. This is great for some stuff, but not when you are looking to make an exact replica of a real-world object.
Like @spike said, use a telephoto lens if you can. If you or your photog friend don’t have a telephoto, use a standard zoom lens (not digital zoom) set up as far away as possible and zoomed all the way in. You can measure the height of the panel to find the halfway point and set your tripod up so that the lens is centered exactly.
Personally, I would bring that photo into illustrator and use the pen tool at high magnification to place nodes at each high-point and low point, and then go back to work the bezier points to follow each line precisely. Inkscape has similar tools.
-or-
can you take the door off? is there a hinge-pin that you could just remove? In that case you could lay the door on some paper and trace one side, flip and trace again to copy the missing bits.
it may not be easy or desirable to remove the door, being an antique and all. @rebecca may also find that the silk-covered backing is too difficult/delicate to remove.
If it is easy to remove, and if the door can be pulled without damaging the whole piece, tracing the shape could also solve her problem of attaching floating scrollwork while strengthening the entire unit: make a scroll-shape-matched back piece for the whole door, and glue behind.
(That said, I can hear the Antiques Roadshow presenters in my mind cringing at the very thought!)
OK maybe we’re over complicating it but another option that occurred to me was to do a rubbing. Whether from the other side or the mirrored piece from the same panel. Scan that in, flip(if it’s the mirrored piece) and vectorize it.
I’m just going to chime in from a cabinetmakers position on this(I am one).
40$ and a quick search of Kijiji you can find a used scroll saw. To just trace it out and hand cut it would be really fast and easy. Since you have to get into doing hand work for both contouring the piece, and cleaning up the joint, you are into doing wood working already.
How I would proceed:
Remove the backing piece gingerly and politely if you can.
Trace the mirrored piece onto paper, also project a little bit more past the connections. You’ll see why later
Assuming you have stock that is the right thickness, adhere the paper to the stock. Many options here, glue stick, contact cement, two side tape(THIN STUFF, NOT DOLLAR STORE), masking tape can work, but you will end up cutting your paper off before you finish.
Go to town on the scroll saw. They are basically sewing machines with a saw instead of a needle. Fairly safe as long as you don’t jam your finger into the blade. They cut slow with no pull on the piece, so you have a lot of control. Also they have a bit of a hold down, so don’t worry to much. Also use a fresh sharp blade.
-Contouring and shaping with dremel, sand paper, chisels, etc
-To clean up the joint before gluing, use a sharp chisel and flatten the broken joint. The reason I suggested projecting longer then the piece was traced is you may need to fit the piece you cut.
-Glue with yellow or white wood glue, I prefer the yellow. You can use painters tape on the piece and door side to try and keep glue off things you don’t want glued. I don’t see any good ways to clamp or nail. Try using the tape a bit to create some clamping, also try to set it up on a flat surface.
Finishing is a bit of a problem. Since I assume you do not want to sand and refinish the whole unit, and I also assume you are experienced with finishing, I suggest a water based finish. Stain any brand you wish, and Varathane water based is super easy to use. you can use oil based stain, but make sure it is 2-3 days dried before using water finish.
I think that about covers it in my head. Really cutting the piece is the easy part, its the shaping and installing. Practice on some MDF or scrap first.
I work with carpenters and one thing i know is they always make minute errors like 1 or 2mm off certain hand cut/routed/hemming blah blah workpiece. So I would avoid assuming they are the same design and instead draw/trace on the actual piece to obtain the exact shape required. then measure the drawn piece and factor a bit extra which u can sand off later. Send to a glowforge and (assuming the purpose is to use glowforge) have it cut. As for installing the piece, you’re going to need to take macro shots to let us see how the present damage is like, we’ll need to shave off the damage first. Then just use simple bonding glue to bond the wood together. or epoxy but we’re talking wood so woodwork glue is sufficient.
If you have access to a wand scanner, use that to scan over the piece. Post it in this thread. The Sharks who lurk here will chew it up and spit it out as vector ready for whatever tool you choose. Or just take a closer picture of it with a measuring tape prominent. If we can analyze Dealey plaza and find the second shooter, we can do this fretwork.
This should actually be pretty simple to do, though will require a bit of trial and error to get things looks sharp.
I would tell your friend to get on eye level with the design. Take the clearest picture they can.
Import that image into a photo program, crank the contrast up to help make your selections easier.
All the designs appear to be mirrored, so just identify the pieces that are missing on a side that they still exist and flip them.
Print on paper or junk wood to test.
Refine as needed.
Print on real wood.
I feel tracing it would be the best option for figuring out shape and size. A few questions come to mind, such as what kind of wood is it, is it stained and what kind of finish does it have?