I’m using a full sheet of proofgrade maple plywood to make something and I got everything nice and centered on the app (I type in coordinates on the x,y axis so I know it’s accurate), but on the finished result it is not centered! For example, if I cut a whole at x= 0.5 inch, it’s NOT coming out at 0.5 inch from the edge. I took the cutting area at 19.5 (listed on the website) and centered my item at x= 9.75 in, but it is too far to the right. What am I doing wrong? On the app itself, the design cannot go any further to the left without being cut off. What is extra perplexing is that on the app, the origin point is indeed x=0, y=0. But in real life, it is not!
Update: I ran the camera recalibrator app and the test print is NOT centered. I’ve wasted two proofgrade sheets now please send help ![]()
When I look at the proofgrade sheet, the design is too far to my right. This is a new Glowforge pro, I’ve used it twice before, today is the first time I noticed this problem. Looking at my old scraps, this was not a problem before. I don’t know if it matters but I’m using the air filter.
The x,y coordinates do not necessarily indicate exact placements as the honeycomb bed wiggles and placement of the material is not always the same among users. Also, there will always be a larger margin on the left as the printhead at the home position leaves material to the left and behind the printhead that cannot be accessed. I am attaching a bounding box file that, when placed exactly, will define the limits of the cutting area and the largest circle that can be cut. If you use the alignment tool to align the center of your art to the center of the circle, you will be centered on the usable area of the bed. The usable area of the bed is about 10.9" x 19.5"
Bounding Box(1).svg.zip (1.4 KB)
3 Likes
Thank you. I recalibrated the whole camera and used the bounding box, the problem is the bounding box has pretty much the same workspace as what I was working with before. I followed it, and now my work is too far to the right again ![]()
Ok you guys, Glowforge are seriously the biggest trolls on the planet. The proofgrade boards are actually 20.5 inches after measuring them. It’s still bigger than the error that I’m seeing, but it doesn’t help.
The proofgrade boards, as all materials, will vary in size. If you want the middle of the material rather than the middle of the bed, your best bet would be to measure and mark the middle with a pencil mark. Zoom way in and center your file on the mark. Be sure you are using the set focus tool in the center before placing your artwork.
5 Likes
That is so smart. I’m hitting myself for not doing that… thank you!
Ok so your solution was a great temporary stopgap so that I could finish my project. Thank you very much! I still have an alignment problem though… I used to be able to print much closer to the left edge and now the closest I can get is a little over half an inch. As mentioned before, I did align the camera using the Glowforge software, but I’m still here. Do you have any ideas left?
If you print on 12x20 Proofgrade sheets, the full print area leaves you with .69" on the left and .25" on the right, .687" along the top and .39" along the bottom. Those are the mechanical limits of the machine.
4 Likes
I think you are mis-remembering. If you look at the printhead in the home position, you will see that there is material behind and to the left of it. The printhead cannot (and never could) access that part of the material.
A 96 inch sheet of material cut into 5 pieces with four 1/4 wide cuts makes for a 19 inch wide piece of material. You can cut all the way across 19" wide material. If you have a pro you can use 19x48 inch material, if not then you need to decide where to cut the 48" to get maximum use.
I find it far better to have more room than the available cutting area than less or the same, and that is why I sprang for the pro. For ten times the price you can cut much bigger and thicker stuff, but then you need to have the space and the rest of the shop and the market to be able to use it.
1 Like
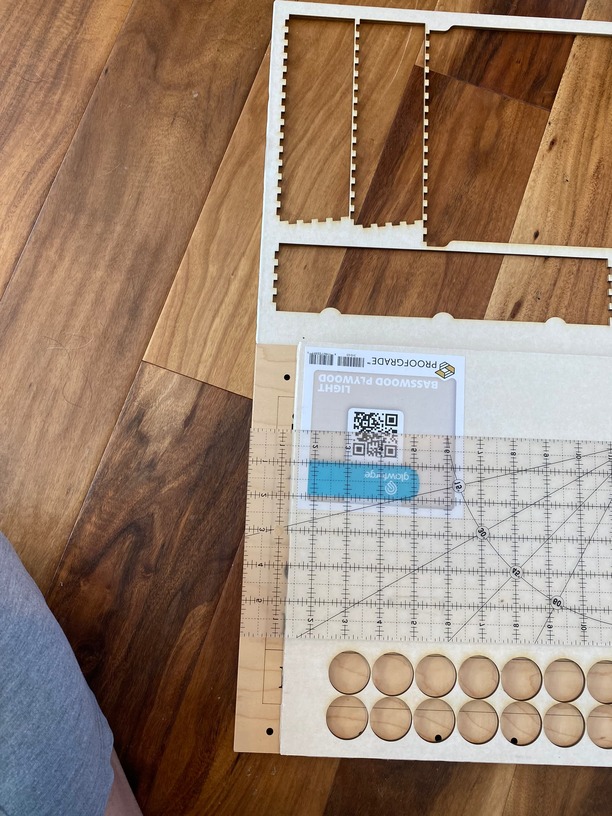
Sorry- not trying to be difficult. Here you can see two proofgrade materials that are pretty much the same size. The top one was something I cut out 1 week ago, that was as close to the edge as I could get.
The bottom piece (darker maple- I had to cover it with another board because theres private info on it) was what I tried to do last night. That was as close to the edge as I could possibly get.
I only have a quilting ruler on me so that what I included for scale.
I don’t know if I did something but the other day it was having trouble centering the camera so I turned the machine off and centered it per the tips on this forum. Since then I’ve recalibrated the camera like I said, and the app said it was done successfully. I’m hesitant to waste yet another proofgrade board to do that again if its not going to change anything.
Did you have anything to engrave on the circles(maybe coins-ish items)? If yes:
Did you have anything to engrave on the box parts? If no:
Engraving(and the higher the speed the more an issue this is) takes up more room than just doing a cut due to the momentum of the head needing space to slow down, stop, and speed up to go back the other way. So this extra motion needs to shrink the left and right boarders in to accommodate it. Faster engrave speeds means needs more room to do so.
If this doesn’t fit your situation, it’s always good to know but I’m just guessing at a likely cause.
1 Like
You cannot engrave as close to the margin as you can cut. The printhead has to have room to slow down, stop, and reverse course for every line of engraving. This is true at both the left and right sides of the board.
4 Likes
That makes sense, thank you!
I think you’ve hit the nail on the head there, there was partially a camera alignment problem + PG material was half an inch bigger than I thought + not realizing engraving and cut margins were different.
1 Like
This topic was automatically closed 30 days after the last reply. New replies are no longer allowed.