Hi everyone I am new here but just received my GF on Thursday and having some trouble with creating things - any advice would be greatly appreciated!
when creating a 3.5" x 2" business card I made the correct size in illustrator - brought into the glowforge app and even lined it up with the rulers making sure of the size. But once it was done cutting/engraving instead of it being 3.5" wide x 2" high it was only 2-7/8" x 1-5/8" - how do I get my set up to stay true to size?
On my business card I have a “light” background symbol and then dark text on top. When I bring the design into the GF app the layers panel shows the symbol is lighter in the background with dark text on top - but when it engraves it makes that symbol very dark / deep engrave and then the lettering on top just looks bad. I just want that symbol very light … like a light shading in the background with dark letters on top. Any advice?
Make sure to check “unresponsive” when exporting from AI. I’m not an AI person so there may be other things; someone else will chime in if so.
Best way to make sure your image comes out the right size is to always export it with a 20x12" workspace. Glowforge detects that proportion and automatically adjusts it if needed.
If you were visually checking the size in the GF interface and it cut differently than what you saw onscreen, you didn’t have your material height set correctly, so the laser beam wasn’t focused where the top of your material was. Easiest way to make sure it’s right is to use the Set Focus tool under the gear icon in the top menu, and click in the vicinity of your cut to have the onscreen view dewarp the fisheye for that specific spot, so it looks as close as possible to what the outcome will actually be. That also lets the GF know where to focus the beam.
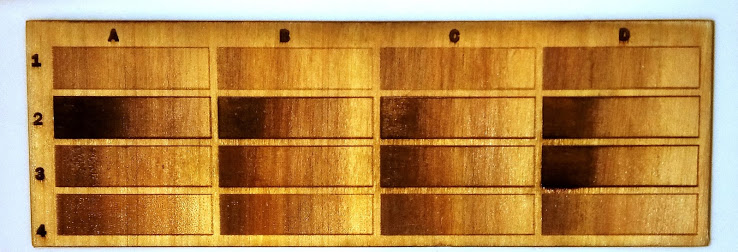
To adjust your engrave darkness, you need to adjust the settings. The view shown in the thumbnail isn’t going to approximate the outcome, it’s just so you can see where things are. For lighter engraves you need to increase speed and/or decrease power, and you can also adjust the dot density and lines per inch in that same menu, to fine-tune your outcome. Making a test strip on the same material, with a row of rectangles with different settings, will help you to dial it in.
Perhaps a test of different ways to print (file in zip) Also a rectangle around the card cut as a light score will tell you what the size will be and where.
Thank you so much for your help, @geek2nurse and @rbtdanforth! Were you able to resolve your issue with these tips? If not, please let me know right away so we can look into this further.
I am so glad to hear you were able to resolve your issue! I am going to close this thread now. If you have any other questions or if you an issue arises please feel free to start a new thread or email us at support@glowforge.com.